
Contents
This book reproduces and expands the complete Basics of Microsoft PowerPoint syllabus. Every topic, definition, procedure, table, note and exam question of the original manual is preserved here in full academic detail, with extra beginner-friendly explanation and worked context added on top. Page numbers below match the printed booklet.
Introduction to PowerPoint
Microsoft PowerPoint is a commercial presentation application written and distributed by Microsoft for the Microsoft Windows operating system. It is a presentation tool that supports text, shapes, graphics, pictures and multimedia, and it integrates with the other Microsoft Office products such as Excel — so a chart or table built in another Office program can be brought directly into a slide.
In practice, PowerPoint lets you build a sequence of pages called slides. Each slide can carry headings, body text, photographs, drawn shapes, tables, charts (graphs) and even video, and the finished sequence is displayed on screen one slide after another as a slide show. Because it combines words with visuals and motion, it is the standard Office program for teaching, reporting and public speaking.
Think of a PowerPoint file as a digital flip-chart. Instead of flipping large paper sheets on an easel, you flip electronic slides on a screen — but you can also add colour, pictures, sound and movement that paper can never show.
File format and naming
By default, documents saved in PowerPoint are stored with the .pptx extension, whereas the file extension used by the prior (older) versions of PowerPoint is .ppt. The short form PPT stands for PowerPoint Presentation, and a freshly opened, unsaved file is given the default name Presentation1. The file that stores the slides made in PowerPoint is itself known as a presentation file.
What you need to run PowerPoint
To access PowerPoint, you must have Microsoft Office installed on your computer. Only the Office Home and Student, Home and Business, Standard, Professional and Professional Plus packages include PowerPoint within them. Other packages may provide only a viewer — that is, they let you open and watch a presentation, but you cannot create presentations with them.
The newer .pptx format is based on the open Office Open XML standard, which makes files smaller and less prone to corruption than the old .ppt binary format. A related format, .ppsx (PowerPoint Show), opens straight into the slide show instead of the editing window — handy when you want a file that plays the moment it is double-clicked.
Starting PowerPoint
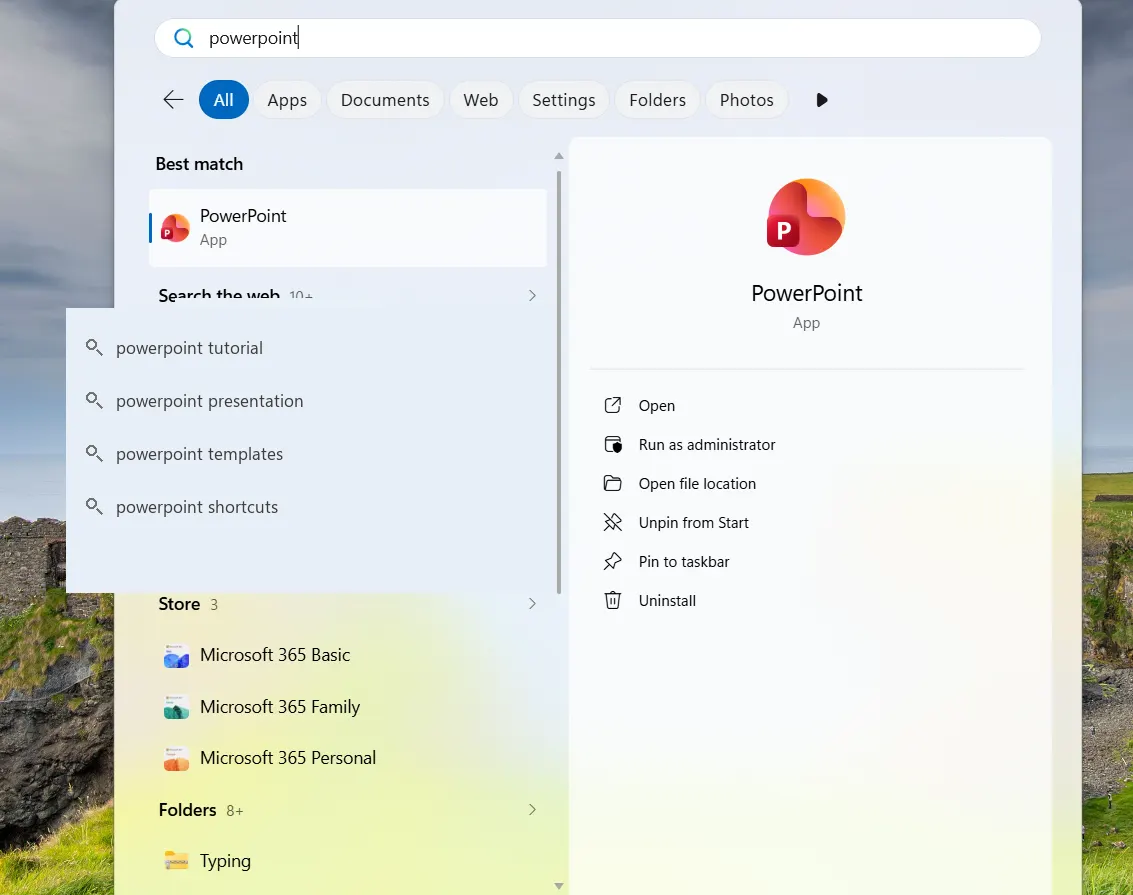
PowerPoint is launched from the Windows Start menu in the same way as any other Office program. Follow these steps the first time you open it:
- Click the Start button.
- Click the All Programs option from the menu.
- Search for Microsoft Office from the sub-menu and click it.
- Search for Microsoft PowerPoint from the sub-menu and click it.
After PowerPoint has been launched for the first time, the PowerPoint icon will be placed on the Quick Launch pane. This means that from then on you can simply click the Start button and then click the PowerPoint icon to launch the program. A shortcut for PowerPoint can also be created on your desktop, so a double-click on that desktop icon opens the program directly.
As an alternative to the menu route, you can simply double-click the PowerPoint icon (on the desktop or taskbar). Whichever way you start it, this launches the Microsoft PowerPoint application and the presentation window shown on the next page appears.
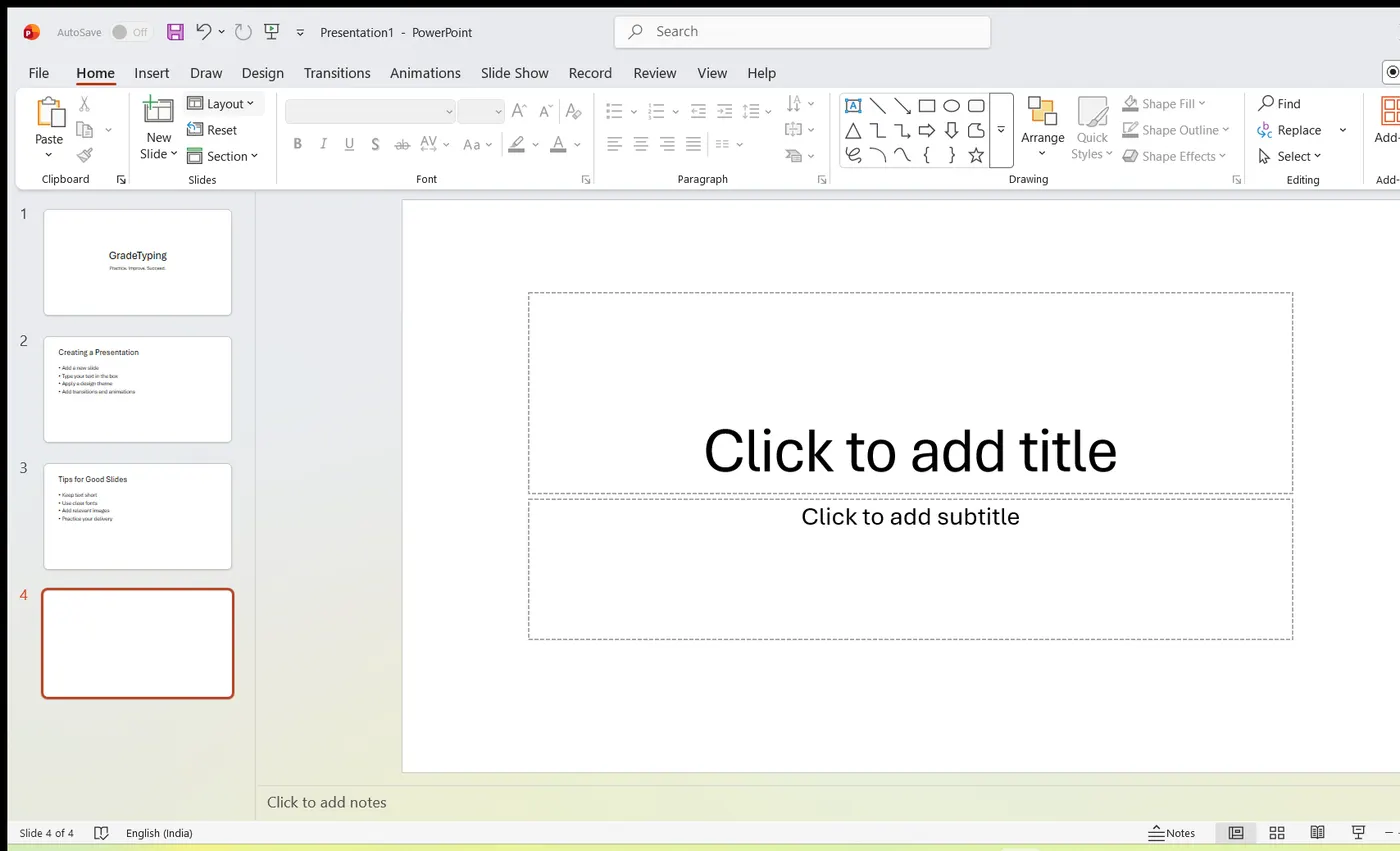
When the start screen offers a choice of templates, select Blank Presentation; the blank working window then appears, ready for you to begin typing and inserting content.
Opening PowerPoint is like taking a brand-new, empty notebook off the shelf. "Blank Presentation" is that empty notebook; the design templates beside it are notebooks that already have a coloured cover and ruled, styled pages waiting inside.
On Windows 8.1, 10 and 11 you can also start PowerPoint quickly by pressing the Windows key, typing the word PowerPoint, and pressing Enter — the search box finds the program without you having to browse through All Programs at all.
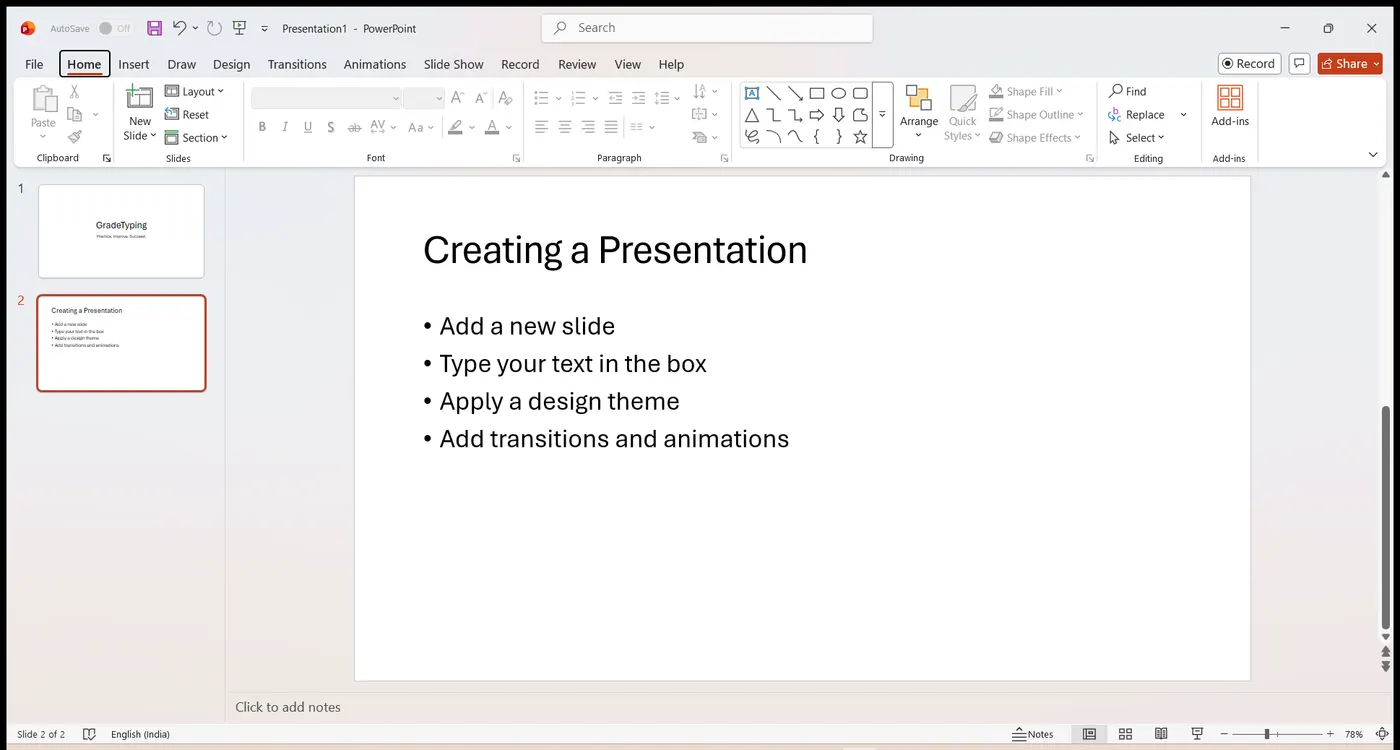
The Presentation Window — Parts (I)
The presentation window is divided into several distinct areas. It is important to familiarise yourself with these areas because doing so makes learning and using PowerPoint much easier. The labelled regions of a standard PowerPoint file are the Title Bar, Quick Access Toolbar, File Menu (File Tab), Ribbon, Slide Area, Slide Tab, Notes Section, Slide Views, Zoom Options, Help and the Status Bar. The first three are explained below; the rest continue on the next page.
File Tab
This tab opens the Backstage view, which basically allows you to manage the file and the settings in PowerPoint. From here you can save presentations, open existing ones, and create new presentations based on blank or predefined templates. The other file-related operations are also executed from this view.
Ribbon
The Ribbon is the strip of controls across the top of the window. It contains three components:
- Tabs — they appear across the top of the Ribbon and contain groups of related commands. Home, Insert and Page Layout are examples of ribbon tabs.
- Groups — they organise related commands, and each group name appears below the group on the Ribbon. For example, a group of commands related to fonts, or a group of commands related to alignment.
- Commands — the individual buttons that appear within each group, as mentioned above.
Title Bar
This is the top section of the window. It shows the name of the file followed by the name of the program — which in this case is Microsoft PowerPoint.
The Ribbon is like a tool drawer organised into compartments: the Tabs are the drawers, the Groups are the labelled compartments inside a drawer, and the Commands are the individual tools resting in each compartment.
Some tabs are contextual: they only appear when you select a particular object. Click a picture, for instance, and a Picture Tools — Format tab appears; click it away and the tab disappears. You can also collapse the Ribbon (Ctrl + F1) to free up screen space.
The Presentation Window — Parts (II)
Slide Area
This is the area where the actual slide is created and edited. In this section you can add, edit and delete text, images, shapes and multimedia — it is the main canvas of your presentation.
Help
The Help icon can be used to get PowerPoint-related help any time you need it. Clicking the "?" opens the PowerPoint Help window, where you have a list of common topics to browse from; you can also search for specific topics from the search bar at the top.
Zoom Options
The zoom control lets you zoom in for a closer look at your text. The zoom control consists of a slider that you can slide left or right to zoom in or out, and you can click the "−" and "+" buttons to decrease or increase the zoom factor. The maximum zoom supported by PowerPoint is 400%, and 100% is indicated by the mark in the middle of the slider.
Slide Views
The group of four buttons located to the left of the Zoom control, near the bottom of the screen, lets you switch between PowerPoint views:
- Normal Layout view — displays the page in normal view, with the slide on the right and a list of thumbnails to the left. This view allows you to edit individual slides and also to rearrange them.
- Slide Sorter view — displays all the slides as a matrix. This view only allows you to rearrange the slides, but not to edit the contents of each slide.
- Reading View — this view is like a slideshow but with access to the Windows task bar, in case you need to switch windows. However, like the slideshow, you cannot edit anything in this view.
Notes Section
This section allows you to add notes for the presentation. These notes will not be displayed on the screen during the presentation; they are just a quick reference for the presenter.
Quick Access Toolbar
The Quick Access Toolbar sits above the File Tab. This toolbar offers a convenient place to group the most commonly used commands in PowerPoint — such as Save, Undo, Redo and New — and you can customise it to suit your needs.
Slide Tab
This section is available only in the Normal view. It displays all the slides in sequence, and from here you can add, delete and reorder slides.
The Status Bar runs along the very bottom of the window. On its left sit the View Buttons (placed to the left of the horizontal scroll bar), and on its right sit the Zoom controls just described.
Backstage View & File Commands
In Office, Microsoft replaced the traditional file menu with the new Backstage view. This view not only offers all the menu items that used to sit under the file menu, but adds further details that make management of your files a great deal easier.
You can access the Backstage view simply by clicking the File tab. You can exit this view by clicking on any tab (including the File tab again), or by pressing the Esc key on the keyboard.
Commands available under the File tab
The table below describes the commands found in the first (commands) pane of the Backstage view.
| Command | Description |
|---|---|
| Save | Saves a new file or an existing file in standard format. If you are working on a previously saved file, this saves the new changes in the same file format; if you are working on a new file, this command behaves like Save As. |
| Save As | Allows you to specify the file name and the file type before saving the file. |
| Open | Allows you to open new (existing) PowerPoint files. |
| Close | Allows you to close an existing file. |
| Info | Displays the information about the current file. |
| Recent | Lists a series of recently viewed or edited PowerPoint files. |
| New | Allows you to create a new file using a blank or a pre-defined template. |
| Allows you to select the printer settings and print the presentation. | |
| Save & Send | Allows you to share your presentation with a larger audience via emails, the web, cloud services, etc. |
| Help | Provides access to PowerPoint Help. |
| Options | Allows you to set various options related to the PowerPoint program. |
| Exit | Closes the presentation and exits the program (this closes all open presentations). |
Backstage Panes & Ribbon Tabs
Organisation of the Backstage view
The Backstage view has three sections or panes:
- First Pane — this is the commands pane, which consists of all the commands you would typically find in the file menu of older versions. It also contains the Options menu, which lets you edit the options on the program, such as customising the Ribbon.
- Second Pane — this is the subcommands pane. It lists all the commands related to the main command you choose in the first pane. For example, if you select Print in the first pane, you get to choose the printer and adjust the print settings in the second pane.
- Third Pane — this is the preview or file-information page. Depending on the command and the subcommand you select, this pane will either display the properties of the file or give you a preview of the file.
The Ribbon tabs and their commands
PowerPoint offers a great many tools that help you create a presentation. These tools are organised logically into the various ribbons (tabs) in PowerPoint. The table below describes the commands you can access from the different tabs.
| Tab Name | Ribbon Commands |
|---|---|
| Home | Clipboard functions, manipulating slides, fonts, paragraph settings, drawing objects and editing functions. |
| Insert | Insert tables, pictures, images, shapes, charts, special texts, multimedia and symbols. |
| Design | Slide setup, slide orientation, presentation themes and background. |
| Transitions | Commands related to slide transitions. |
| Animations | Commands related to animation within the individual slides. |
| Slideshow | Commands related to slideshow set-up and previews. |
| Review | Proofing content, language selection, comments and comparing presentations. |
| View | Commands related to presentation views, Master slides, colour settings and window arrangements. |
Besides these standard tabs, and depending on the objects selected in the slide, there are other (contextual) menu tabs that get enabled — for example tabs for editing a picture, a table or a drawing appear only while such an object is selected.
Adding a New Slide
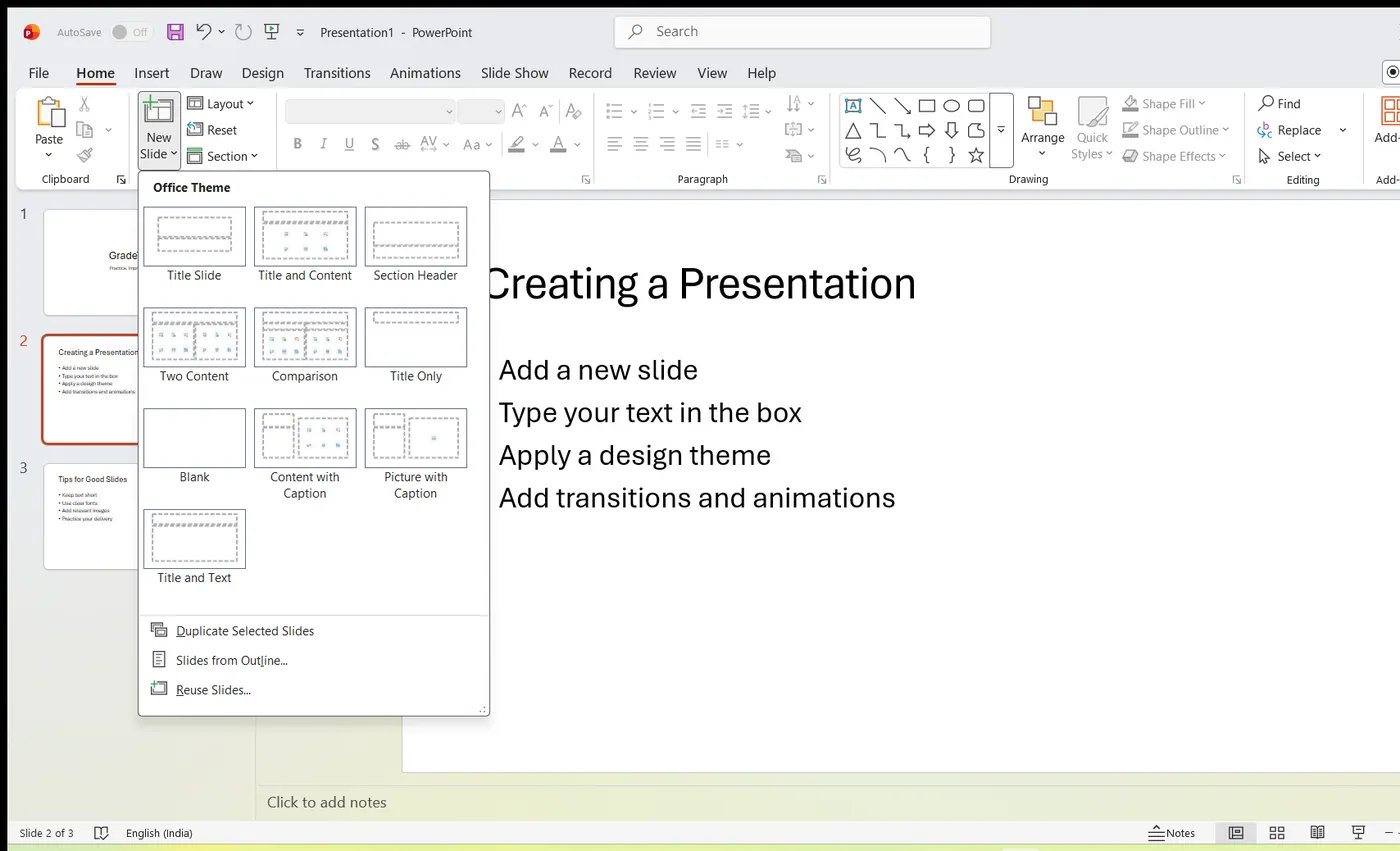
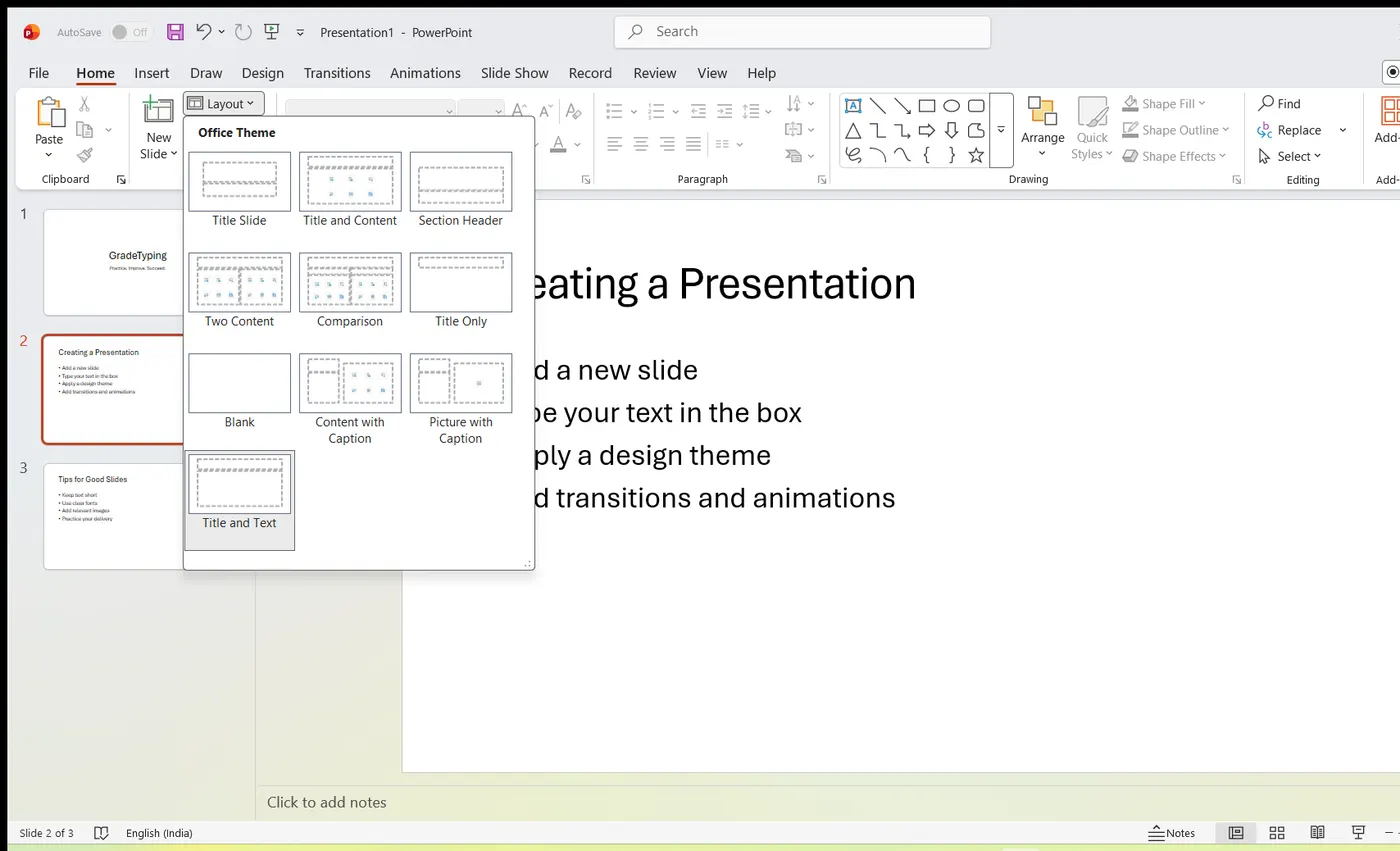
The following steps allow you to insert a new slide into the deck (the collection of slides):
- Go to the Home tab and, in the Slides group, select the New Slide option.
- The new slide is inserted. You can now change the layout of this slide to suit your design requirements.
- To change the slide layout, right-click on the newly inserted slide and go to the Layout option in the Slides group of the Home tab, where you can choose from the existing layout styles available.
You can follow these same steps to insert a new slide in between existing slides, or at the end of the slide list.
When you insert a new slide, it inherits the layout of its previous slide, with one exception: if you are inserting a new slide after the first slide (the Title slide), the subsequent slide will have the Title and Content layout.
There is a faster way to add a slide: press the shortcut Ctrl + M. To make an exact copy of the current slide, right-click it and choose Duplicate Slide. The New Slide button's drop-down offers 9 ready-made layouts (Title Slide, Title and Content, Section Header, Two Content, Comparison, Title Only, Blank, Content with Caption and Picture with Caption), so you can pick the right arrangement before you start typing.
A layout is like a pre-drawn worksheet template: it decides where the title box, the bullet box and any picture boxes sit on the slide, so you only have to fill in the blanks.
Adding Text in Boxes
PowerPoint allows you to add text to a slide in a well-defined manner, so that the content is well distributed and easy to read. The procedure to add text in a PowerPoint slide is always the same — just click in the text box and start typing. The text will follow the default formatting set for that text box, although this formatting can be changed later, as required, from the Home tab. What changes from box to box is the kind of content box that supports the text. The most common content blocks you will see in PowerPoint are described below.
Title Box
This is typically found on slides with the Title layout, and on all slides that have a title box in them. This box is indicated by the prompt "Click to add title".
Subtitle Box
This is found only in slides with the Title layout. It is indicated by the prompt "Click to add subtitle".
Content Box
This is found in most of the slides that have a placeholder for adding content. It is indicated by the prompt "Click to add text". As you can see, this box allows you to add text as well as non-text content (a table, chart, picture, SmartArt or video). To add text to such a box, click anywhere on the box — except on one of the content icons in the centre — and start typing.
Text Only Box
This is not a default content box available in PowerPoint, but you can create it using the Slide Master, if required. It is also indicated by "Click to add text". The only difference between the Text Only Box and the Content Box is that the former supports only text in its content area.
These dotted-border boxes — Title, Subtitle and Content — are collectively called placeholders. The default font size of the Title placeholder on a Title Slide is 44 pt, and the default body-text size is 32 pt.
Adding New Text Boxes
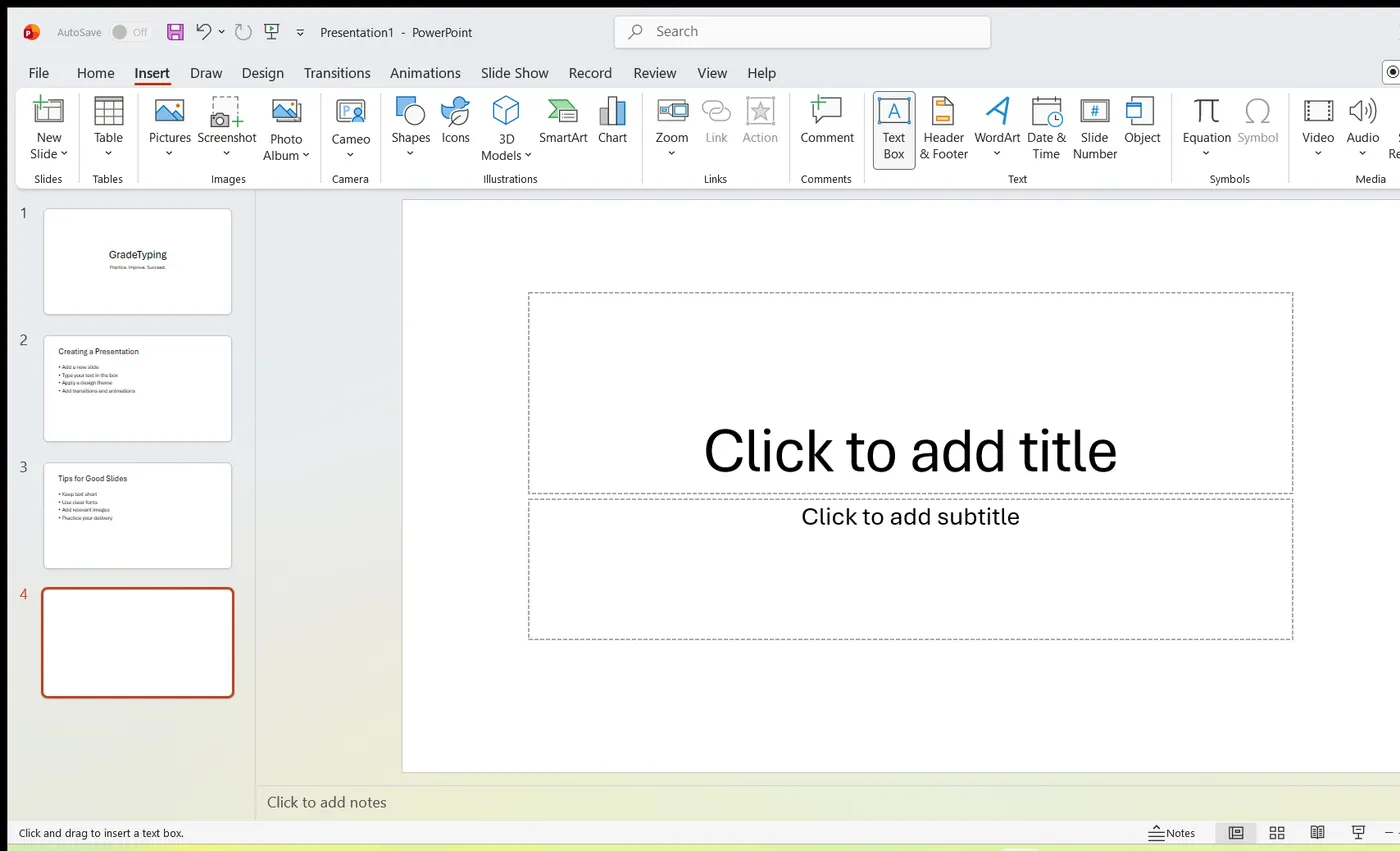
Most of the standard layouts come with the text-box option. As mentioned previously, text boxes will have "Click to add text" as their default text. Here are the steps to add a new text box to a slide:
- Click the Text Box icon in the Home ribbon, under the Drawing section.
- You will get the insert-text-box cursor, which looks like an inverted cross.
- Click to insert a text box. You can now start typing directly into the text box.
- Alternatively, you can click and drag the cursor — without releasing the click — to create a text box of the size you want.
The size of the text box can be adjusted afterwards by selecting one of the edges (marked by little squares) or one of the corners (marked by little circles) and dragging it.
A text box is like a sticky note you can place anywhere on the slide — unlike the built-in placeholders, which always sit in fixed positions chosen by the layout. The squares and circles around a selected box are its "handles", just like the corner handles you drag to resize a photo.
The same Text Box command also lives on the Insert tab, inside the Text group. A text box you add this way can be moved, rotated, given a fill colour or an outline, and layered in front of or behind other objects using the Arrange command.
Deleting Existing Slides
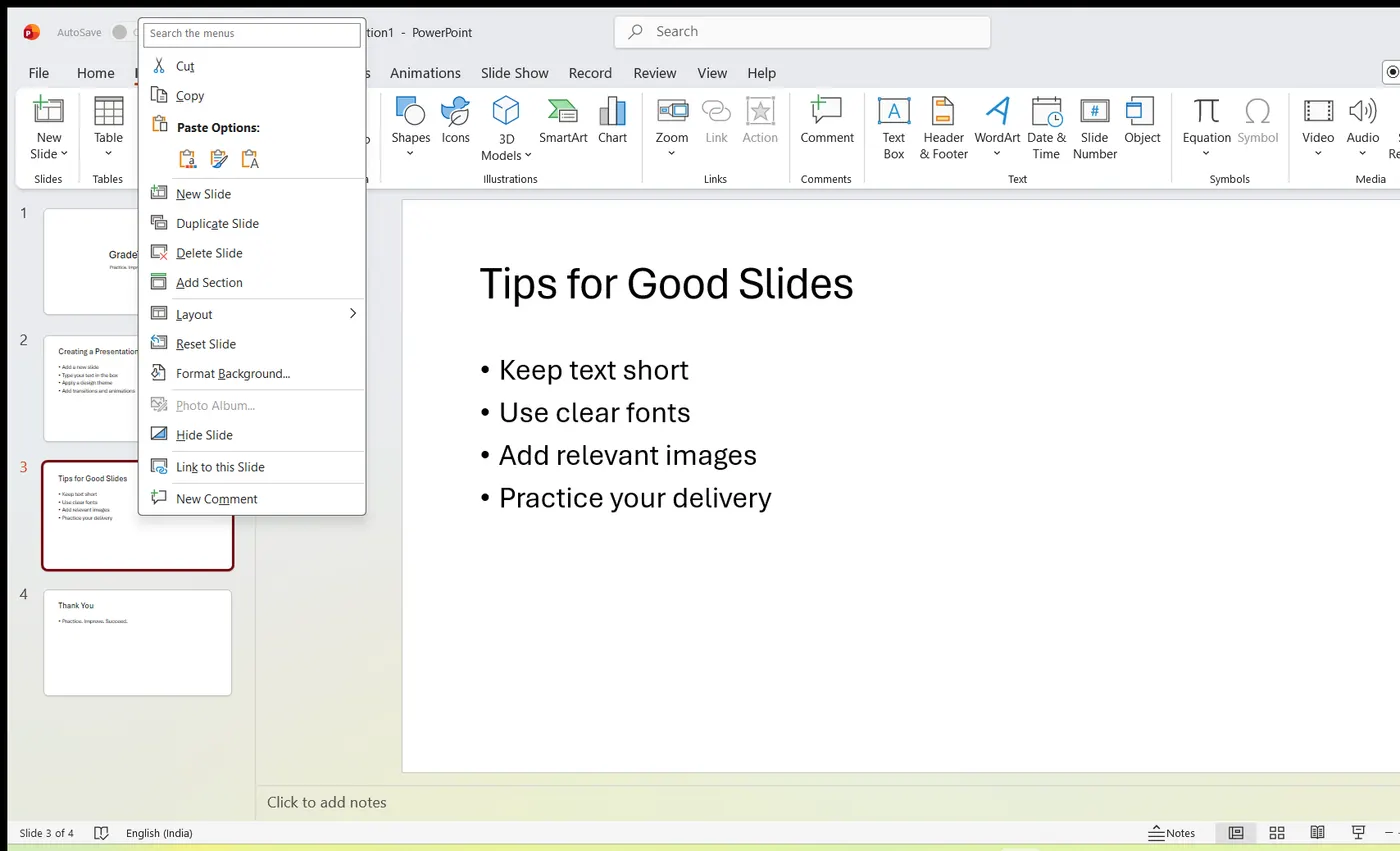
There are times, while building a slide deck, when you may need to delete some slides. This can be done easily in PowerPoint. You can delete slides from the Normal view as well as from the Slide Sorter view, and in each view there are two ways to do it.
Deleting from Normal View
- Go to the Normal view.
- Right-click on the slide to be deleted and select the Delete Slide option.
Alternatively, you can select the slide and press the Delete button on your keyboard.
Deleting from Slide Sorter View
- Go to the Slide Sorter view.
- Right-click on the slide to be deleted and select the Delete Slide option.
Alternatively, you can select the slide and press the Delete button on your keyboard.
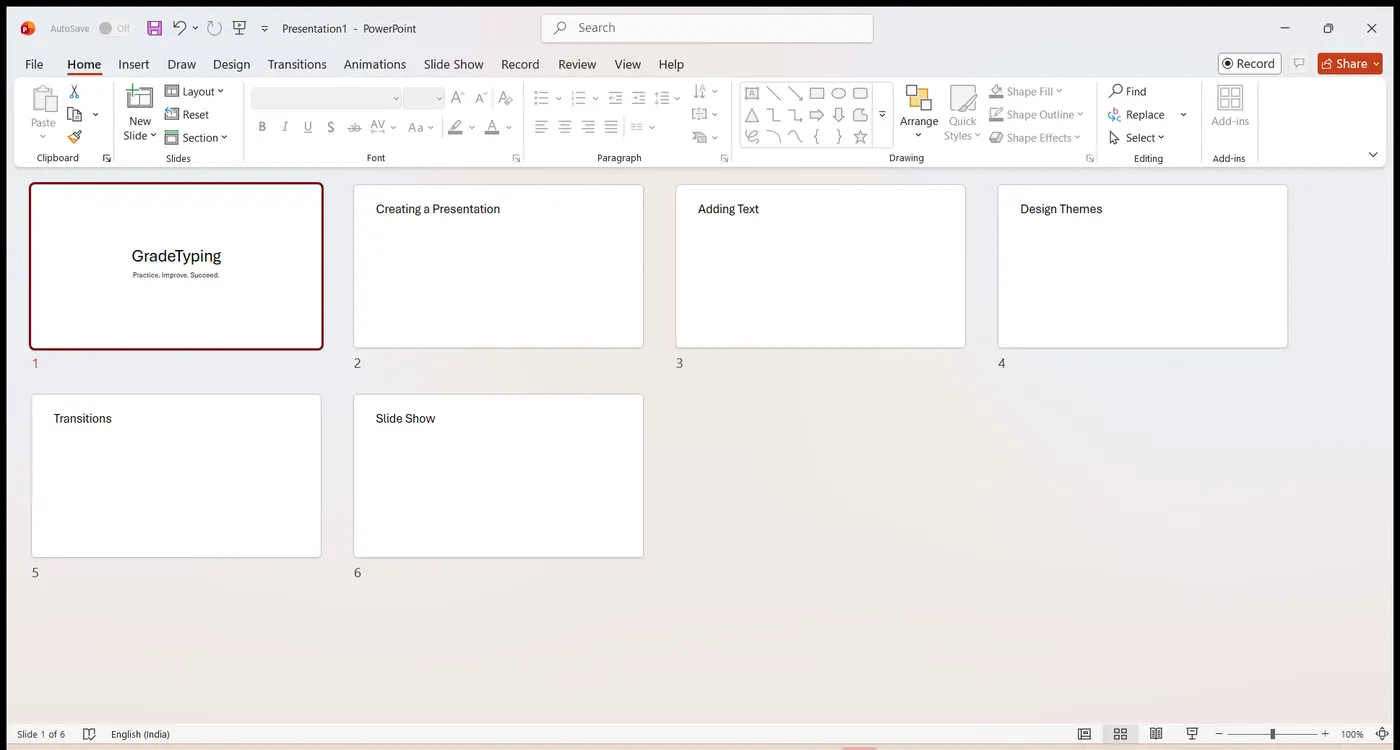
To remove several slides at once, hold Ctrl and click each unwanted slide (or hold Shift to select a continuous run), then press Delete. If you delete a slide by mistake, Ctrl + Z brings it straight back.
Rearranging Slides
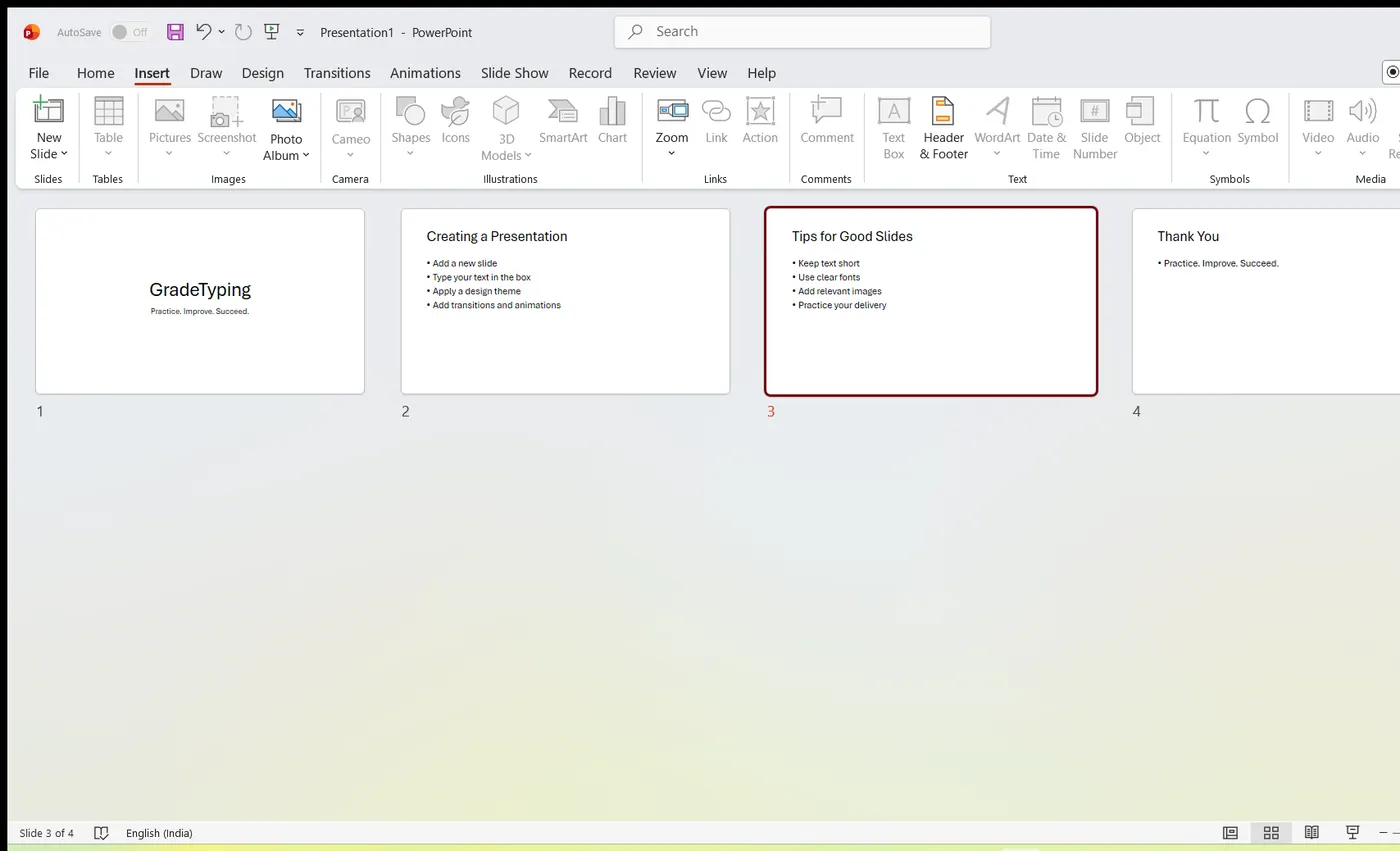
Rearranging slides is important when it comes to organising the overall flow of the presentation. While it is vital that you get the right content on every slide, it is equally important that you are able to present the slides in an order that makes it easier for the audience to understand the content; most of the time this will require rearranging the slides. You can rearrange slides from two views in PowerPoint — the Normal View and the Slide Sorter View. The steps for each view are given below.
In Normal View
- Select the slide to be moved.
- Left-click on the slide and drag it to the position in the sequence where you want to place it. PowerPoint indicates the insert position with a line in between the existing slides.
- When you reach the right position, release the left-click button to insert the slide. Alternatively, you can cut the selected slide and paste it back into the sequence.
In Slide Sorter View
- Select the slide to be moved.
- Left-click on the slide and drag it to the position in the sequence where you want to place it. PowerPoint again indicates the insert position with a line in between the existing slides.
- When you reach the right position, release the left-click button to insert the slide. Alternatively, you can cut the selected slide and paste it back into the sequence.
Rearranging slides is exactly like shuffling a stack of printed cards into a better order — except the thin line PowerPoint draws between thumbnails shows you precisely where the card you are holding will drop when you let go.
Designing a Theme
A Theme gives your slides a consistent appearance throughout your presentation. Themes contain colour schemes with custom formatting, styled fonts, and layouts. When you apply a design template to your presentation, the slide master and colour scheme of the template replace the original blank slide.
To design the theme, follow these steps:
- Select the Design tab, then in the Themes group click the drop-down arrow next to the last theme shown.
- The All Themes window appears, displaying the available presentation themes.
- Move the mouse pointer over a theme to preview how it would look on your slides.
- Click on a theme of your choice to apply it.
You can change the theme during or after the creation of your PowerPoint file — applying a new theme re-styles every existing slide instantly.
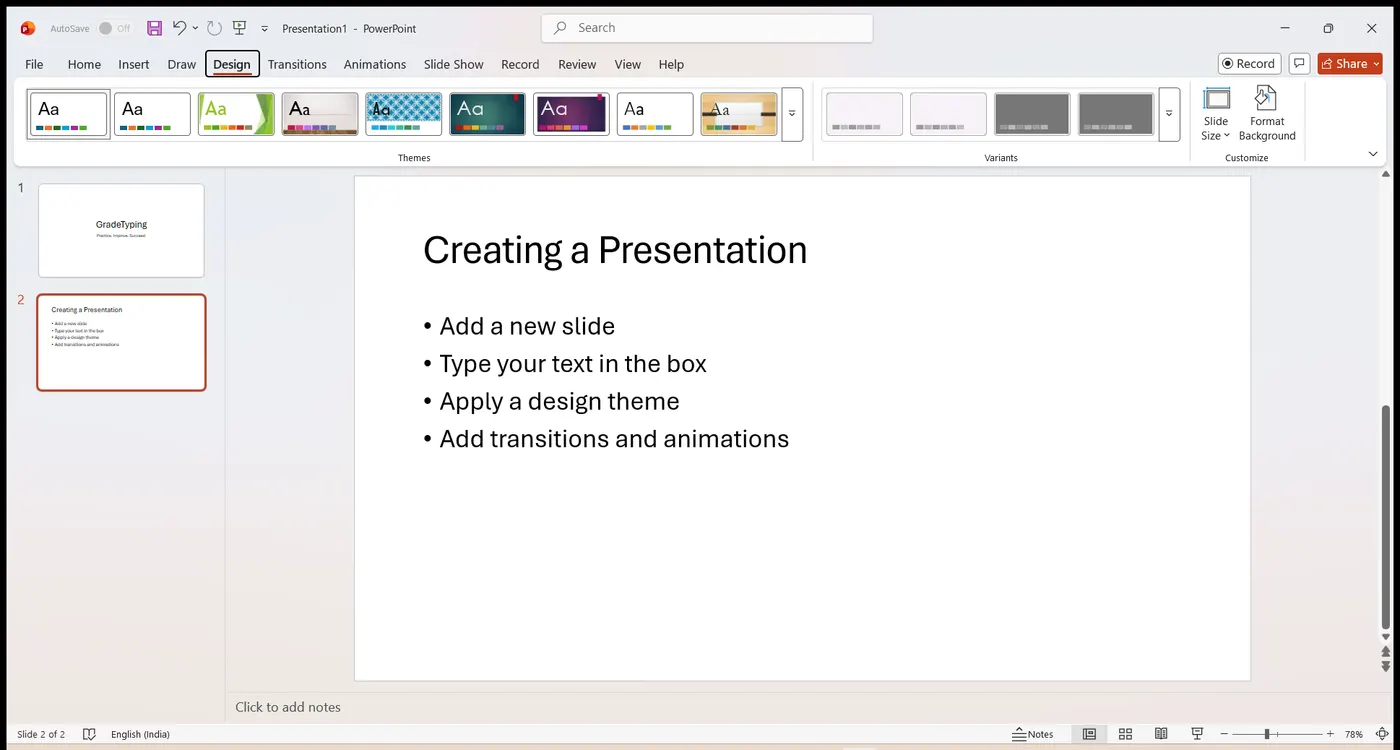
After choosing a theme you can fine-tune its Variant (an alternative colour set for the same theme), and use Format Background on the Design tab to apply a solid colour, gradient or picture behind your slides. Themes keep a deck looking professional because every slide automatically shares the same fonts and colours.
Editing Techniques — View Modes
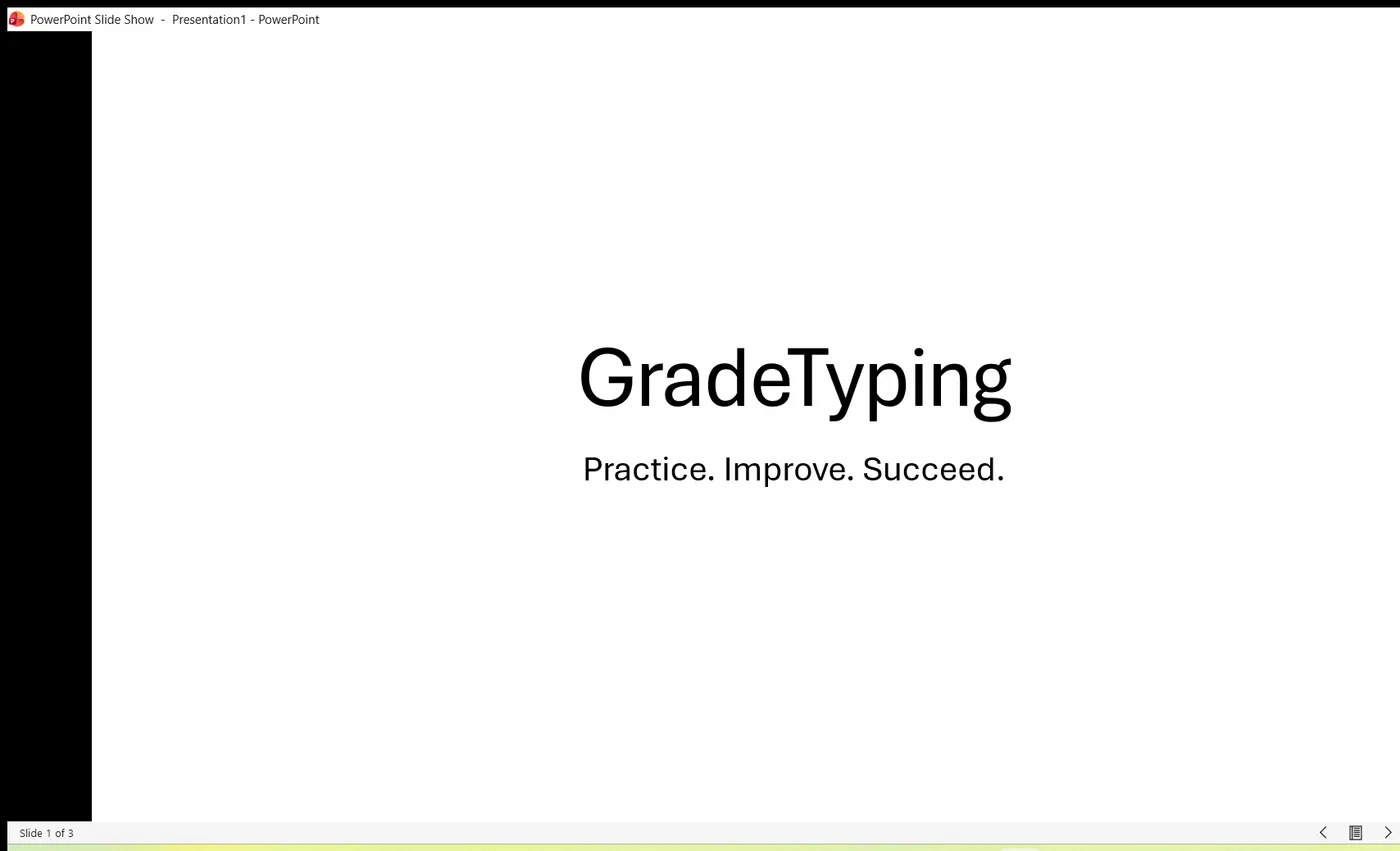
The Normal, Slide Sorter, Reading and Slideshow views all allow you to type, edit and view your presentation. To switch between views, click the View Options buttons at the lower right-hand side of the PowerPoint window.
A. Normal View
Normal View is the main editing view, which you use to write and design your presentation. The view has three working areas: on the left, tabs that alternate between an outline of your slide text (the Outline tab) and your slides displayed as thumbnails (the Slides tab); on the right, the slide pane, which displays a large view of the current slide; and at the bottom, the notes pane.
B. Slide Sorter View
Slide Sorter View is an exclusive view of your slides in thumbnail form. When you have finished creating and editing your presentation, Slide Sorter gives you an overall picture of it, making it easy to reorder, add or delete slides and to preview your transition and animation effects.
C. Reading View
Reading View is new in PowerPoint. It is similar to Slide Show View. The difference between the two is that while Slide Show View takes over the whole screen, in Reading View the slide is shown in full screen but you still see the PowerPoint title band at the top of the screen, and the PowerPoint status bar together with the Windows task bar are also displayed at the bottom.
D. Slideshow View
Slide Show View takes up the full computer screen, like an actual slide-show presentation. In this full-screen view you see your presentation the way your audience will. You can see how your graphics, timings, movies, transition effects and animation elements will look in the actual show.
Bulleted Lists, Pictures & Masters
Adding a Bulleted List
Typing text in PowerPoint is similar to typing in other applications. However, because PowerPoint deals with bulleted lists, a few keystrokes will help you when typing multiple lines.
In Normal View, to edit the bulleted list, place the insertion bar after each line of the bulleted text, then go to the Home tab, then the Paragraph subgroup, and select the first option. To add a sub-bullet (a deeper level of indentation), go to the Home tab, then the Paragraph subgroup, and select the second option.
Adding Pictures
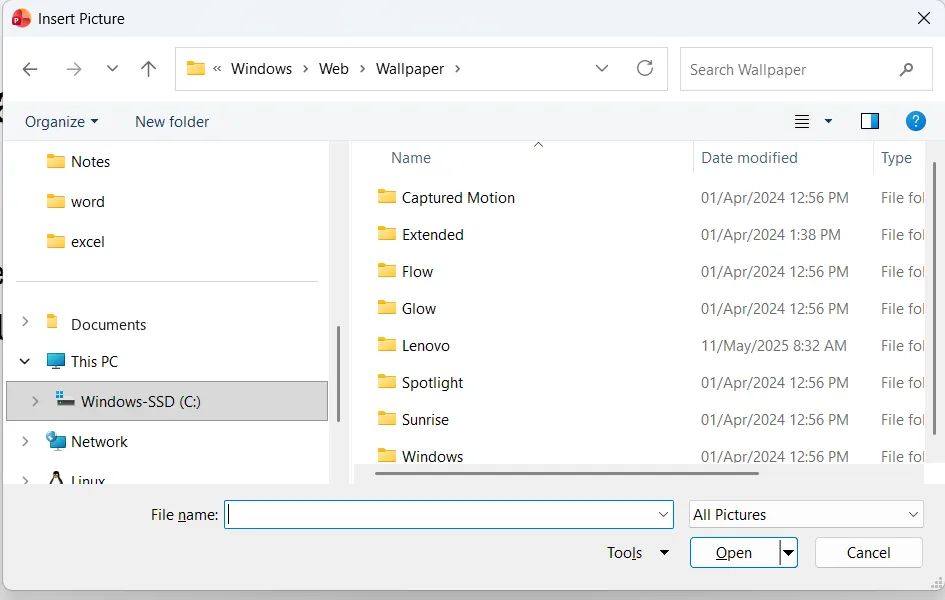
Pictures are any type of computerised images, such as artwork and photos. You can make your presentation more eye-catching and entertaining by adding pictures. To add a picture to your presentation, follow these steps:
- Go to the Insert tab and, in the Images subgroup, select the Pictures option.
- Select the picture to be inserted.
- Click the Insert button. The picture will get inserted into your presentation.
Similarly, Online Pictures, Screenshots and a Photo Album can also be inserted into the presentation from the Images group.
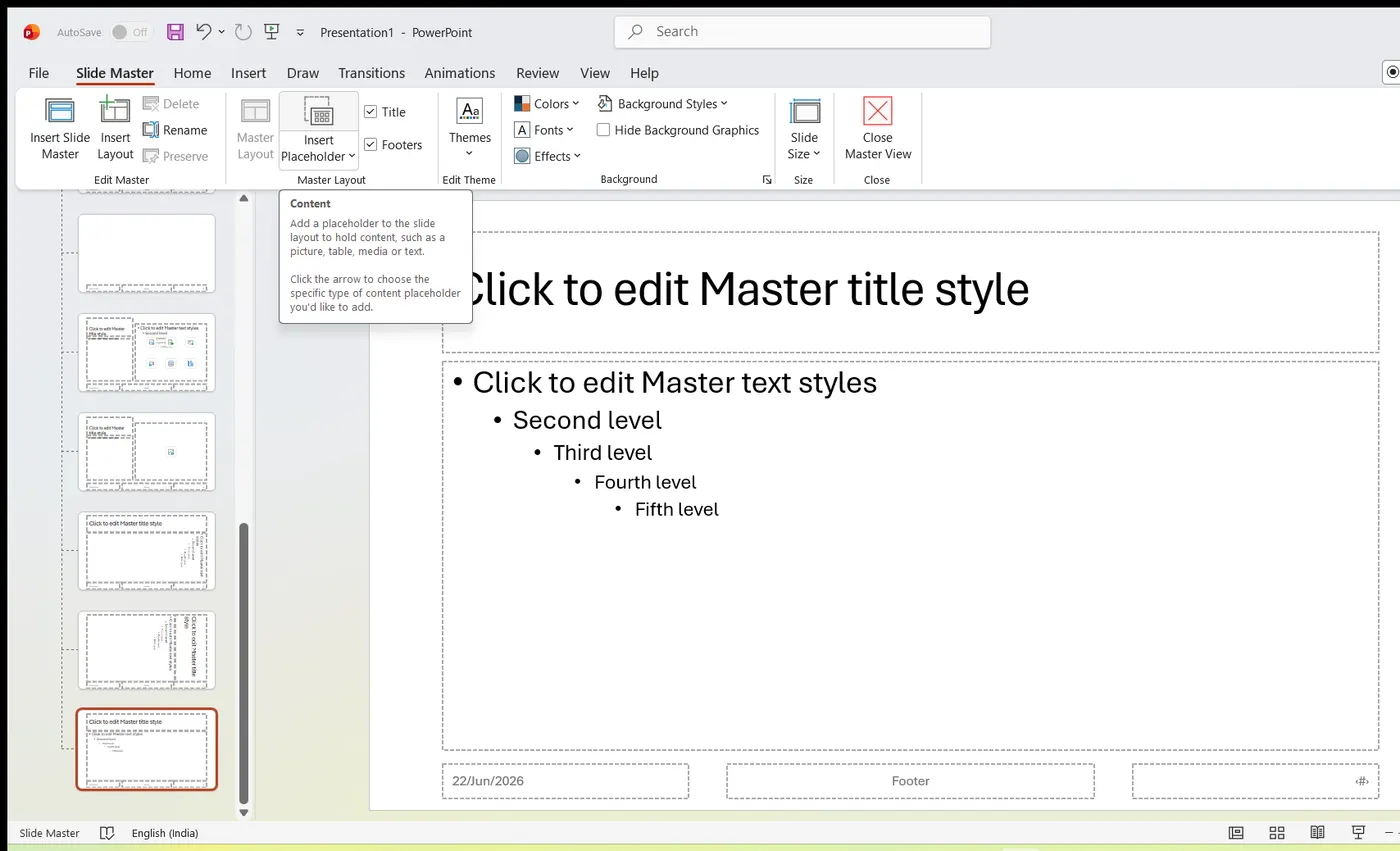
Slide Masters
PowerPoint has a set of Master Slides available for every Design Theme. The three masters are the Slide Master, the Handout Master and the Notes Master. Masters correspond directly to the slides; they contain the elements that appear on every slide and control the format for all slides in a presentation, which provides a consistent appearance for each slide.
Any change you make to the Slide Master will affect all slides in your presentation — this is the fastest way to restyle a whole deck at once.
Slide Transitions
PowerPoint allows you to apply special effects, using slide transitions and text/graphical animation, to make your presentation more visually appealing. This page covers transitions; the next covers animation.
A Slide Transition is the visual special effect that you see when you move from one slide to the next (effects such as Fade, Push, Wipe, Split and Cover). Working in Normal or Slide Sorter views allows you to set transitions for a slide; the Transitions ribbon is what you use to apply them.
To apply a transition to a slide, follow these steps:
- Click on the slide.
- Go to the Transitions tab and click on the transition you want.
- Apply the transition effect of your choice.
You can also apply a sound and a timing speed to the selected transition from the Timing group located on the Transitions ribbon. Click the drop-down arrow in the Sound box to choose a sound, and click the up or down arrow in the Duration box to set the timing of the transition.
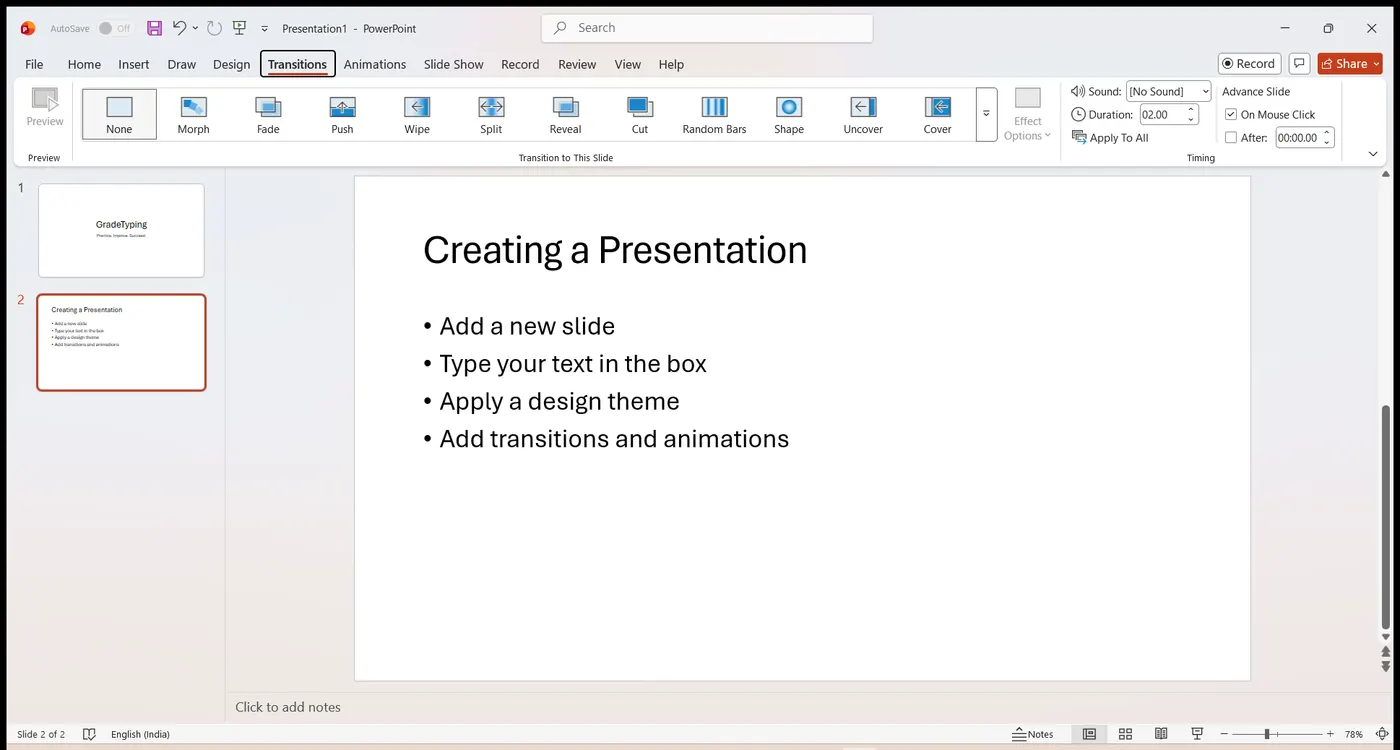
A transition is not the same as an animation: a transition affects the whole slide as it arrives, while an animation affects an individual object within a slide. Use Apply To All in the Timing group to give every slide the same transition in one click.
Text & Object Animation
Text animation (bulleted-text animation) refers to the progressive display of bulleted items. By default, bulleted items appear at the same time on a slide. When text animation is applied, the bulleted list items can appear on the slide one at a time, or can have motion as they display on the screen. Select the Animations ribbon to apply animation to slide text.
To apply animation to text, follow these steps:
- Confirm that you are in Normal View (View > Normal).
- Go to the slide you want to animate.
- Click inside the Text Placeholder and select the text area.
- Click on the Animations tab and then click the drop-down arrow located in the Animation group to view the animation categories.
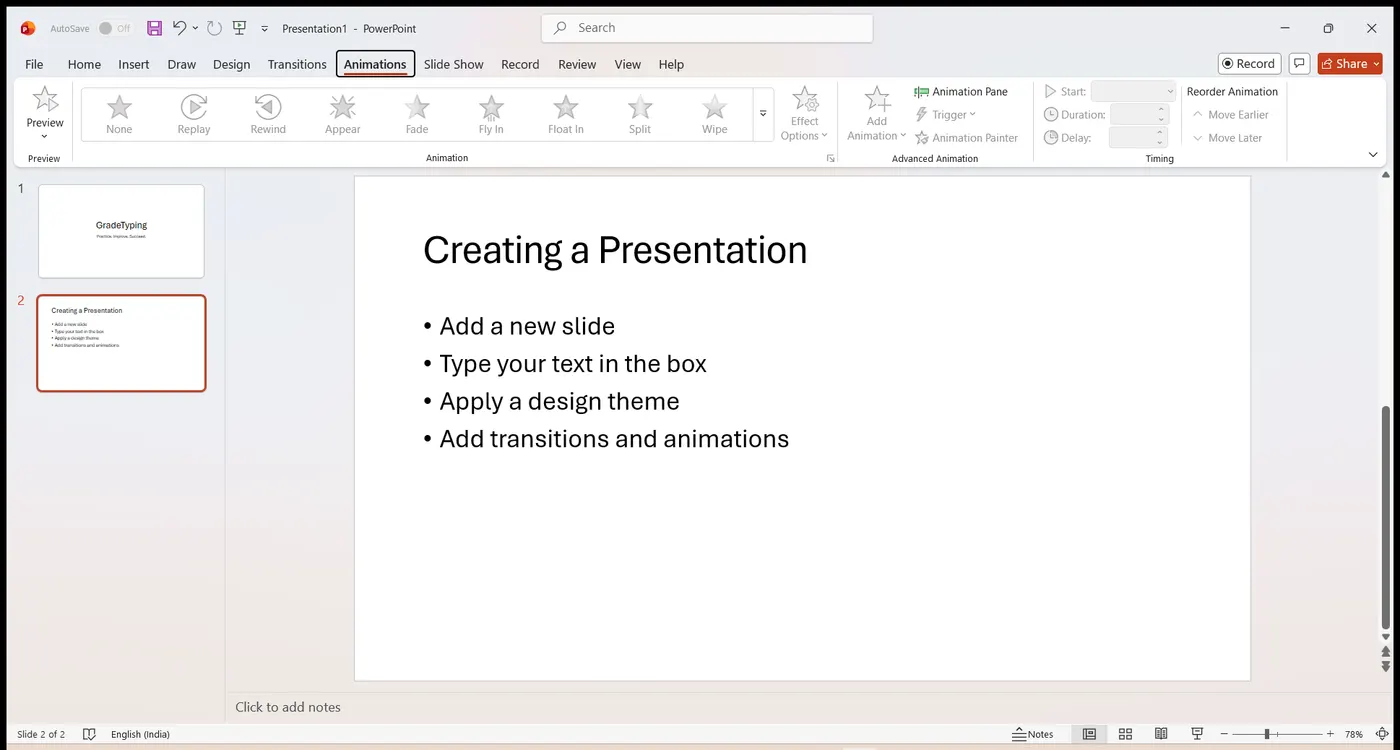
Animation effects fall into four categories — Entrance (how an object appears, e.g. Fly In; "Fly from left bottom" is an entrance animation), Emphasis (it draws attention while on screen), Exit (how it leaves), and Motion Paths (it travels along a route). The Animation Pane — opened from Animations > Advanced Animation > Animation Pane — lets you reorder and time every effect on the slide.
If a slide is a stage, an animation is an actor walking on, gesturing, then walking off — whereas a transition is the whole curtain changing between scenes.
Illustrations, SmartArt & Shapes
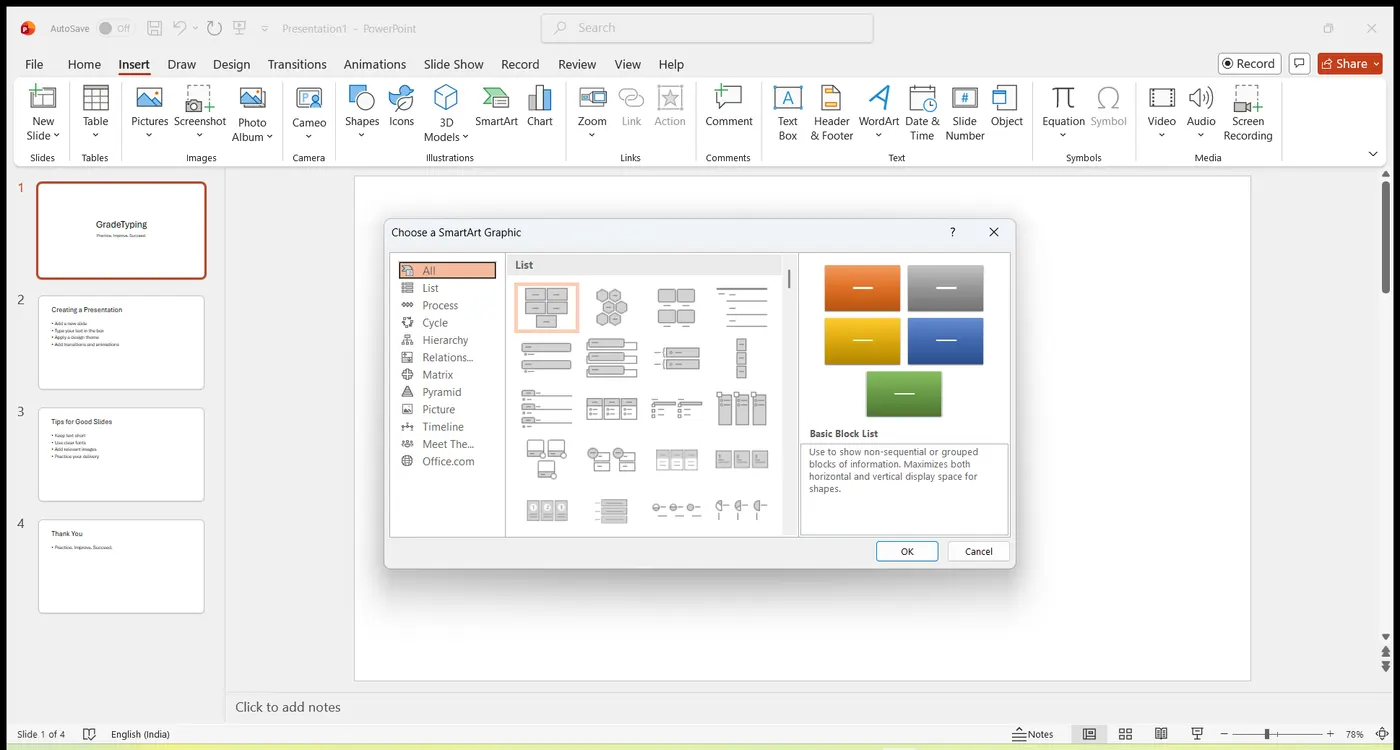
Illustration Features
Microsoft Office has multiple Illustration and Image features that let you enhance your document with numerous graphics, sound and motion. PowerPoint allows you to insert illustration and image features such as Tables, Charts, SmartArt, Pictures and Media Clips within the text placeholders of a slide.
Inserting SmartArt
- Click an Illustration and Image button to locate, format and insert features into your slide. (These features can also be located on the Insert ribbon.)
- SmartArt is the newest feature in Microsoft Office. When you click on the SmartArt button, the Choose a SmartArt Graphic window appears. You can enhance your slide presentation by incorporating text together with a variety of images.
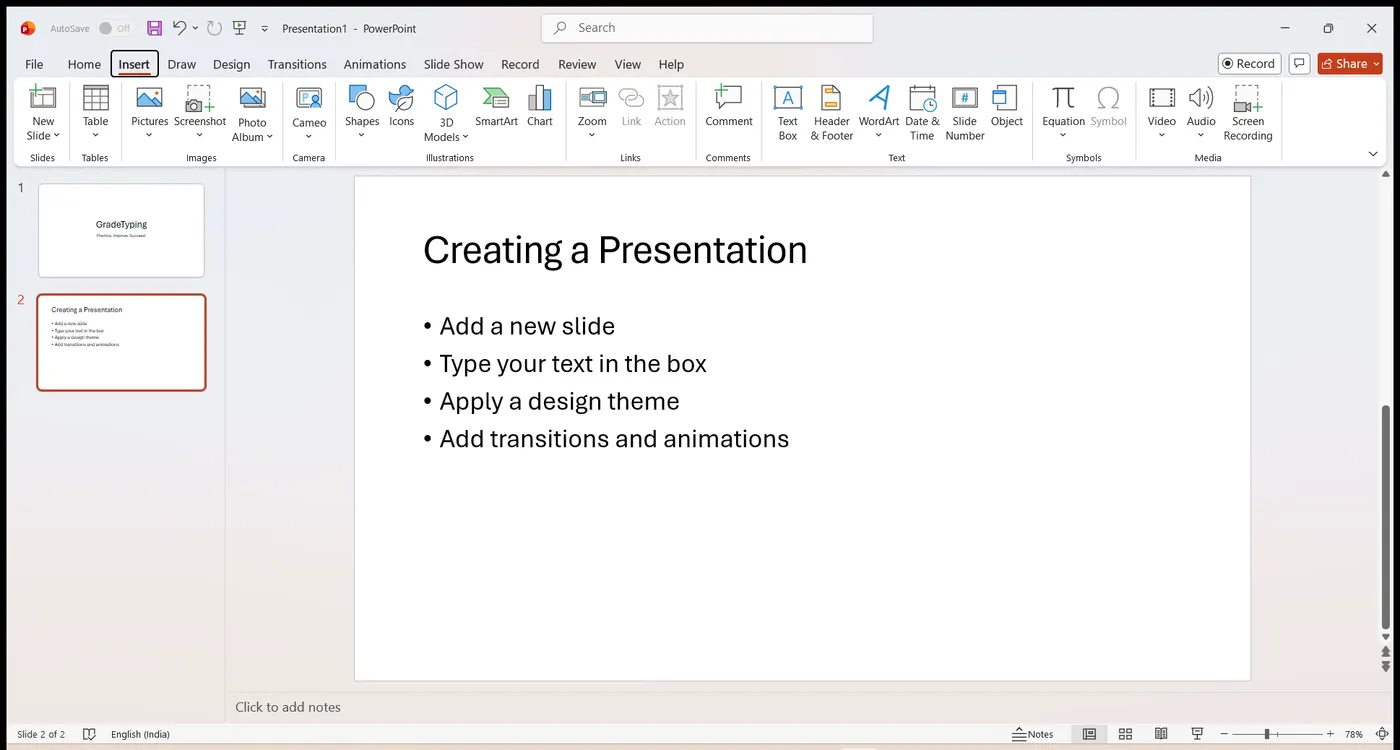
Inserting Shapes
SmartArt has numerous graphical options to select from, but you can also create your own graphical slide by using Shapes. Select the Insert ribbon to view the available shapes (lines, rectangles, arrows, callouts, stars and more), then drag on the slide to draw the shape you need.
SmartArt is like a ready-made diagram kit — you pick a layout (a cycle, a list, a hierarchy) and just type your words in; Shapes are the loose building blocks you assemble yourself when no ready-made diagram fits.
Running the Slide Show
Once you have finished adding text, graphics and formatting to a presentation, you can run the Slide Show. PowerPoint allows you to preview, rehearse or show your presentation electronically to an audience. Display the presentation on screen by selecting the Slide Show ribbon.
A. Launching the Slide Show
Select the Slide Show ribbon and then click the From Beginning button. The slide show will begin with the first slide.
The Slide Show button on the Option Views bar (the view buttons near the status bar) will start the slide show beginning with the current slide instead of the first one.
B. Navigating the Slide Show
While running your slide show, you can move to the next slide by clicking with your mouse, pressing the right arrow on the keyboard, or pressing the Enter key. To return to the previous slide, press the left arrow on the keyboard (the Page Up key also moves to the previous slide). To end the presentation, press the Esc key on the keyboard.
You can use these keyboard and mouse controls while running a slide show. Press the F1 key during a presentation to display the Slide Show Help dialog box, which lists every available shortcut.
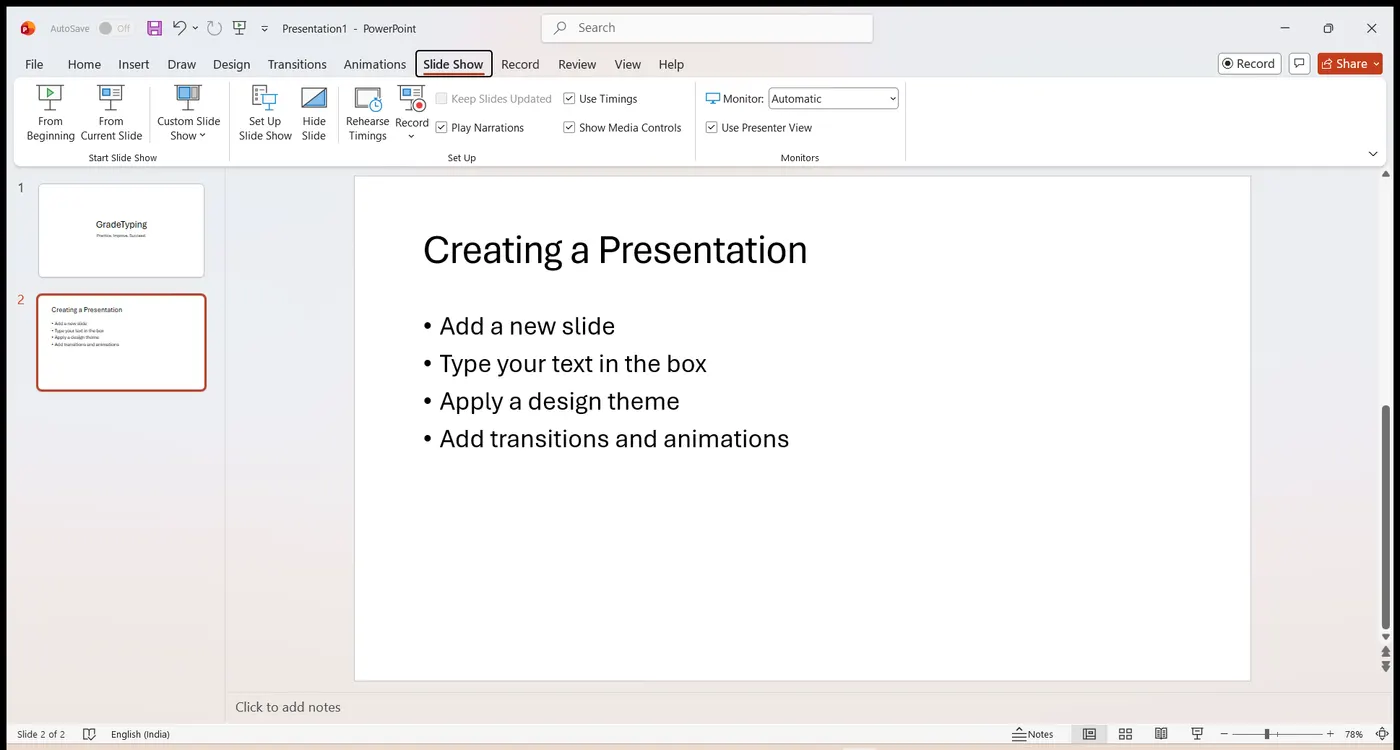
The shortcut F5 runs the show from the beginning. During the show, press B for a black screen or W for a white screen, and type a slide number + Enter to jump straight to that slide. Rehearse Timings records how long each slide stays so the show can later run automatically, and Broadcast Slide Show (also on this tab) shows it live over the internet.
Printing the Presentation
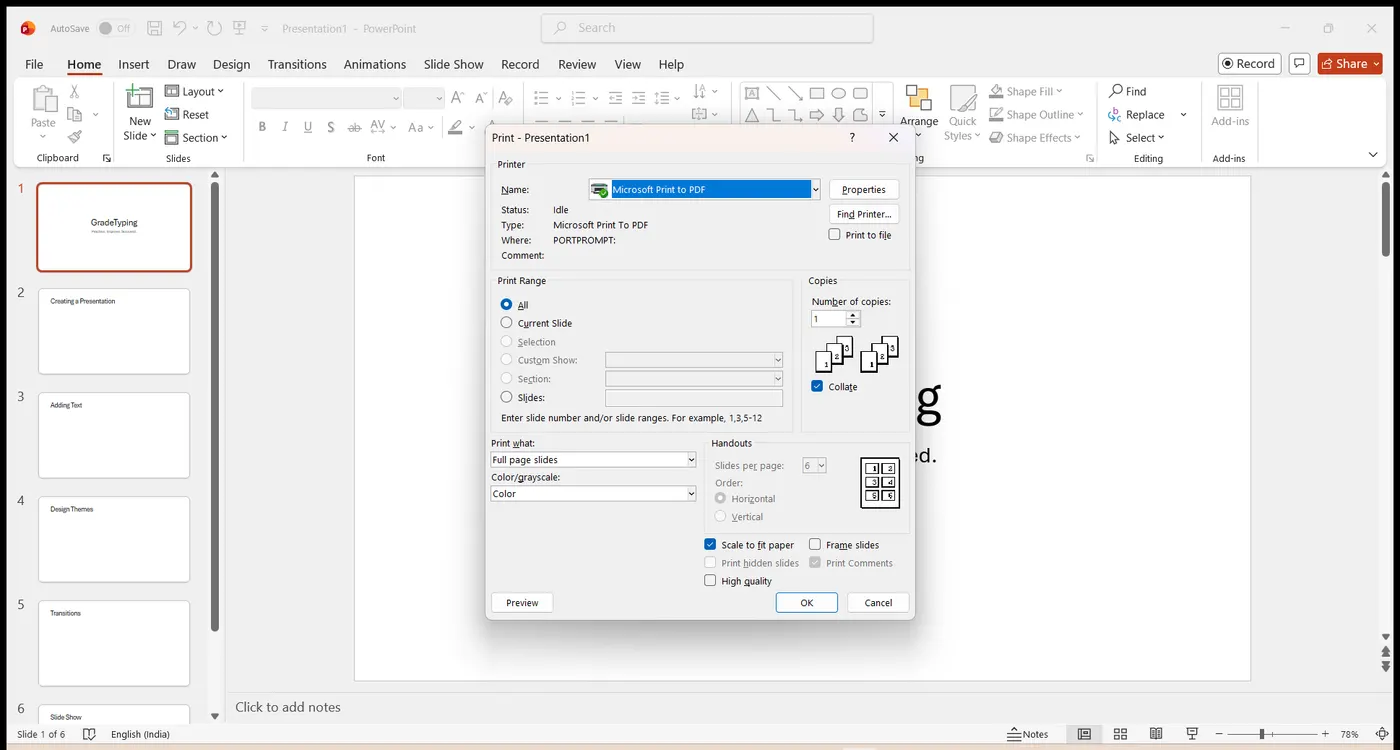
You can print your presentation by following these steps: go to the File tab and select the Print option. PowerPoint lets you print your presentation as slides, outlines, speaker's notes and audience handouts. Slides will be printed in full colour (on a colour printer) or in grayscale (on a black-and-white printer).
A PowerPoint presentation can also be printed on transparencies.
Make sure the appropriate transparencies are used for your printer model. The wrong type of transparencies can melt inside your printer, damaging it.
Under the print layout drop-down, Handouts let you fit several slides on one sheet (1, 2, 3, 4, 6 or 9 per page) to save paper, Notes Pages print each slide with its speaker notes beneath, and Outline prints just the slide text. Besides Colour and Grayscale there is also a Pure Black and White mode for the clearest text-only printout.
Review, Zoom & Other Tools
The Review tab
- Spelling — check the spelling and grammar in your slides from Review > Proofing > Spelling.
- Comments — the Comment option is on the Review ribbon; use it to attach a note to a slide for a reviewer.
- Translate — the Translate tool is also on the Review ribbon.
Zoom and the Status Bar
Use Zoom In to see an object in a bigger size and Zoom Out to see it in a smaller size. In general, when the zoom is set to 125%, the slide on screen looks similar to the printed page. The Zoom controls sit at the right-hand side of the Status Bar, and the View Buttons sit at its left, just to the left of the horizontal scroll bar.
Views, Notes and the View tab
PowerPoint provides 4 views that let you look at your presentation; the default view is Normal. These are found in the Presentation Views group of the View tab. The Notes Page view is used to prepare the speaker's notes for the audience; below the slide pane is the Notes Pane, where you type notes about the current slide. The Ruler, Gridlines and Guides commands are chosen on the View tab to display those on-screen aids. The Outline View in PowerPoint works in a similar way to the Outline View in a Word document.
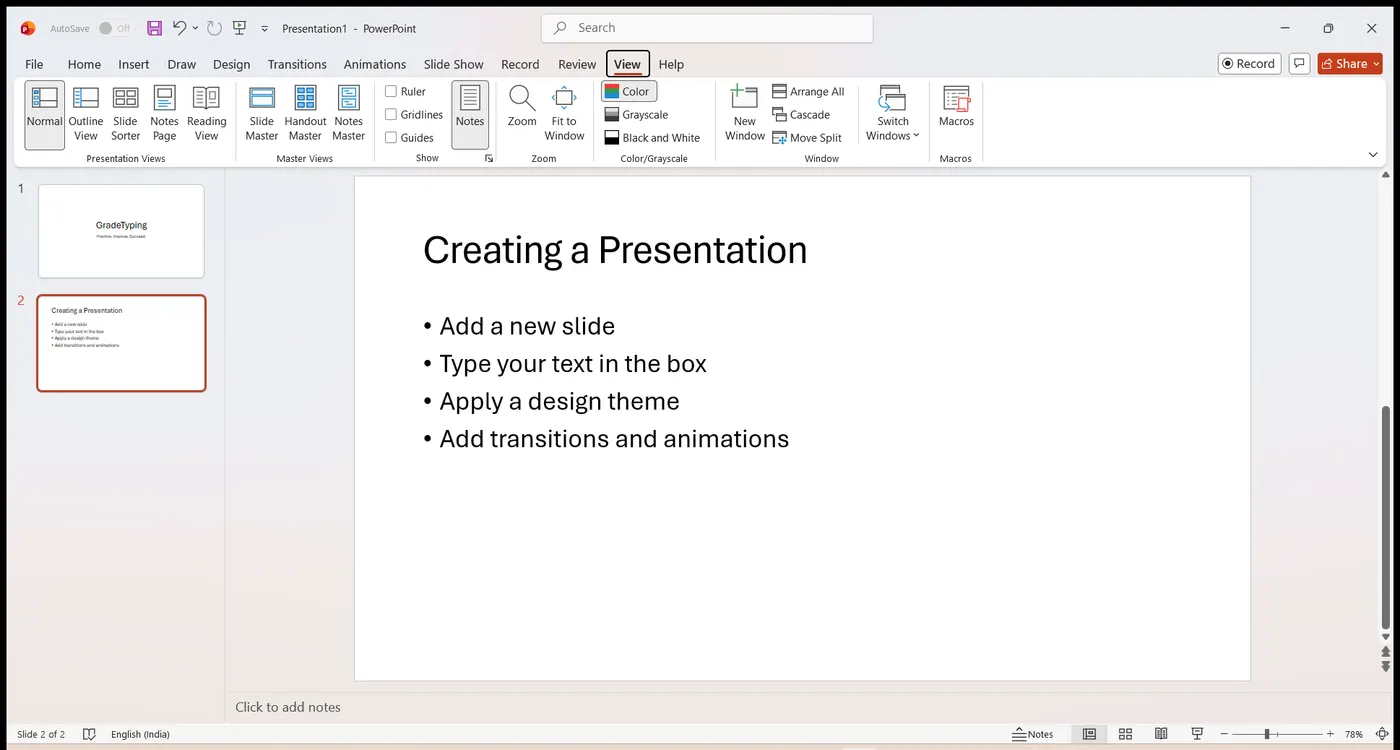
A Hyperlink can be inserted into a PowerPoint presentation, and a presentation page created for displaying on the screen is itself known as a slide.
Key Facts & Shortcuts
Must-remember facts
| File extension | .pptx | Old extension | .ppt |
| Default file name | Presentation1 | PPT means | PowerPoint Presentation |
| Title placeholder font | 44 pt | Default body text | 32 pt |
| Number of layouts | 9 | Number of views | 4 |
| Default view | Normal | Default orientation | Landscape |
| Maximum zoom | 400% | "Print-like" zoom | 125% |
| Changes for all slides | Slide Master | WMF means | Windows Meta File |
Keyboard shortcuts
| Keys | Action | Keys | Action |
|---|---|---|---|
| Ctrl + M | Insert a new slide | F5 | Run the slide show |
| Ctrl + I | Italic text | Esc | Quit the slide show |
| Page Up | Previous slide | Page Down | Next slide |
| F1 | Slide-show Help dialog | Ctrl + Z | Undo last action |
Where common commands live
- New Slide, Layout → Home > Slides · Text Colour, Shadow → Home > Font · Line Spacing, bullets → Home > Paragraph · Arrange → Home > Drawing
- Tables, Picture, Video, Slide Number, Text Box, Header & Footer, WordArt, Date & Time, Object → Insert (Text group) · Themes, Format Background, Slide Orientation, Page Setup / Slide Size → Design
- Rehearse Timings, Broadcast, From Beginning → Slide Show · Spelling, Comments, Translate → Review · Ruler, Gridlines, Guides, Presentation Views → View
Exam Question Bank
These objective questions are frequently asked in GCC-TBC and computer exams. Revise with the answer beside each question. All 103 questions from the source question bank are reproduced here.
| # | Question | Answer |
|---|---|---|
| 1 | In PowerPoint, the ___ command is used for closing the PowerPoint application. | Exit |
| 2 | Italic effect is given to text using the ___ shortcut key. | Ctrl + I |
| 3 | There is no difference between an effect and an animation effect in PowerPoint. | False |
| 4 | Design & Layout themes are given to slides according to the template selected. | True |
| 5 | Changes made in the ___ are applied to all slides. | Slide Master |
| 6 | The Broadcast Slide Show option is available under the ___ ribbon. | Slide Show |
| 7 | To add a copy of the current slide, the ___ command is used. | Duplicate Slide |
| 8 | To change a slide layout, the ___ option is selected on the Home tab Slides group. | Layout |
| 9 | Presentation files are made with which type of software? | Presentation Graphics Programs |
| 10 | A video file is inserted in a slide through ___ | Insert Tab > Media Group > Video |
| 11 | Slide Views are available in which group of the View tab? | Presentation (Views) |
| 12 | The dotted-border boxes for inserting text / picture / object are called ___ | Placeholder |
| 13 | By default, the font size of the Title text box of a Title Slide is ___ | 44 |
| 14 | If a slide gets full while typing, a new slide ___ be inserted. | will not |
| 15 | By default, the orientation of a slide is ___ | Landscape |
| 16 | Click the ___ option in the Slides group of the Home tab to create a new slide. | New Slide |
| 17 | On a Title Slide, the default font size of the Title placeholder is ___ | 44 |
| 18 | To open an existing presentation, click the File menu ___ option. | Open |
| 19 | How many views are there that let you look at your presentation? | 4 |
| 20 | To change the layout of an inserted slide, click ___ | Home Tab > Slides Group > Layout |
| 21 | When you press Enter, bullets are provided automatically to each line, in the ___ type slide. | Title |
| 22 | In general, when the zoom is ___ it is similar to the print. | 125 percent |
| 23 | The Exit command will close all open presentations. | True |
| 24 | In PowerPoint, the Page Setup command is available in ___ | Design |
| 25 | Use the ___ function key to run the slide show. | F5 |
| 26 | Spelling and grammar in slides are corrected using ___ | Review > Proofing > Spelling |
Exam Question Bank (cont.)
| # | Question | Answer |
|---|---|---|
| 27 | Which are entrance animation effects in PowerPoint? | All of the above |
| 28 | To select a placeholder box, bring the mouse pointer on it and ___ on it. | Click |
| 29 | At the right-hand side of the Status bar, we can see the ___ | None of the above |
| 30 | The Rehearse Timing option is available under the ___ ribbon. | Slide Show |
| 31 | The file name is displayed at the ___ in PowerPoint. | Title Bar |
| 32 | .pptx is the extension of PowerPoint. | True |
| 33 | WMF means ___ | Windows Meta File |
| 34 | To insert a slide, the shortcut key ___ can be pressed. | Ctrl + M |
| 35 | Frequently used commands like New, Save, Undo, Redo are present on the Quick Access Toolbar. | True |
| 36 | The Outline View in Word and the Outline View in PowerPoint work similarly. | True |
| 37 | We can change the slide background of only one slide. | False |
| 38 | To move from one view to another, use the ___ at the left of the Horizontal Scroll Bar. | View Buttons |
| 39 | The Guides command is chosen on the ___ tab to display guides. | View |
| 40 | To go to the previous slide, press the ___ key. | Pg Up |
| 41 | To insert pictures on a slide, use the Picture command on the ___ tab. | Insert |
| 42 | Changes made in the ___ are applied to all slides. | Slide Master |
| 43 | The Line Spacing command is available in the ___ group. | Paragraph |
| 44 | The file in which slides made from PowerPoint are stored is known as a ___ file. | Presentation |
| 45 | The Arrange command is available in the ___ group. | Drawing |
| 46 | We can quit a slide show after clicking the ___ key on the keyboard. | Esc |
| 47 | You can press ___ keys to navigate in a slide show. | Both A and B (Page Up & Page Down) |
| 48 | In ___ we can see all the slides in the presentation in thumbnail view. | Slides Pane & Slide Sorter |
| 49 | The components of a slide are ___ | All of the above |
| 50 | The Animation Pane is displayed when we click ___ | Animations > Advanced Animation > Animation Pane |
| 51 | We can see an object in a big size using the ___ command. | Zoom In |
| 52 | We can see an object in a big size using the ___ command. | Zoom In |
| 53 | In PowerPoint, there are a total of ___ layouts in the New Slides button. | 9 |
| 54 | You can save the timing to run the show automatically by using ___ | Rehearse Timing |
Exam Question Bank (cont.)
| # | Question | Answer |
|---|---|---|
| 55 | To see the prepared slides one by one on screen (video presentation) is called ___ | Slide Show |
| 56 | ___ is the PowerPoint file extension. | .pptx |
| 57 | You can create a presentation in MS PowerPoint. | True |
| 58 | In MS Office applications, a presentation can only be created in PowerPoint. | True |
| 59 | We can apply Design Themes to one slide out of all the slides. | False |
| 60 | We can see an object in a small size using the ___ command. | Zoom Out |
| 61 | In a slide show, which menu/command is not available? | Background |
| 62 | Hyperlinks can be inserted in a PowerPoint presentation. | True |
| 63 | In ___ view, all slides are displayed in small size like thumbnails. | Slide Sorter |
| 64 | ___ are ready-to-use slides with readymade designs. | Template |
| 65 | To start a slide show, which option is used? | All of the Above |
| 66 | A slide show can be prepared from the ___ application. | PowerPoint |
| 67 | You can insert a graph in an MS PowerPoint file. | True |
| 68 | What is PPT? | PowerPoint Presentation |
| 69 | PPT files are made in which type of software? | Presentation Graphics Programs |
| 70 | To give a number to each slide, use the ___ command in Insert menu > Text group. | Slide Number |
| 71 | The Translate tool is available under the ___ ribbon. | Review |
| 72 | The Comment option is available under the ___ ribbon. | Review |
| 73 | The default font size of text in MS PowerPoint is ___ | 32 pt |
| 74 | The Notes Page view is used to ___ | prepare speaker notes for the audience |
| 75 | The Ruler command is chosen on the ___ tab to display the ruler line. | View |
| 76 | Text Box / Header & Footer / WordArt / Date & Time / Slide Number / Object are in the ___ group of the Insert tab. | Text |
| 77 | The default name of a presentation is ___ | Presentation 1 |
| 78 | Selected text can be coloured with the ___ command in the Font group of the Home tab. | Text Colour |
| 79 | The Slide Orientation command is available on the ___ tab. | Design |
| 80 | A strip having Tabs, Groups and their commands is called the ___ | Ribbon |
Exam Question Bank (cont.)
| # | Question | Answer |
|---|---|---|
| 81 | To move from one view to another, use the ___ placed at the left of the Horizontal Scroll Bar. | View Buttons |
| 82 | By pressing the ___ key, we can stop a running slide show. | Escape |
| 83 | Select the heading and click the ___ button in the Font group of the Home tab to give a shadow to text. | Shadow |
| 84 | In ___ we can do a rehearsal of the time required for each slide. | Rehearse Timing |
| 85 | Below the Slide Pane there is the ___ where we can type some notes about the current slide. | Notes Pane |
| 86 | ___ are transitions available in MS-PowerPoint. | All of the Above |
| 87 | The shortcut key for the Copy command in PowerPoint is ___ | None of the above |
| 88 | The default file name of PowerPoint is ___ | Presentation 1 |
| 89 | We can see an object in a small size using the ___ command. | Zoom Out |
| 90 | The default dotted boxes on a blank slide for inserting text, picture and objects are called ___ | Place Holder |
| 91 | When you click into the Title Text box, only commands in the Font and Paragraph groups are highlighted. | True |
| 92 | "Fly from left bottom" is a/an ___ effect. | Animation |
| 93 | Blank-slide dotted boxes for inserting text, picture and objects are called ___ | Place Holder |
| 94 | We can apply colours and colour effects to the slide background using a ___ | Design Theme |
| 95 | Various transition effects are given in the group ___ | Transition to This Slide |
| 96 | When you press Enter, bullets are provided automatically to each line, in the ___ type slide. | Bulleted List |
| 97 | The Background command group is on the ___ tab. | Design |
| 98 | If you make changes in the ___, the changes apply to the whole presentation. | Slide Master |
| 99 | To create a new presentation, click the File menu ___ option. | New |
| 100 | The ___ option is used to see the slide show at a particular time interval. | Rehearse Time |
| 101 | Which is the default view in PowerPoint? | Normal |
| 102 | A presentation page created for displaying on the screen is known as a 'Slide'. | True |
| 103 | The Tables command is available on the ___ tab in PowerPoint. | Insert |
Chapter Mind Map
One-glance revision of the whole chapter — follow each branch to recall the key points.
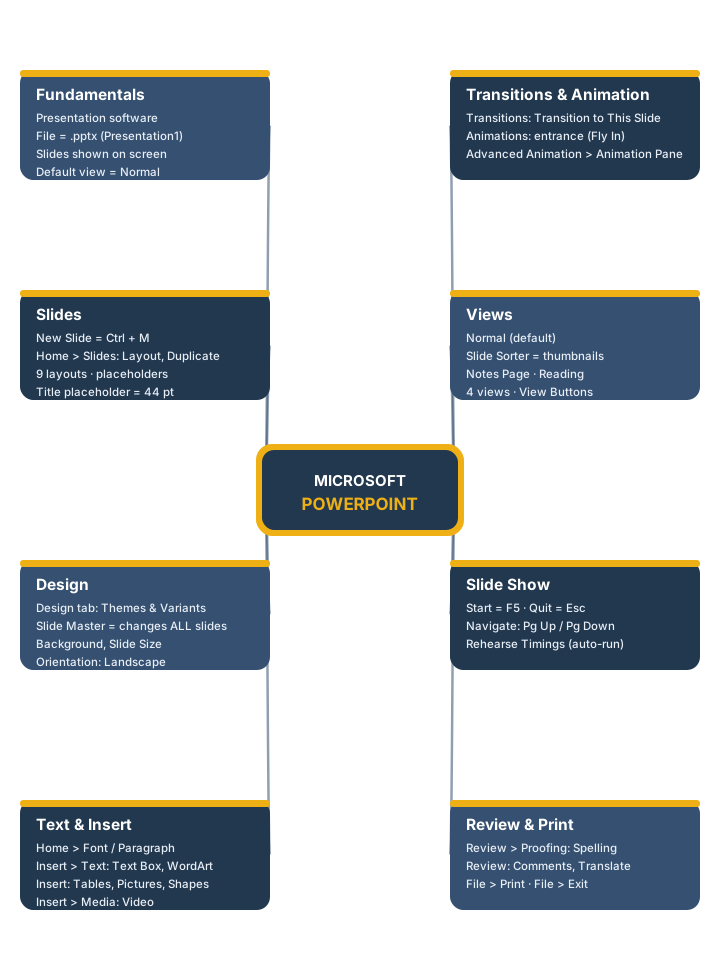
Image Credits
All screenshots in this book were captured from Microsoft PowerPoint running on Microsoft Windows, and were prepared by the GradeTyping editorial team specifically for these training notes. They are reproduced here for educational purposes to illustrate the features described in the text. Microsoft, Windows, Office and PowerPoint are trademarks of Microsoft Corporation.
| Figure | Shows | Source |
|---|---|---|
| ppt_home.png | PowerPoint window & Home tab | PowerPoint — captured by GradeTyping |
| ppt_insert.png | Insert tab (Tables, Images, Illustrations, Text, Media) | PowerPoint — captured by GradeTyping |
| ppt_design.png | Design tab (Themes, Variants, Customize) | PowerPoint — captured by GradeTyping |
| ppt_transitions.png | Transitions tab & Timing group | PowerPoint — captured by GradeTyping |
| ppt_animations.png | Animations tab & Animation Pane | PowerPoint — captured by GradeTyping |
| ppt_view.png | View tab (Presentation Views, Show) | PowerPoint — captured by GradeTyping |
| ppt_slideshow.png | Slide Show tab & Rehearse Timings | PowerPoint — captured by GradeTyping |
| ppt_slidesorter.png | Slide Sorter view (thumbnails) | PowerPoint — captured by GradeTyping |
| ppt_print.png | File > Print Backstage view | PowerPoint — captured by GradeTyping |
The GradeTyping logo, mind-map and page watermark are original vector artwork created in-house for the GradeTyping Practice. Improve. Succeed. series.