
What is Microsoft Windows?
Microsoft Windows, usually called simply Windows, is not a single program but a whole group of proprietary graphical operating-system families, every one of which is developed and marketed by the Microsoft corporation. Each family in this group is aimed at a particular sector of the computing industry — there are editions tuned for home users, for businesses, for servers and for tablets — yet all of them share the same fundamental idea of letting a person operate a computer through pictures rather than typed commands.
Windows did not begin as a complete operating system. Microsoft first introduced an operating environment named Windows on 20 November 1985, releasing it as a graphical operating-system shell that sat on top of the older, text-only MS-DOS. The company built it in direct response to the rapidly growing public interest in graphical user interfaces (GUIs) — the new style of computing in which the screen shows windows, icons and menus that you point at and click, instead of a blank prompt waiting for typed instructions.
An operating system (OS) is the most important software on a computer. It allows the computer to manage all of its other software and to perform its essential tasks — running programs, handling files, controlling the screen, keyboard and other hardware.
Introduction to Windows 7
Windows 7 is an operating system that Microsoft produced specifically for use on personal computers. It is the direct follow-up to the Windows Vista operating system, which Microsoft had released in 2006. Like every member of the Windows family, Windows 7 performs the two great duties of an operating system at the same time. First, as an operating system it allows the computer to manage software and carry out its essential tasks. Second, it is also a Graphical User Interface (GUI), which means it lets us visually interact with the computer's functions in a way that is logical, enjoyable and easy to learn.
Starting the computer — the Welcome Screen
When the power is switched on, Windows starts up automatically. If the PC is a shared computer used by more than one person, or it belongs to a single user but is protected by a password, Windows first presents a Welcome (sign-in) screen where you choose your account and, if required, type your password. Only after signing in do you reach the main work area — the Desktop — described next. The original manual illustrates three such cases (the full desktop with all of its parts labelled, a Welcome screen for a computer with several user accounts, and a Welcome screen for a computer with just one user).
The Desktop & its Parts
The Desktop is the very first screen that appears after we turn on the power of the computer (and sign in). It is the main Windows 7 screen — the central work area in which dialog boxes, windows, icons and menus appear.
The designers of Windows deliberately modelled this area on a real office desk. Just as an office desk holds the items you need to do your job, the Windows 7 desktop contains the tools, shortcuts and icons you reach for most often. From the desktop you can perform file-management tasks — such as opening folders or moving files — and you can run software applications. You are also free to customize the appearance of the desktop to suit your own preferences, for example by changing its background picture or rearranging its icons.
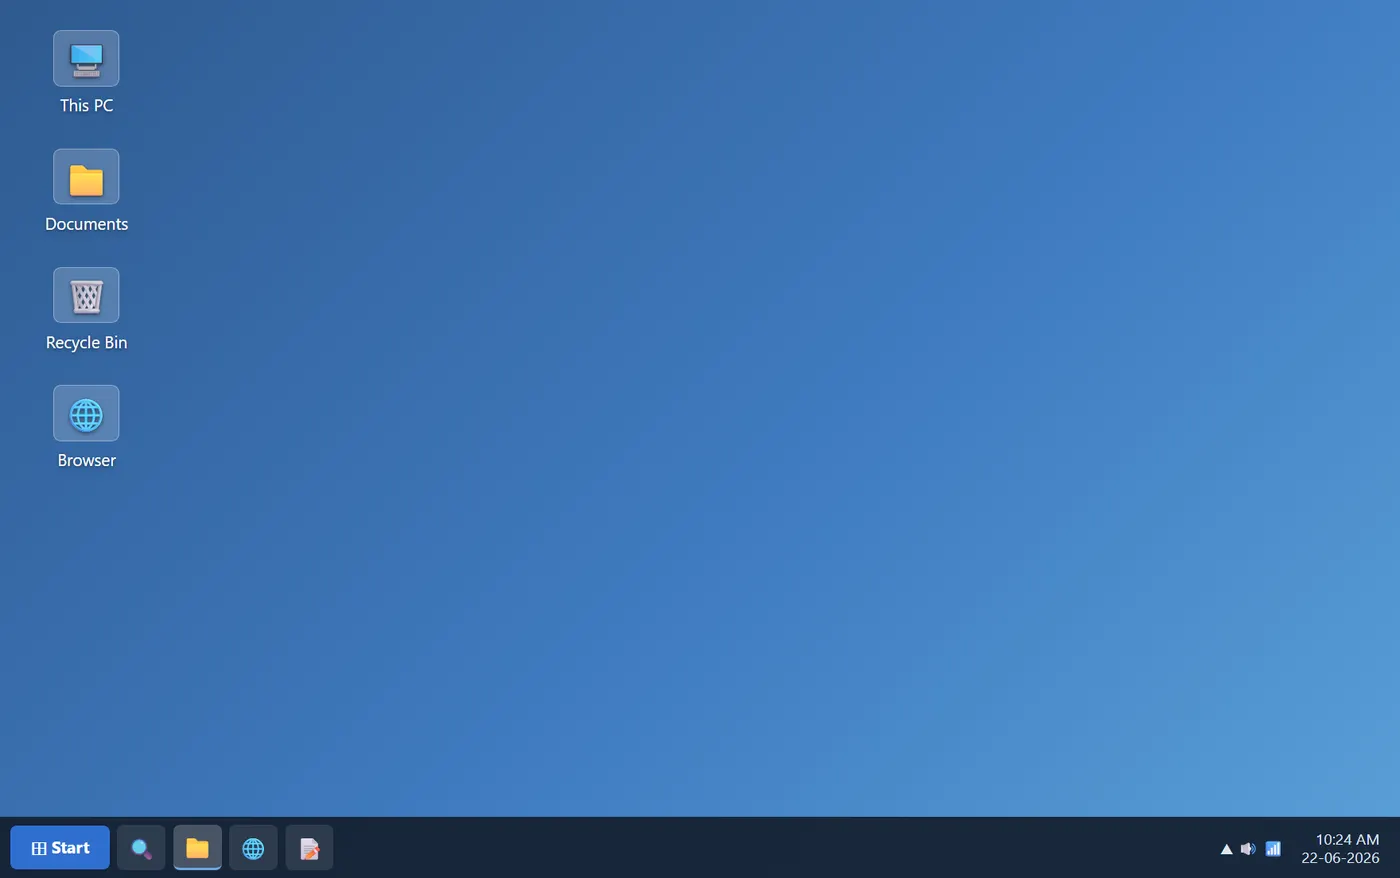
The main parts of the desktop
- Desktop Icons & Shortcuts — the small pictures scattered across the desktop that stand for your programs, folders and files.
- Taskbar — the long horizontal bar that normally runs along the bottom of the screen. It shows the buttons of your open windows and your pinned apps.
- Start Button — found at the left end of the taskbar; clicking it opens the Start Menu, the gateway to the whole computer.
- Notification Area — at the right end of the taskbar; it displays the clock, the sound and network icons and other small status indicators.
Desktop Icons
An icon is a graphic image — a small picture or object — that represents a file, a program, a web page or a command. Icons help us to execute commands and open programs or documents quickly. To carry out a command using an icon we simply click or double-click it. Icons are also useful for recognising an object quickly in a list, such as a browser list.
The Desktop is where we find icons for many of our most frequently used programs. On a typical Windows 7 computer we are most likely to see icons for Computer, Documents, the Recycle Bin and a web browser. Each of these is explained below.
The common desktop icons
- This PC (My Computer) — allows us to explore the contents of the computer's drives and to manage the computer's files. Once it is open, it shows all of the drives available on the machine. For most users the one that matters is the Local Disk (C:) drive — the hard drive that stores all your files. My Computer also lets us see exactly which drives are attached to the computer: the local hard disk drive, the CD/DVD drives, any networked shared drives, and external drives such as a USB flash drive (pen drive). We can then open any of these drives and view the files stored on them.
- Documents — supplies a "catch-all" place for our personal files. Inside it we can keep our own files, see any shared files belonging to other users of the computer, and store music or pictures. The Documents folder is sometimes labelled with our own name instead of the word "Documents."
- Recycle Bin — a special location (a folder) where deleted files are temporarily stored. Its job is to let us recover files that have been deleted; it holds on to everything we delete until we choose to empty it.
- Browser (e.g. Internet Explorer) — contains Windows' built-in web browser, which integrates with other Windows components such as your folders and your Documents, so you can move smoothly between the web and your own files.
Files, Folders & Shortcuts
Everything stored on our hard drive — every photo, document and program — exists as one of two things: files and folders. The basic difference between the two is straightforward but important: files store data, while folders store files and other folders.
A folder, often referred to as a directory, is used to organize the files on our computer. Folders can hold both files and further folders nested inside them. The folders themselves take up virtually no space on the hard drive — they are simply containers that keep our work tidy.
A file is a collection of data stored in one unit and identified by a filename. A file name is made of two parts — the name and the extension — separated by a full stop (period), for example Notes.docx, where Notes is the name and .docx is the extension that tells Windows what kind of file it is. Files can range in size from a few bytes to several gigabytes, and they can be documents, programs, libraries and many other compilations of data.
Shortcuts
A shortcut is a link that points to a program (or file) on the computer. Shortcuts let users create links to their programs in any folder, on the Start bar, the Taskbar, the Desktop or other locations. A shortcut in Windows is commonly identified by a small arrow in the bottom corner of the icon.
Because a shortcut is only a link, deleting it never deletes the real program it points to — you are merely removing the convenient pointer, while the original file stays safely in its true location. This is why the same program can have shortcuts in several places at once.
Operations on Desktop Icons
Windows gives us several ways to arrange and tidy the icons that sit on the desktop. Every one of these operations begins the same way — by right-clicking an empty part of the desktop to open its shortcut menu.
A. Arranging icons on the desktop
To change the order in which icons are arranged on the desktop:
- Right-click an empty area of the desktop.
- Click Sort by.
- From the sub-menu, select one of the options for arranging the icons — for example by Name, Size, Item type or Date modified.
B. View / Hide icons
- Right-click the desktop.
- Click View.
- Check whether Show desktop icons (and Auto Arrange) has a check mark beside it.
- If it does and you want to hide the icons, click it to remove the check mark.
C. Change icon size
- Right-click the desktop.
- Click View.
- Choose the required size — Large icons, Medium icons or Small icons.
D. Auto Arrange icons
- Right-click the desktop.
- Click View.
- Check whether Auto Arrange icons has a check mark — when it is on, Windows lines the icons up automatically into a neat grid.
- If it does and you want to position icons freely, click it to remove the check mark.
The Start Menu
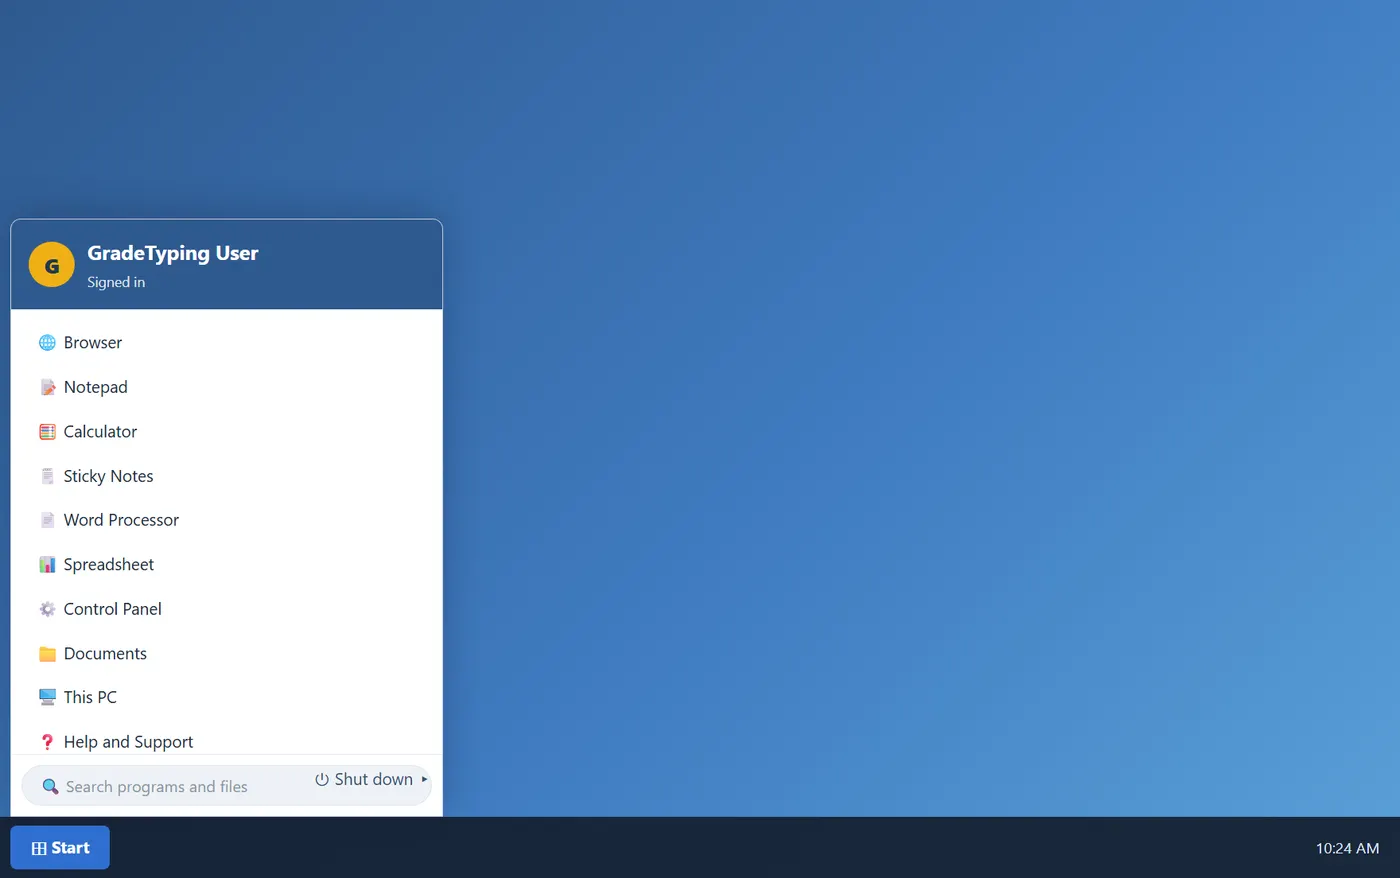
The Start Menu for Windows 7 is made up of many parts, and it opens from the Start button at the left end of the taskbar. It is the principal gateway to almost everything the computer can do. We use the Start menu to carry out the following common activities:
- Start programs — launch any application installed on the computer.
- Open commonly used folders — such as Documents, Pictures or Music.
- Search for files, folders and programs — using the search box at the bottom of the menu.
- Adjust computer settings — reach the Control Panel and other configuration tools.
- Get help with the Windows operating system.
- Turn off the computer.
- Log off from Windows or switch to a different user account.
Shutting Down & Power Options
At the bottom of the right-hand pane of the Start menu sits the Shut down button. Clicking it turns off your computer completely. Clicking the small arrow next to the Shut down button opens a menu with additional choices — for switching users, logging off, locking, restarting or putting the computer to sleep. Each of these is explained below.
The power options explained
- Shut down — saves nothing further and turns the computer off completely.
- Switch user — if there is more than one user account on the computer, Fast User Switching is an easy way for another person to log on without logging you off or closing your programs and files. Your work simply waits in the background until you return.
- Log off — when we log off from Windows, all of the programs we were using are closed, but the computer is not turned off. The sign-in screen reappears, ready for the next person.
- Lock — locking the PC is a good option if you'll be back soon. You will have to enter your password when you come back, which helps keep your work more secure while you are away. Your programs keep running, hidden behind the lock screen.
- Restart — the Restart button "reboots" the computer; this is sometimes called a "warm boot" or "soft boot." It saves your information to the hard drive, turns the computer off for a moment, and then turns it back on again.
- Sleep — clicking Sleep puts the computer into a low-power state but does not turn it off. Its main advantage is that it lets us get back to work quickly, without having to wait for the computer to perform a full reboot.
Working with a Window — its Parts
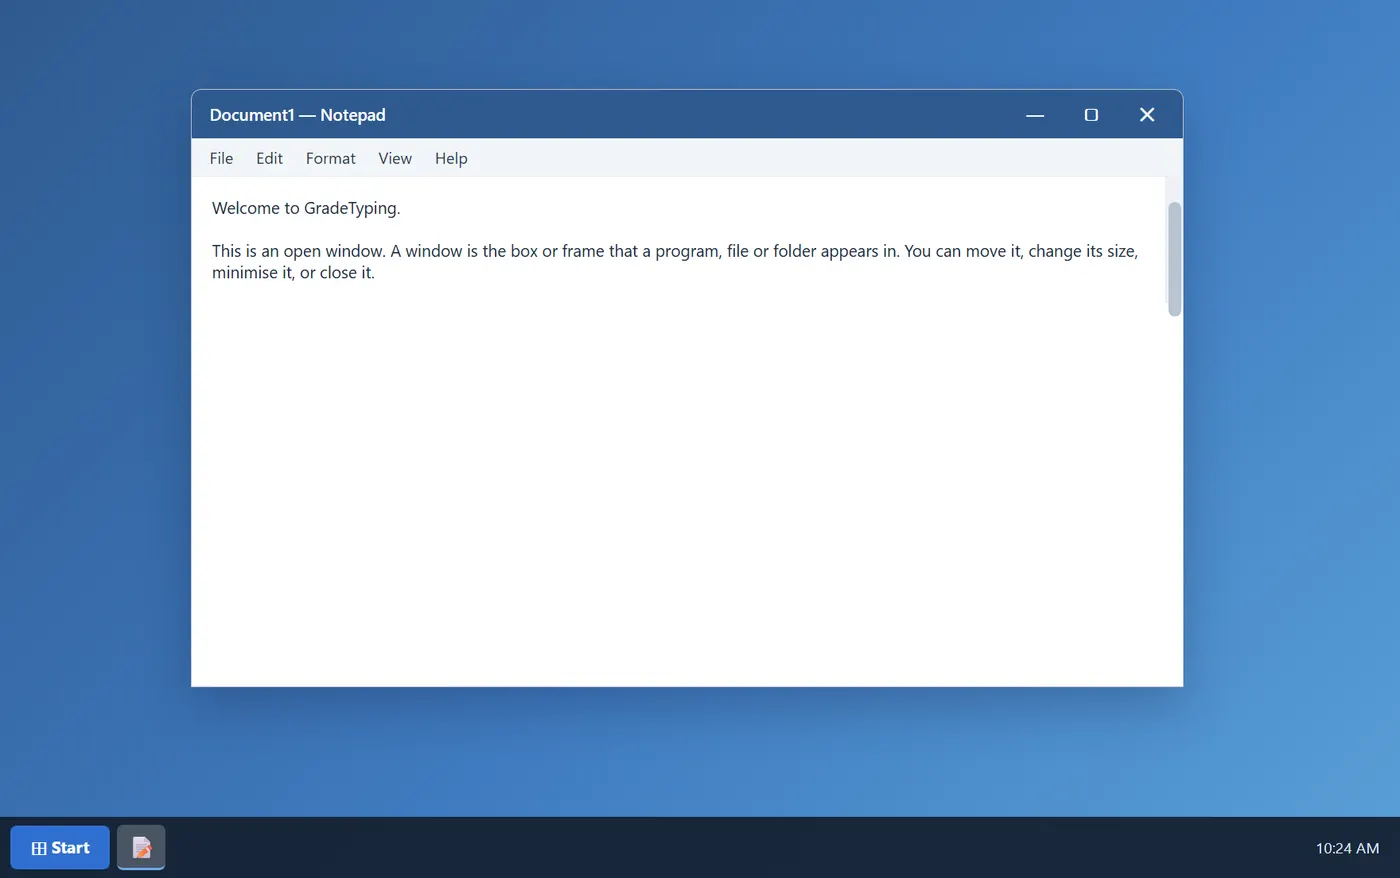
Whenever we open a program, a file or a folder, it appears on our screen inside a box or frame called a window — and it is from these windows that the whole operating system takes its name, Windows. Because windows are everywhere in Windows, it is important to understand how to move them, change their size, or simply make them go away.
Although the contents of every window are different, all windows share certain things in common. For one thing, windows always appear on the desktop — the main work area of our screen. In addition, most windows have the same basic parts, listed below.
- Title Bar — runs along the top and displays the name of the document and the program (or the folder name, if you are working in a folder).
- Minimize, Maximize and Close buttons — these three buttons respectively hide the window, enlarge it to fill the whole screen, and close it.
- Menu Bar — contains items (such as File, Edit and View) that we can click to make choices in a program.
- Scroll Bar — lets us scroll the contents of the window up, down or sideways to see information that is currently out of view.
- Borders and Corners — we can drag these with the mouse pointer to change the size of the window.
Moving, Sizing & Closing a Window
Moving a window
To move a window, point to its title bar with the mouse pointer and then drag the window to the location you want.
Dragging means pointing to an item, holding down the mouse button, moving the item with the pointer, and then releasing the mouse button.
Changing the size of a window
- To make a window fill the entire screen, click its Maximize button or double-click the window's title bar.
- To return a maximized window to its former size, click its Restore button (which takes the place of the Maximize button), or again double-click the title bar.
- To resize a window (make it smaller or bigger), point to any of the window's borders or corners. When the mouse pointer changes into a two-headed arrow, drag the border or corner to shrink or enlarge the window.
Hiding a window (minimizing)
Hiding a window is called minimizing it. If we want to get a window out of the way temporarily without closing it, we minimize it. To minimize a window, click its Minimize button: the window disappears from the desktop and remains visible only as a button on the taskbar — the long horizontal bar at the bottom of the screen. To make a minimized window appear again on the desktop, click its taskbar button, and it returns exactly as it was before we minimized it.
Closing a window
Closing a window removes it from both the desktop and the taskbar. When we have finished with a program or document and do not need to return to it right away, we should close it. To close a window, click its Close button. If we close a document without saving the changes we made, a message appears giving us the option to save those changes first.
Switching Between Windows
If we open more than one program or document, our desktop can quickly become cluttered with windows. Keeping track of which windows we have open is not always easy, because some windows might partially or completely cover others. Windows 7 gives us three convenient ways to find and switch between them.
Using the taskbar
The taskbar provides a way to organize all of our windows. Each open window has a corresponding button on the taskbar. To switch to another window, we simply click its taskbar button: that window then appears in front of all the others, becoming the active window — the one we are currently working in. To identify a window easily, point to its taskbar button. When we do, we see a thumbnail-sized preview of the window, whether its content is a document, a photo or even a running video. This preview is especially useful when we cannot identify a window by its title alone.
Using Alt + Tab
We can switch to the previous window by pressing Alt + Tab. To cycle through all of the open windows and the desktop, hold down Alt and repeatedly press Tab; release the Alt key to display the window we have selected.
Using Aero Flip 3D
Aero Flip 3D arranges our windows in a three-dimensional stack that we can quickly flip through. To use Flip 3D, hold down the Windows logo key and press Tab to open it.
Dialog boxes
A dialog box is a special type of window that asks us a question, allows us to select options to perform a task, or provides us with information. We often see dialog boxes when a program or Windows needs a response from us before it can continue. Unlike regular windows, most dialog boxes cannot be maximized, minimized or resized — but they can be moved.
Understanding the Folder Window
When we open a folder or a library, we see it in a window. The various parts of this window are designed to help us navigate around Windows and work with files, folders and libraries more easily. The following is a typical folder window (also called a File Explorer window) and each of its parts.
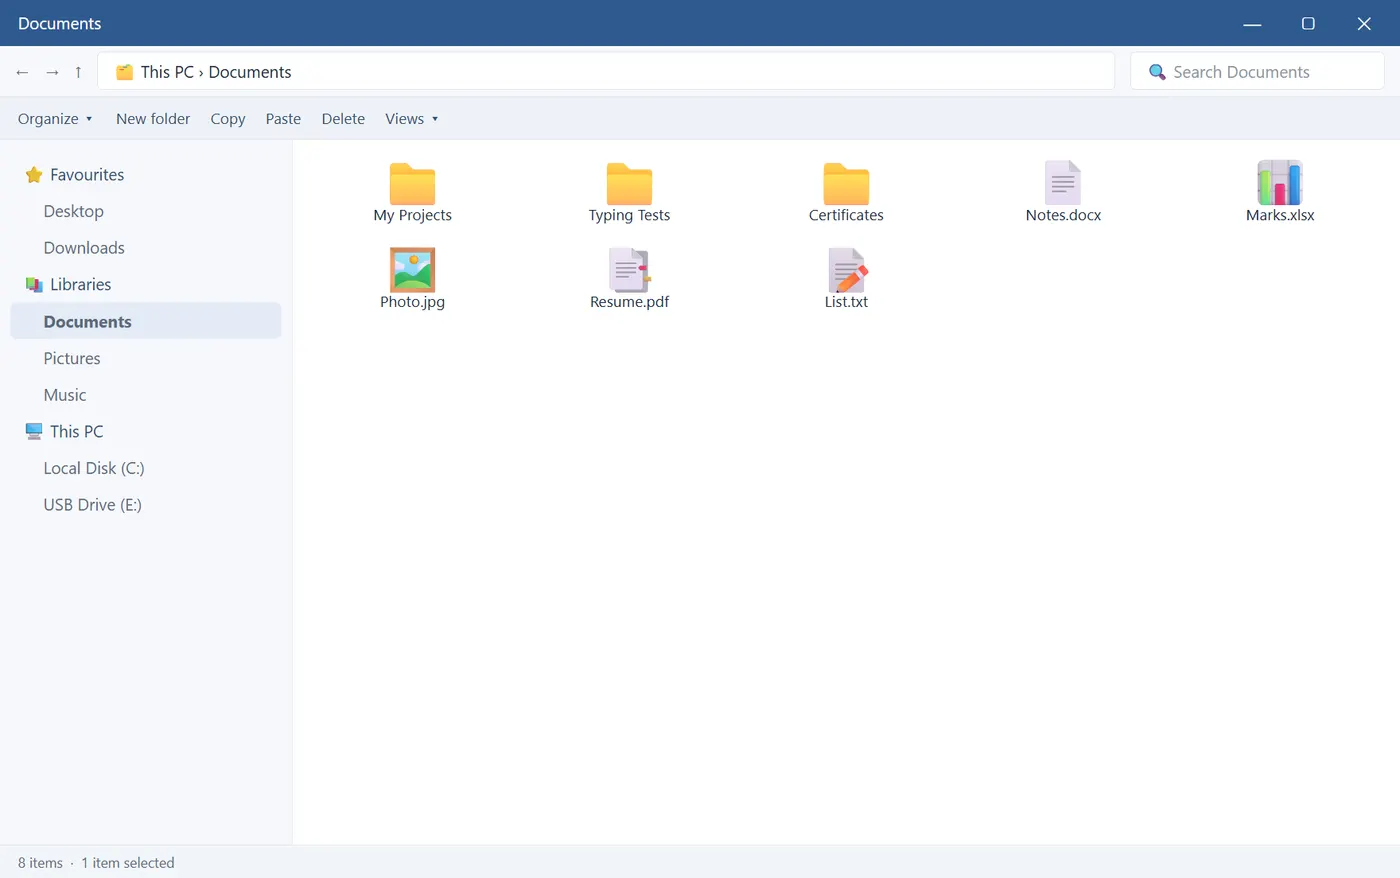
- Navigation pane — used to access libraries, folders, saved searches and even entire hard disks. The Favourites section opens our most commonly used folders and searches; the Libraries section accesses our libraries; and we can expand Computer to browse folders and subfolders.
- Back and Forward buttons — used to navigate to other folders or libraries we have already opened, without closing the current window. They work together with the address bar.
- Toolbar — used to perform common tasks such as changing the appearance of our files and folders, burning files to a CD, or starting a digital picture slide show. Its buttons change to show only the tasks that are relevant at the moment.
- Address bar — used to navigate to a different folder or library, or to go back to a previous one.
- Library pane — appears only when we are in a library (such as the Documents library). We use it to customize the library or to arrange the files by different properties.
- Column headings — used to change how the files in the file list are organized. Clicking the left side of a column heading changes the order in which files and folders are displayed; clicking the right side filters the files in different ways. (Column headings are available only in Details view.)
- File list — where the contents of the current folder or library are displayed. If we type in the search box, only the files that match our current view — including files in subfolders — will appear here.
Views, Panes & Selecting Files
- Search box — if we type a word or phrase here, Windows looks for an item in the current folder or library. The search begins as soon as we begin typing; so if we type "V", for example, all the files whose names start with the letter V will appear in the file list.
- Details pane — used to see the most common properties associated with the selected file. File properties are pieces of information about a file, such as its author, the date we last changed it, and any descriptive tags we may have added.
- Preview pane — used to see the contents of most files. If we select an e-mail message, a text file or a picture, we can see its contents without opening it in a program. If the preview pane is not visible, click the Preview pane button in the toolbar to turn it on.
Viewing and arranging files and folders
When we open a folder or library we can change how the files look in the window — we might prefer larger or smaller icons, or a view that lets us see different kinds of information about each file. To make these changes we use the Views button in the toolbar. Each time we click the left side of the Views button it changes the display by cycling through five different views:
- Large Icons — big thumbnails of each file.
- List — a simple list of file names.
- Details — shows several columns of information about each file.
- Tiles — a smaller icon view.
- Content — shows some of the content from within each file.
If we click the arrow on the right side of the Views button, we get more choices. We can move the slider up or down to fine-tune the size of the file and folder icons, watching the icons change size as we move it.
Selecting files and folders
- A single object — to select one object, click it once.
- A consecutive group — click the first item, press and hold Shift, then click the last item.
- Items near each other — drag the mouse pointer to create a selection box around the outside of all the items you want to include.
- Non-consecutive items — press and hold Ctrl and then click each item you want to select.
- All items in a window — on the toolbar, click Organize → Select all (or press Ctrl + A). To exclude one or more items, hold Ctrl and click them.
Renaming, Copying & Moving
Renaming a file or folder
- Click the file or folder to select it.
- Click the Organize button on the toolbar, then click Rename.
- With the name highlighted, type a new name (or click to position the insertion point, then edit the existing name).
- Press Enter.
Copying a file or folder
When we copy an item, the original item remains in its original location and we get a new copy as well. To copy an item:
- Open the location that contains the file you want to copy.
- Right-click the file, then click Copy.
- Open the location where you want to store the copy.
- Right-click an empty space within that location, then click Paste. The copy of the original file is now stored in the new location.
Moving (cutting) a file or folder
Moving a file or folder is different from copying it. Moving cuts the item from its previous location and places it in a new location, whereas copying leaves the original where it was and creates a duplicate elsewhere. In other words, when we copy something we end up with two of it; when we move something, we still have only one.
- Open the drive or folder containing the file or folder you want to move.
- Select the files or folders you want to move.
- Click the Organize button on the toolbar, then click Cut.
- Display the destination folder, then click Organize → Paste.
Drag & Drop · Creating Folders
Copying or moving a file using drag and drop
- Open the drive or folder containing the file or folder you want to copy or move.
- Select the files or folders you want to copy or move.
- In the Navigation pane, point to a folder list to display the expand and collapse arrows.
- Click the arrows to display the destination folder, then click the destination folder.
- Right-click the selected files or folders, drag them to the destination folder, then click Copy Here or Move Here.
Creating a new folder
- Open the drive or folder where you want to create a folder.
- Click the New folder button on the toolbar.
- With the words "New Folder" selected, type a new name and press Enter.
Deleting & the Recycle Bin
Deleting a file or folder
- Select the file or folder.
- Click the Organize button and select Delete from the pull-down menu.
- After you choose Delete, a confirmation message appears.
When we delete a file or folder from our hard disk, it is not deleted right away. Instead it is stored in the Recycle Bin until the Recycle Bin is emptied. If we delete a file or folder from a network folder or from a USB flash drive, it might be permanently deleted rather than being stored in the Recycle Bin. If a file cannot be deleted, it might be in use by a program that is currently running — try closing the program or restarting the computer to fix the problem.
Permanently deleting files from the Recycle Bin
When we delete a file it is usually moved to the Recycle Bin so that we can restore it later if necessary. To permanently remove files and reclaim the hard-disk space they were using, we must delete them from the Recycle Bin itself. We can delete individual files or empty the entire bin at once.
- Open the Recycle Bin by double-clicking it on the desktop.
- Then do one of the following: to permanently delete one file, click it, press Delete and click Yes; or to delete all of the files, on the toolbar click Empty the Recycle Bin and click Yes.
Restoring an item from the Recycle Bin
- Open the Recycle Bin by double-clicking it on the desktop.
- To restore one file, click it and then, on the toolbar, click Restore this item; to restore everything, make sure no files are selected and click Restore all items. The files are restored to their original locations on the computer.
Opening & Searching for Files
Opening an existing file or folder
To open a file, simply double-click it. The file will usually open in the program that we used to create or change it. For example, a text file will open in our word-processing program, while a picture will open in a photo viewer.
Searching for a file or folder
Windows provides several ways to find files and folders, and there isn't one single best way — we can use different methods for different situations.
- We can use the search box on the Start menu to find files, folders, programs and e-mail messages stored on our computer. Click the Start button and then type a word, or part of a word, in the search box.
- Search results appear as soon as we start typing: the items that match our text appear on the Start menu. These results are based on text in the file name, text inside the file, tags, and other file properties.
- The easiest way to start a search window is to press F3.
- If we know which file type it is, we can simply enter the file extension (for example "JPG") in the search box to find all such files.
- We can also use other techniques to narrow a search quickly. If we are searching for a file based on one or more of its properties (such as a tag or the date it was last modified), we can use search filters to specify the property, or type extra keywords in the search box to narrow the results even further.
The Control Panel
We use the Control Panel to change the settings for Windows. These settings control nearly everything about how Windows looks and works, and we use them to set Windows up the way we want. We can open the Control Panel by clicking the Start button and then clicking Control Panel. There are two ways to find items inside the Control Panel:
- Use search — to find a setting we are interested in or a task we want to perform, type a word or phrase in the search box. For example, type "sound" to find specific settings for our sound card, the system sounds, and the volume icon on the taskbar.
- Browse — explore the Control Panel by clicking the different categories (for example, System and Security, Programs, or Ease of Access) and viewing the common tasks listed under each. Alternatively, under View by, click either Large icons or Small icons to view a single list of all Control Panel items.
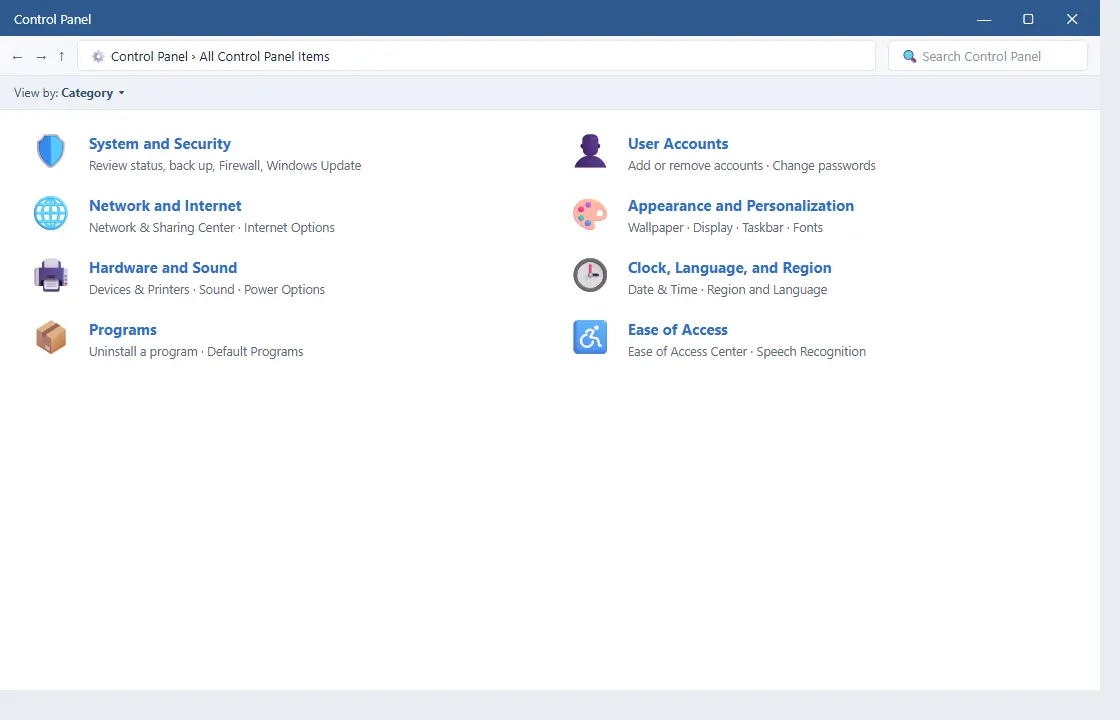
The table on the next page describes all the Control Panel categories, including the various programs you can reach by clicking each category's hyperlink.
Control Panel Categories
The following table gives a description of all the Control Panel categories, including the various programs you can find by clicking each category's hyperlink.
| Category Name | The groups of links it displays |
|---|---|
| System and Security | Action Center, Windows Firewall, System, Windows Update, Power Options, Backup and Restore, BitLocker Drive Encryption, and Administrative Tools |
| User Accounts | User Accounts, Windows CardSpace, Credential Manager, and Mail (32-bit) |
| Network and Internet | Network and Sharing Center, HomeGroup, and Internet Options |
| Appearance and Personalization | Personalization, Display, Desktop Gadgets, Taskbar and Start Menu, Ease of Access Center, Folder Options, and Fonts |
| Hardware and Sound | Devices and Printers, AutoPlay, Sound, Power Options, Display, and Windows Mobility Center |
| Clock, Language, and Region | Date and Time, and Region and Language |
| Programs | Programs and Features, Default Programs, and Desktop Gadgets |
| Ease of Access | Ease of Access Center and Speech Recognition |
Wallpaper & Screen Saver
Changing the desktop background (wallpaper)
Our desktop background (also called wallpaper) can be a digital picture from our personal collection or one that comes with Windows. We can also select a colour for our desktop background, or use a colour to frame our background picture. Windows comes with lots of desktop-background choices. To change the desktop background:
- Open Desktop Background by clicking the Start button → Control Panel → Appearance and Personalization → Personalization → Desktop Background.
- Click the picture or colour you want. If the picture you want is not in the list, click the Picture location down arrow to view other categories, or click Browse to search for the picture on your computer; when you find it, double-click it and it becomes your background and appears in the list.
- Under How should the picture be positioned, choose to have the picture fit the screen, tile, or be centered, and then click OK.
Changing the screen saver
Windows comes with several screen savers. We can also create our own from personal pictures we have saved on the computer, and some software companies develop additional screen savers for download or purchase. To change a screen saver:
- Open Screen Saver Settings by clicking the Start button → Control Panel → Appearance and Personalization → Personalization → Screen Saver.
- Under Screen saver, in the drop-down list, click the screen saver you want to use.
- Click Preview to see what your chosen screen saver will look like.
Customising the Taskbar
We can customize the taskbar in many ways, including the way taskbar buttons look, how they group together when we have more than one window open, where the taskbar sits on our desktop, and what icons and apps are on it.
Rearranging taskbar buttons
To rearrange the order of the app buttons on the taskbar, drag a button from its current position to a different position on the taskbar. We can rearrange apps as often as we like. Note that all open files from the same app are always grouped together, even if we did not open them one after the other — this is so that we can see all of the previews for that app at the same time.
Moving the taskbar
Usually we find the taskbar at the bottom of the desktop, but we can move it to the sides or the top of the desktop instead. Before we can move the taskbar, we need to unlock it.
- Press and hold (or right-click) an empty space on the taskbar. If Lock the taskbar has a check mark next to it, the taskbar is locked; unlock it by clicking Lock the taskbar, which removes the check mark.
- To move the taskbar, click an empty space on it and hold down the mouse button as you drag the taskbar to one of the four edges of the desktop. When the taskbar is where you want it, release the mouse button.
Taskbar Grouping & Pinning Apps
Changing how taskbar buttons appear
We can choose how buttons are grouped together when there is more than one window open, and we can change the size of the taskbar button icons. To do this, right-click the Taskbar and click Properties. Three grouping modes are available:
- Always combine, hide labels — this is the default setting. Each app appears as a single, unlabelled button, even when multiple windows for that app are open.
- Combine when taskbar is full — this setting shows each window as an individual, labelled button. When the taskbar becomes crowded, apps with multiple open windows collapse into a single app button; tapping or clicking that button displays a list of the windows that are open.
- Never combine — this setting shows each window as an individual, labelled button and never combines them, no matter how many windows are open. As more apps and windows open, the buttons get smaller, and eventually they will scroll.
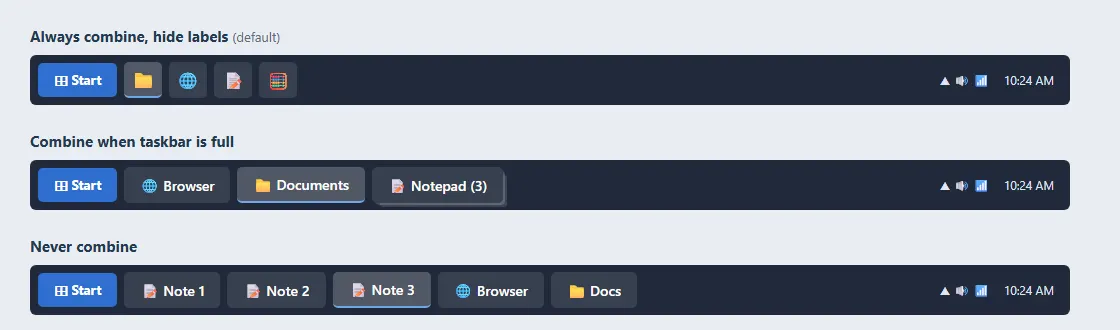
To use small taskbar button icons, select the Use small taskbar buttons check box; to use large icons, clear the check box. Then click OK.
Pinning an app to the taskbar
We can pin an app directly to the taskbar for quick and easy access. On the desktop, press and hold (or right-click) the app's button on the taskbar to open the app's Jump List — a list of shortcuts to recently opened files, folders and websites — and then tap or click Pin this program to taskbar. To remove a pinned app, open its Jump List again and tap or click Unpin this program from taskbar.
Calculator, Sticky Notes & Gadgets
Opening the basic-math Calculator
The built-in Calculator has several dynamic new features — click its View menu to check them out. Its Unit conversion feature translates Celsius to Fahrenheit, kilometres to miles, meters to feet, grams to ounces, joules to BTUs, and more. We can use the new calculation worksheets to quickly compute everyday things such as fuel economy and auto lease payments. The Programmer and Statistics modes handle those more specialised tasks.
Customizing Sticky Notes
We can make the Sticky Notes that we keep on our desktop even handier. We can format the text and change its colour, as well as resize, collapse and flip through several Sticky Notes. If we have a Tablet PC or a touchscreen, we can use multiple input methods (pen and touch) within a single note.
- To open Sticky Notes, tap the Start button, type Sticky Notes in the search box, and then tap Sticky Notes in the list of results.
- To create additional notes, click the New Note button. We can also open a new note by pressing Ctrl + N.
Desktop Gadgets
Windows contains mini-programs called gadgets, which offer information at a glance and provide easy access to frequently used tools. For example, we can use gadgets to display a picture slide show or to view continuously updated headlines. Some of the gadgets that come with Windows 7 are Calendar, Clock, Weather, Feed Headlines, Slide Show and Picture Puzzle.
Key Facts & Shortcuts
| Windows is a/an | Operating System (GUI) | Made by | Microsoft |
| First released on | 20 Nov 1985 | Built on top of | MS-DOS |
| Windows 7 follows | Windows Vista (2006) | First screen after start-up | Desktop |
| Bar at the bottom | Taskbar | Hard-disk drive letter | Local Disk (C:) |
| Deleted files go to | Recycle Bin | Recycle Bin holds | ~10% of the disk |
| Shortcut icon shown by | A small arrow | Max file-name length | 255 characters |
| File name has two parts | Name + Extension | Folder is also called a | Directory |
| Restart is also called a | Warm / soft boot | Settings are changed in | Control Panel |
Keyboard shortcuts
| Ctrl + C / X / V | Copy / Cut / Paste | Ctrl + A | Select all |
| F2 | Rename | F3 | Open Search |
| Delete | Send to Recycle Bin | Shift + Delete | Delete permanently |
| Alt + Tab | Switch / cycle windows | Win + Tab | Aero Flip 3D |
| Ctrl + N | New (e.g. Sticky Note) | Win key | Open Start Menu |
Exam Question Bank
Practise these questions to check your understanding. Each one is answered directly by the theory in this book; the correct answer is given beside the question.
| # | Question | Answer |
|---|---|---|
| 1 | Windows is which type of software? | Operating System |
| 2 | Windows lets us work by pointing and clicking; it is therefore a ___ operating system. | GUI |
| 3 | Windows was first introduced on which date? | 20 November 1985 |
| 4 | The first Windows was a graphical shell for which text-only system? | MS-DOS |
| 5 | Windows 7 is the follow-up to which operating system? | Windows Vista (2006) |
| 6 | The first screen after the computer starts is the ___. | Desktop |
| 7 | The long bar (usually at the bottom of the screen) is the ___. | Taskbar |
| 8 | The button at the left of the taskbar that opens the main menu is the ___. | Start button |
| 9 | The clock and sound/network icons sit in the ___ area. | Notification area |
| 10 | A small picture representing a program, file or command is a ___. | Icon |
| 11 | Which icon lets us explore all the drives of the computer? | This PC (My Computer) |
| 12 | The hard disk is usually shown with which drive letter? | Local Disk (C:) |
| 13 | Deleted files are temporarily stored in the ___. | Recycle Bin |
| 14 | By default the Recycle Bin can occupy about what share of the disk? | 10% |
| 15 | A shortcut icon is recognised by a small ___ in its corner. | Arrow |
| 16 | A file name has two parts: name and ___. | Extension |
| 17 | The maximum length of a file name is ___ characters. | 255 |
| 18 | A folder is also called a ___. | Directory |
| 19 | A folder stores ___. | Files and other folders |
| 20 | The OS gets its name "Windows" because programs open inside a ___. | Window |
Exam Question Bank (contd.)
| # | Question | Answer |
|---|---|---|
| 21 | Which bar displays the name of the document and program? | Title bar |
| 22 | The bar that lets you see content out of view is the ___. | Scroll bar |
| 23 | To make a window fill the screen we click ___ (or double-click the title bar). | Maximize |
| 24 | A maximized window cannot be ___ until it is restored. | Resized |
| 25 | Hiding a window without closing it is called ___ it. | Minimizing |
| 26 | The window we are currently working in is the ___ window. | Active |
| 27 | The shortcut to switch between open windows is ___. | Alt + Tab |
| 28 | Win key + Tab opens which 3-D window switcher? | Aero Flip 3D |
| 29 | A small window that asks a question or shows options is a ___. | Dialog box |
| 30 | Most dialog boxes cannot be resized but they can be ___. | Moved |
| 31 | The Views button cycles through how many views? | Five |
| 32 | To select a consecutive group of files, hold which key? | Shift |
| 33 | To select non-consecutive files, hold which key? | Ctrl |
| 34 | The shortcut key to Rename is ___. | F2 |
| 35 | To select all items, press ___. | Ctrl + A |
| 36 | When you copy an item you end up with how many of it? | Two |
| 37 | Moving an item with the keyboard uses Ctrl + X then ___. | Ctrl + V |
| 38 | To delete a file permanently (skip the Recycle Bin), press ___. | Shift + Delete |
| 39 | To restore a deleted file, open the Recycle Bin and click ___. | Restore this item |
| 40 | The shortcut key to open a search window is ___. | F3 |
| 41 | Settings of Windows are changed using the ___. | Control Panel |
| 42 | The desktop background is also called the ___. | Wallpaper |
| 43 | Three picture positions for wallpaper are Fit, Tile and ___. | Centered |
| 44 | Restart is also called a ___ boot. | Warm (soft) boot |
| 45 | The default taskbar grouping mode is ___. | Always combine, hide labels |
| 46 | The list of recent files shown on right-click of a taskbar button is the ___. | Jump List |
| 47 | To create a new Sticky Note, press ___. | Ctrl + N |
| 48 | Mini-programs on the desktop are called ___. | Gadgets |
| 49 | Name any one Windows 7 gadget. | Clock / Calendar / Weather … |
| 50 | The Calculator's View menu offers Standard, Scientific, Programmer and ___ modes. | Statistics |
Chapter Mind Map
One-glance revision of the whole chapter — follow each branch to recall the key points.
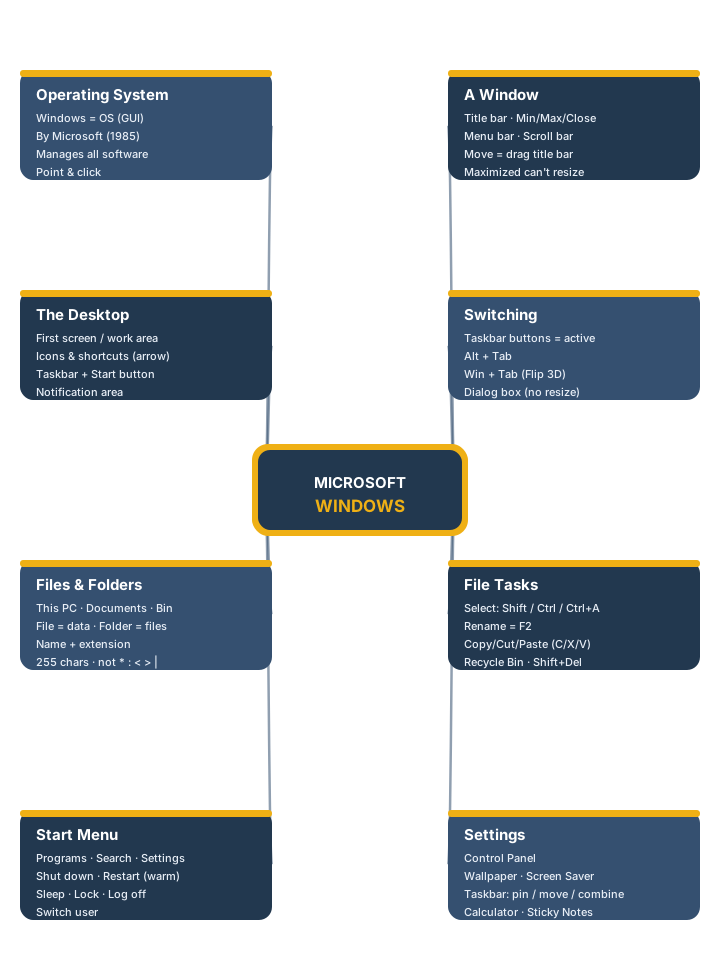
Image Credits
Every illustration in this book is an original, brand-safe GradeTyping mock-up, built from clean HTML/CSS and rendered to an image. No real desktop screenshots were captured, so the book contains no personal data — no real user names, account e-mails, file lists or pinned folders. The user interface shown is a generic, version-neutral representation created purely for teaching.
- The Desktop (§2) — GradeTyping desktop mock-up showing icons, the taskbar, the Start button and the notification area.
- The Start Menu (§6) — GradeTyping Start-menu mock-up showing the program list, the search box and the power options.
- A Window & its parts (§8) — GradeTyping window mock-up illustrating the title bar, window buttons, menu bar and scroll bar.
- File Explorer folder window (§11) — GradeTyping Explorer mock-up showing the navigation pane, address bar, toolbar and file list.
- Control Panel — Category view (§17) — GradeTyping Control-Panel mock-up (newly authored for this edition) showing the eight setting categories.
- Taskbar grouping modes (§20) — GradeTyping taskbar mock-up (newly authored for this edition) comparing the three button-grouping settings.
- Chapter Mind Map (§24) — original GradeTyping SVG diagram.
- Logo & watermark — the GradeTyping graduation-cap-and-keyboard mark, used under the GradeTyping brand.