Microsoft Word Fundamentals
Microsoft Word is a powerful word-processing application. It is regarded as one of the best word-processing packages available for the work of creating and editing documents, and it operates within the Windows environment. Word is Microsoft's latest word processor and forms part of the Microsoft Office suite. Compared with the version that came before it, Word claims improved performance together with more features. It also introduces a Touch Mode that makes Word far more touch-friendly than earlier versions; however, this mode is available only on a computer that has a touch-screen enabled.
In plain terms, a word processor is software whose job is to process text — to let you enter words, then arrange, correct and decorate them before producing a finished printed page. Word sits inside the wider Office family alongside Excel, PowerPoint and the other Office programs; each program specialises in a different kind of work, and Word's speciality is the written document.
Uses of MS Word
Because it can handle anything from a one-line note to a hundred-page report, Word is used for a very wide range of everyday writing jobs. The original manual lists the following five uses of the Microsoft Word application:
- Creating simple letters. Personal letters, applications and short correspondence are quick to type, correct and print.
- Creating a big document such as a project report or a company's yearly (annual) report, where many pages, headings and tables are needed.
- Creating simple designs such as informational vouchers and folders.
- To create a News Letter.
- To create Mail Letters, etc. — the same letter prepared so it can be sent to many different people.
Starting MS Word
Before you can do anything in Word you must first launch the program. The original manual gives the full menu path for starting Microsoft Word: Start Button → All Programs → Microsoft Office → Microsoft Word. In words, you click the Start button, select All Programs, select Microsoft Office, and then select Microsoft Word from the menu options. On newer versions of Windows the Office folder is reached the same way, simply through the Start menu. There are a few easy ways to open Word; the most common is from the Start menu shown below.
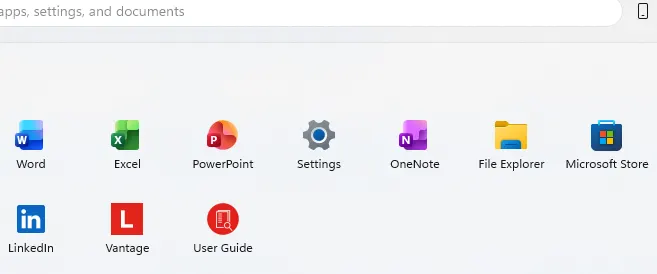
Step 1 — Open the Start menu and find Word
Click the Start button (the Windows logo at the bottom-left of the screen). The Start menu opens and shows your pinned apps — look for Word (marked in gold). If you don't see it, type “Word” in the search box at the top and it will appear.
 Word
Word
Step 2 — Word opens with a blank document
After you click Word, the program opens a new, empty document named Document1, ready for you to start typing. (This is why, when Word gets loaded, the opening screen displays a document named Document1.) A Word file is saved with the extension .docx.
The Starting Window & its Parts
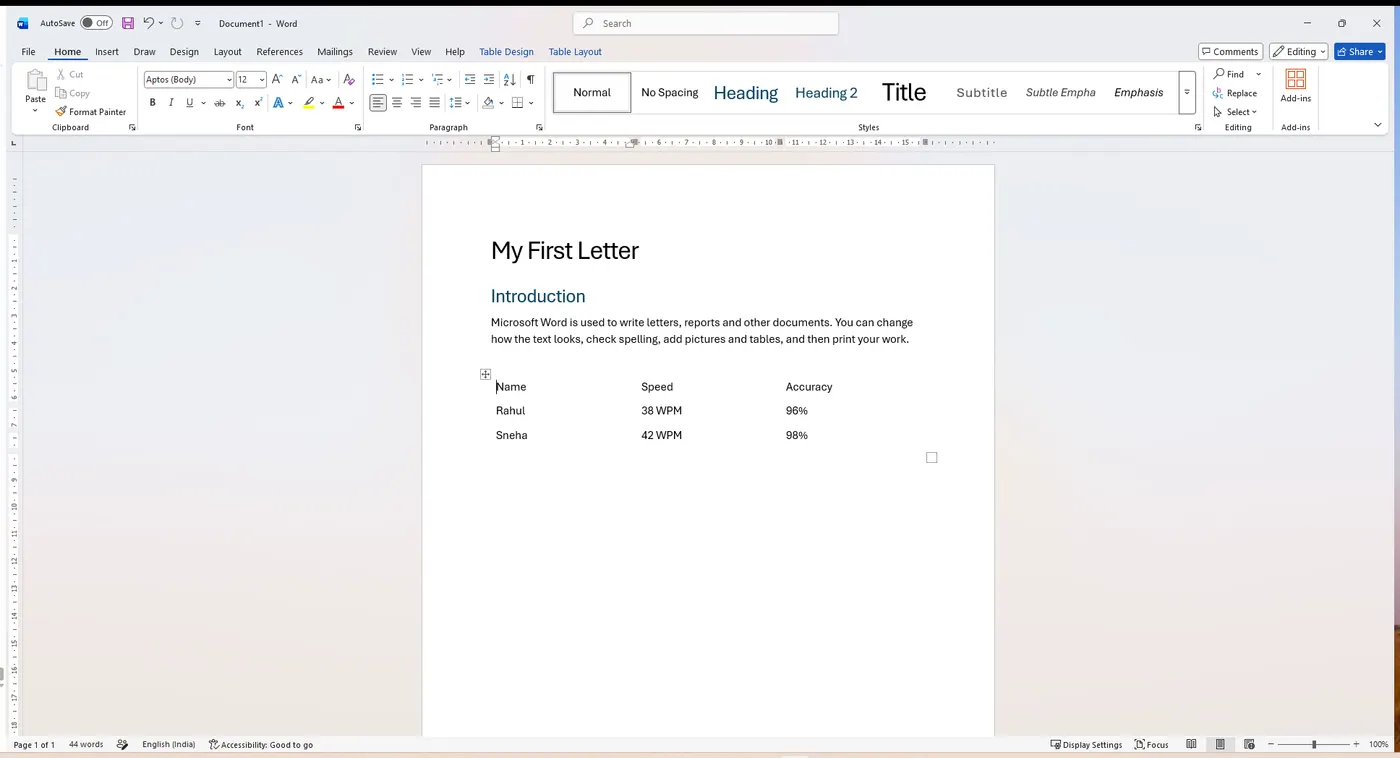
When Word opens, take a moment to learn the main parts of the screen — this is the starting window of Microsoft Word. The window has a row of Tabs at the top, and each tab contains various options. The large white area in the middle of the screen is the actual page in which the document can be typed, formatted and printed. Each labelled part below is marked in gold and joined to its name by a thin leader line.
 Quick Access Toolbar
File Tab
Vertical Ruler
Status Bar
Title Bar
Ribbon Tabs
Ribbon
Horizontal Ruler
Quick Access Toolbar
File Tab
Vertical Ruler
Status Bar
Title Bar
Ribbon Tabs
Ribbon
Horizontal Ruler
- Quick Access Toolbar — displays quick access to commonly used commands (such as Save, Undo and Redo). It sits at the very top-left, near the File menu, so the most frequent commands are always one click away.
- Title Bar — shows the name of the document together with the program name. In MS Word the name of the document is displayed on the Title Bar.
- File Tab — the File tab replaced the Office button of earlier versions. This area is called the Backstage, which helps us to manage the Microsoft application and provides access to its options such as Open, New, Save As, Print, etc. The Backstage also provides information pertaining to your document and options to help set up your window defaults, and it contains standard commands such as Save, Save As, New and Print.
- Ribbon Tab — the title or name of the specific Ribbon (Home, Insert, Page Layout and so on). Ribbon — displays groups of related commands within tabs; each tab provides buttons for commands.
- Horizontal & Vertical Rulers — the measuring strips used to set margins and indents in the document. Insertion Point — the blinking straight line where the text you type appears. The white area is the actual page on which you type, format and print. Status Bar — runs along the bottom of the window and shows page and word information (and is where the total number of pages in the current document is shown).
Tabs, Templates & the Options Window
Microsoft Word uses Tabs instead of menus to organise its various functions. In addition, the command buttons have been placed in a Group within the Ribbon, so that related commands stay together. The small arrow called the Dialog Box Launcher in the corner of a group shows additional options beyond the buttons visible on the ribbon.
Templates
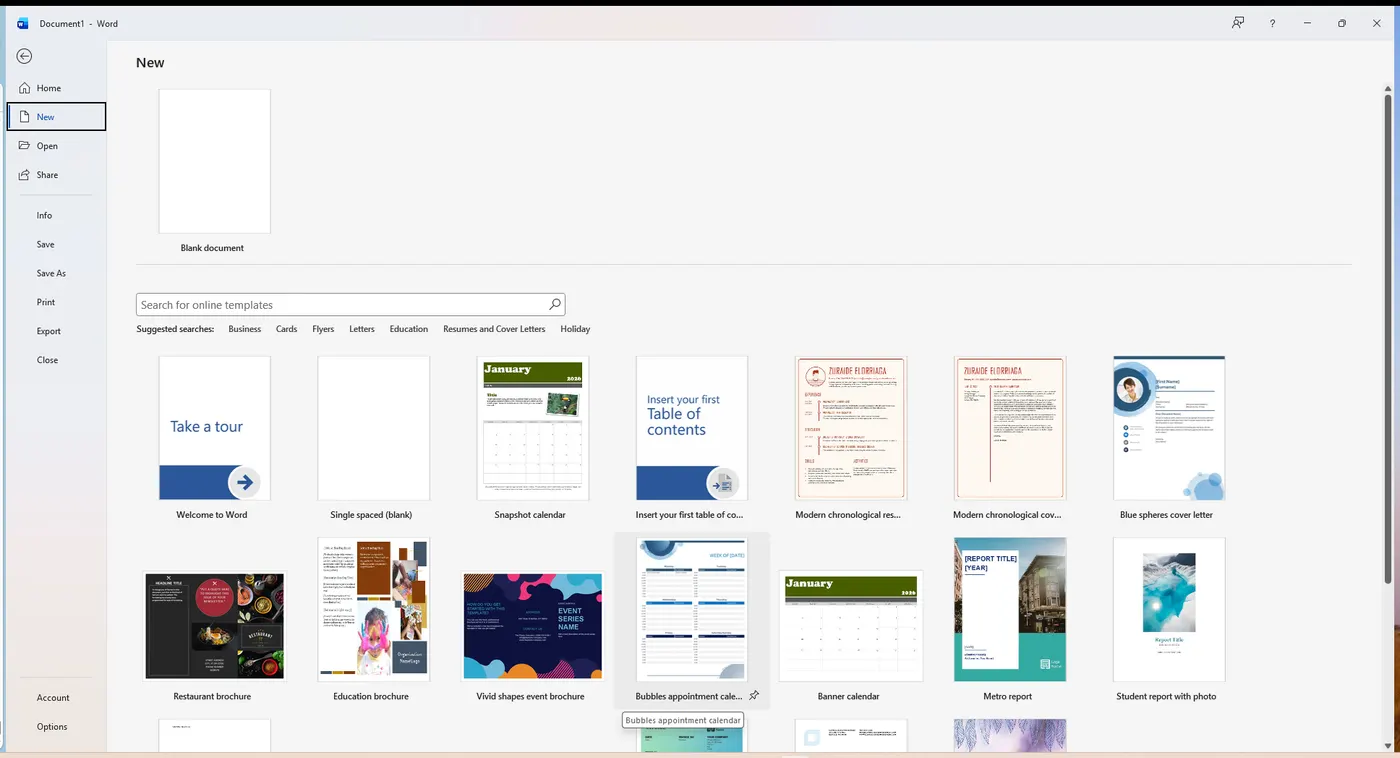
A template is a ready-made, professionally-designed document you can start from instead of a blank page. Microsoft Office has a variety of predesigned templates within specific categories, so that readymade, professionally designed document formats — which are what "templates" really are — can be used as a starting point.
Opening a template:
- Select the File tab, and then click on the New option.
- The Available Templates window will appear — pick the one you want.
 Available templates
The Options Window
The Microsoft Word application allows us to customise its setting options. Everything from how Word displays the screen to how it saves files can be adjusted here.
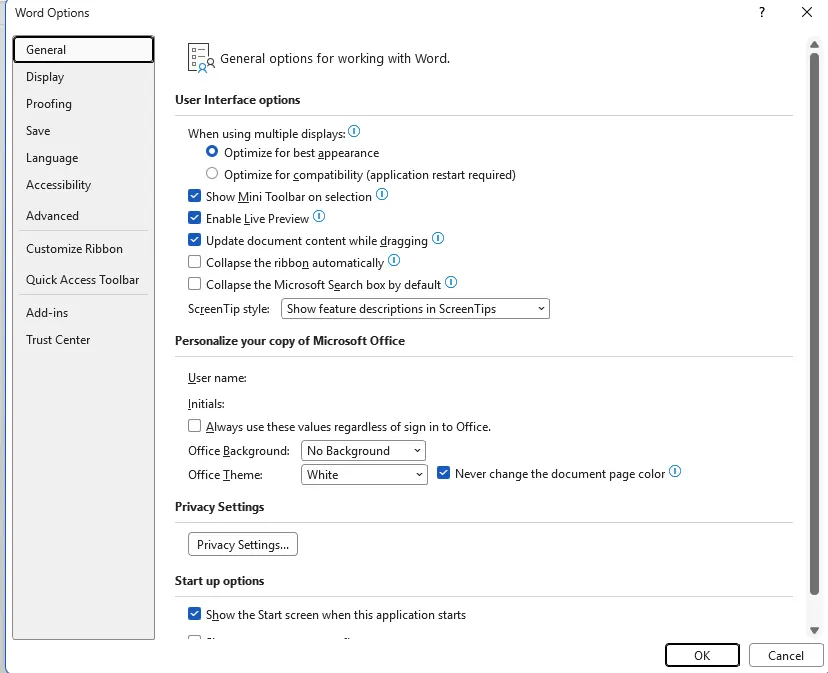
- Click on the File tab, and then select the Options item.
- The Word Options window will appear. This is where we can choose our desired settings and preferences.
Customise the Ribbon
We can easily customise the Ribbon to suit our needs by creating new tabs and filling them with the commands we use the most. This is useful when a command you need often is buried on a tab you rarely open — you can bring it onto a tab of your own. The full procedure has five steps.
Step 1 Click on the File tab, and then select the Options item.
Step 2 The Word Options window will appear. Click on the Customize Ribbon option. From the Choose commands from list, click on your desired ribbon option, and then click on the Add button to place it in the Customize the Ribbon list. Finally, click on the OK button.
 Customize Ribbon
Quick Access Toolbar & Show / Hide
Add commands to the Quick Access Toolbar
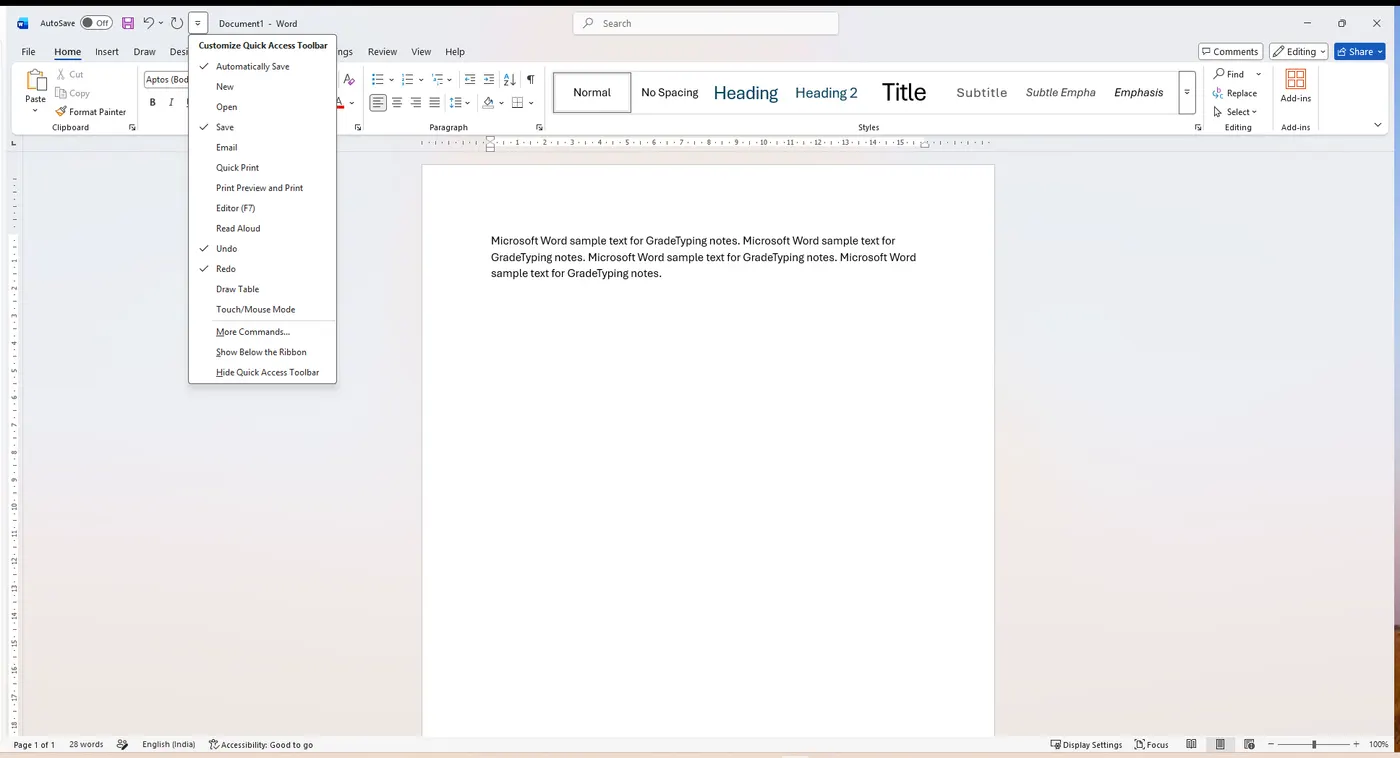
Microsoft Word has a Quick Access Toolbar so that we can have quick access to our most-used commands. Because it stays in the same place no matter which ribbon tab is open, you can add the commands you reach for most and keep them permanently within one click.
Step 1 To add our most-used commands to the Quick Access Toolbar, click on the drop-down arrow next to the Quick Access Toolbar (at the top-left of the window).
Step 2 The Customize Quick Access Toolbar option panel will appear. Click on your desired command option to be placed on the Quick Access Toolbar (or choose More Commands… for the full list).
 Tick a command to add it
Non-Printing Characters (Show / Hide)
The Show/Hide button displays non-printing characters, including paragraph marks, spaces and tabs. This button works as a toggle switch: click it to turn the display of non-printing characters on, and click it again to turn them off. These marks are only an aid while you work — paragraph, space and tab marks will not appear on your printed documents.
Working with Show/Hide: On the Home Ribbon, in the Paragraph group, click on the Show/Hide button to view paragraph marks; click on the Show/Hide button again to hide them.
Where Home ribbon → Paragraph group → Show/Hide (¶).
Show / Hide 
Saving a Document
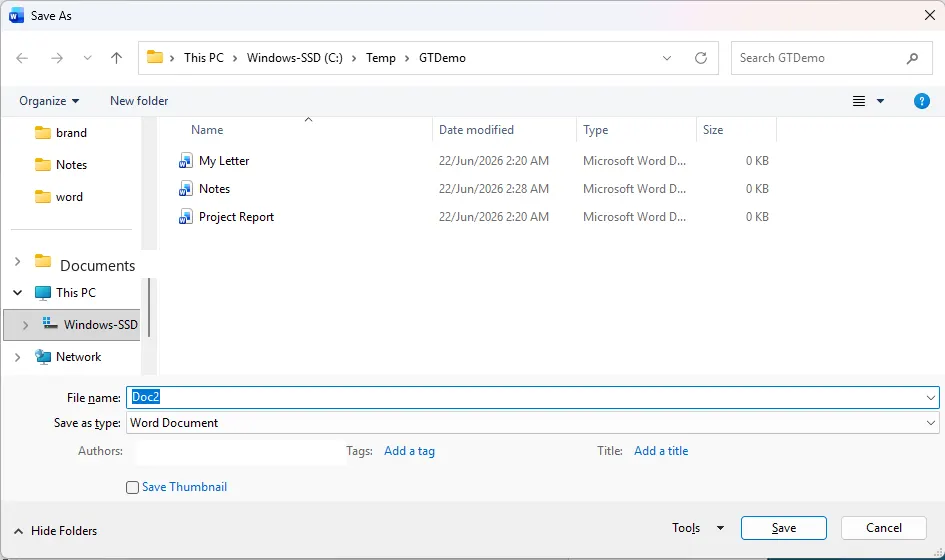
Saving a document stores it permanently to your hard drive or other storage device, so that your work is not lost when the program closes. The first time you save a new document, Word asks you for a name and a place to keep it. The procedure has four steps.
Step 1 Click on the File tab, then select the Save option (or press Ctrl + S) to save the document permanently to your hard drive or other storage device.
File → Save
Step 2 The Save As window will appear. In the Directory section on the left side of the window, click on the icon for the place where we wish to save our document. Then, in the File Name box, type your desired document name, and click on the Save button.
 File name
Save
File name
Save
A Word document is saved as a .docx file. Shortcuts: Ctrl + S to Save, Ctrl + O to Open.
Selecting Text
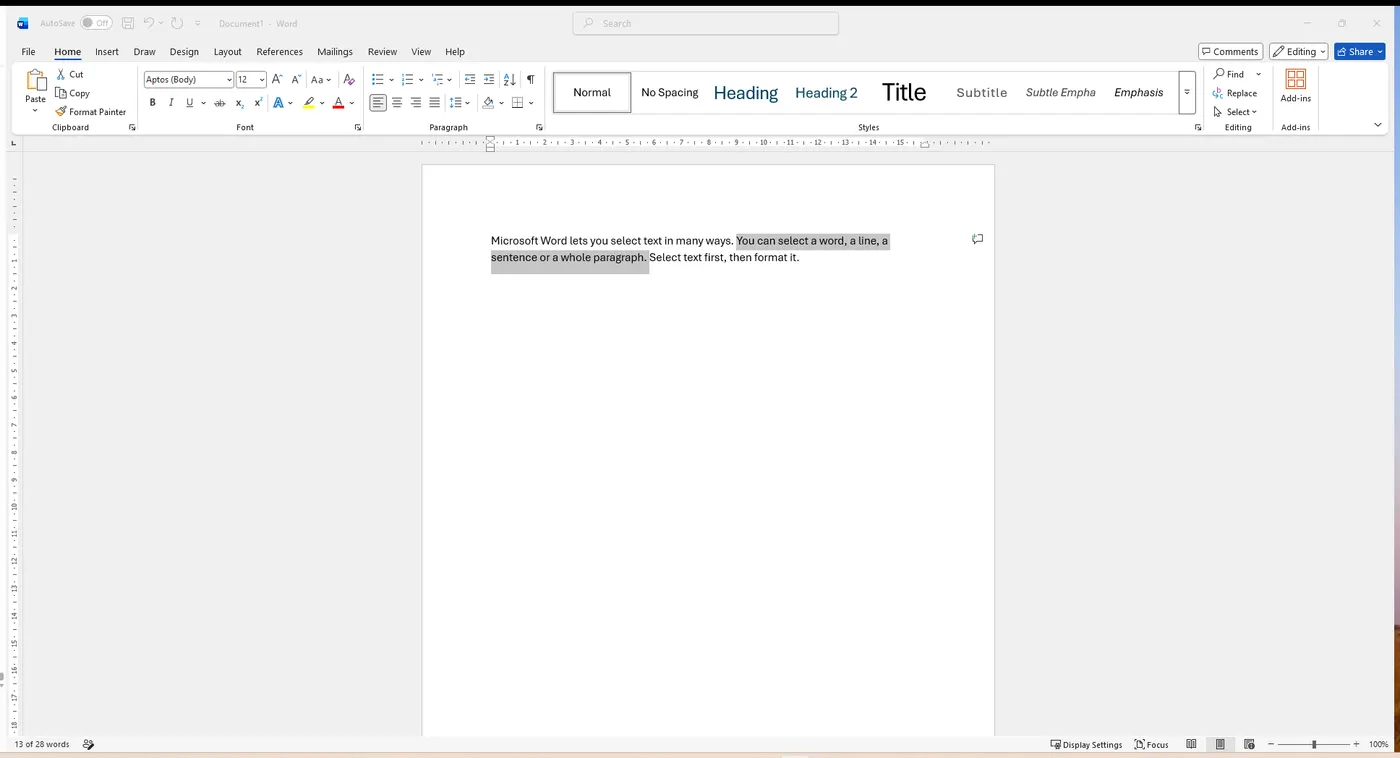
We must select text before we can change the format — that is, before you can make text bold, colour it, move it or delete it, you must first mark which text the change should apply to. We can use the mouse to select text in a variety of ways, which are explained in the table below. Selected text is shown with a grey highlight, as in the screenshot.
 Selected text
The table shows the many ways to select with the mouse.
| To select | What to do |
|---|---|
| Any text | Click at the start, hold Shift and click at the end — or just drag across the text. |
| A word | Double-click the word. |
| A line | Move the pointer to the left margin next to the line and click once. |
| Multiple lines | Click in the left margin by the first line, then hold Ctrl and click more lines. |
| A sentence | Hold Ctrl and click anywhere in the sentence. |
| A paragraph | Double-click in the left margin next to the paragraph. |
| Many paragraphs | Click at the start of the first paragraph and drag through the others. |
| The whole document | Hold Ctrl and click once in the left margin (or press Ctrl + A). |
Setting Margins
The margin is the empty border around the text. Microsoft Word margins are defaulted to 1 inch for the top and bottom, and 1 inch for the left and right. To change your margins, use the Margins button found on the Page Layout ribbon. The full procedure to create margins has five steps; follow each one below.
Step 1 First select the entire document text — press the Ctrl key, place the mouse pointer anywhere on the left margin, and click once with the right mouse button. Then select the Page Layout tab and, in the Page Setup group, click the Margins button.
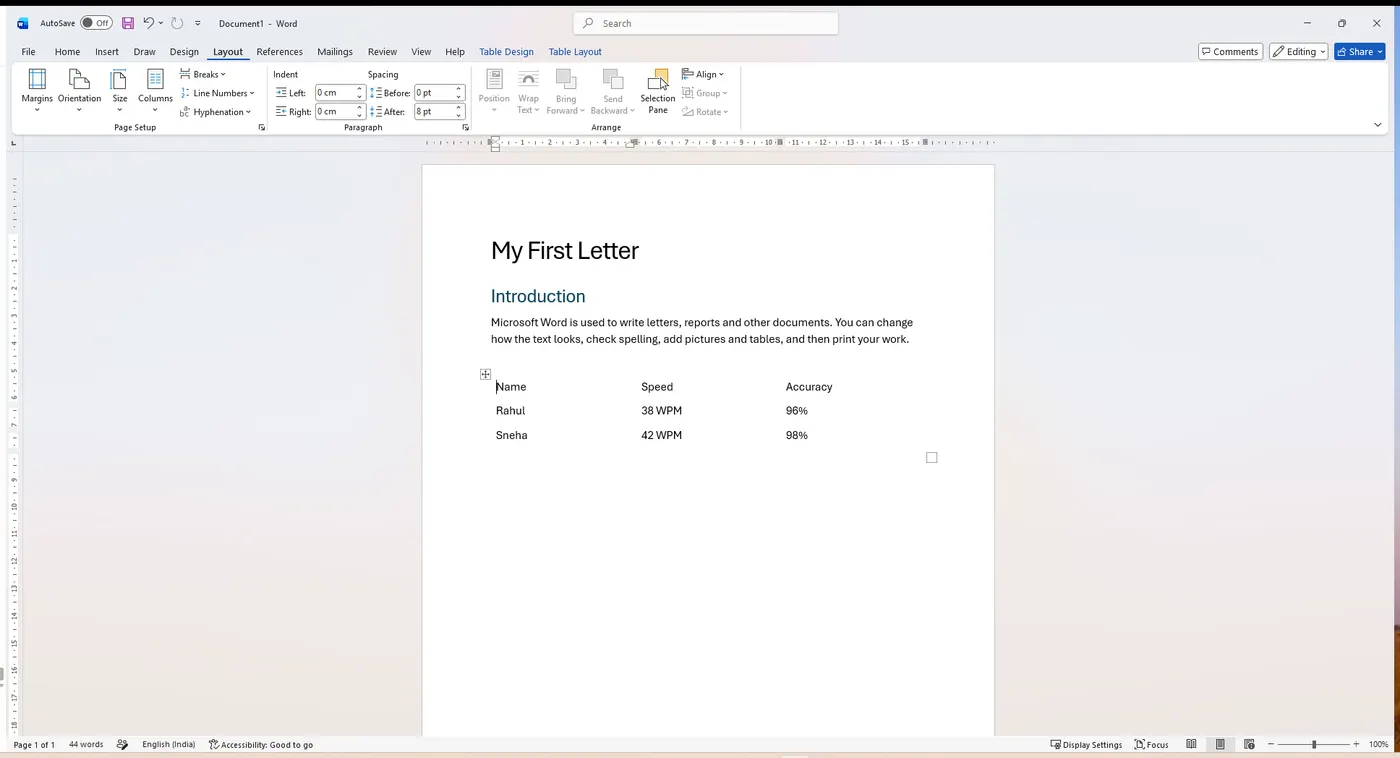 Margins
Step 2 The predesigned margins panel will appear. Change the margin by selecting one of the preset margin buttons (for example the top one, Normal, which is 1 inch all round). For a size that is not listed, click Custom Margins… at the bottom of the panel to customise your margin.
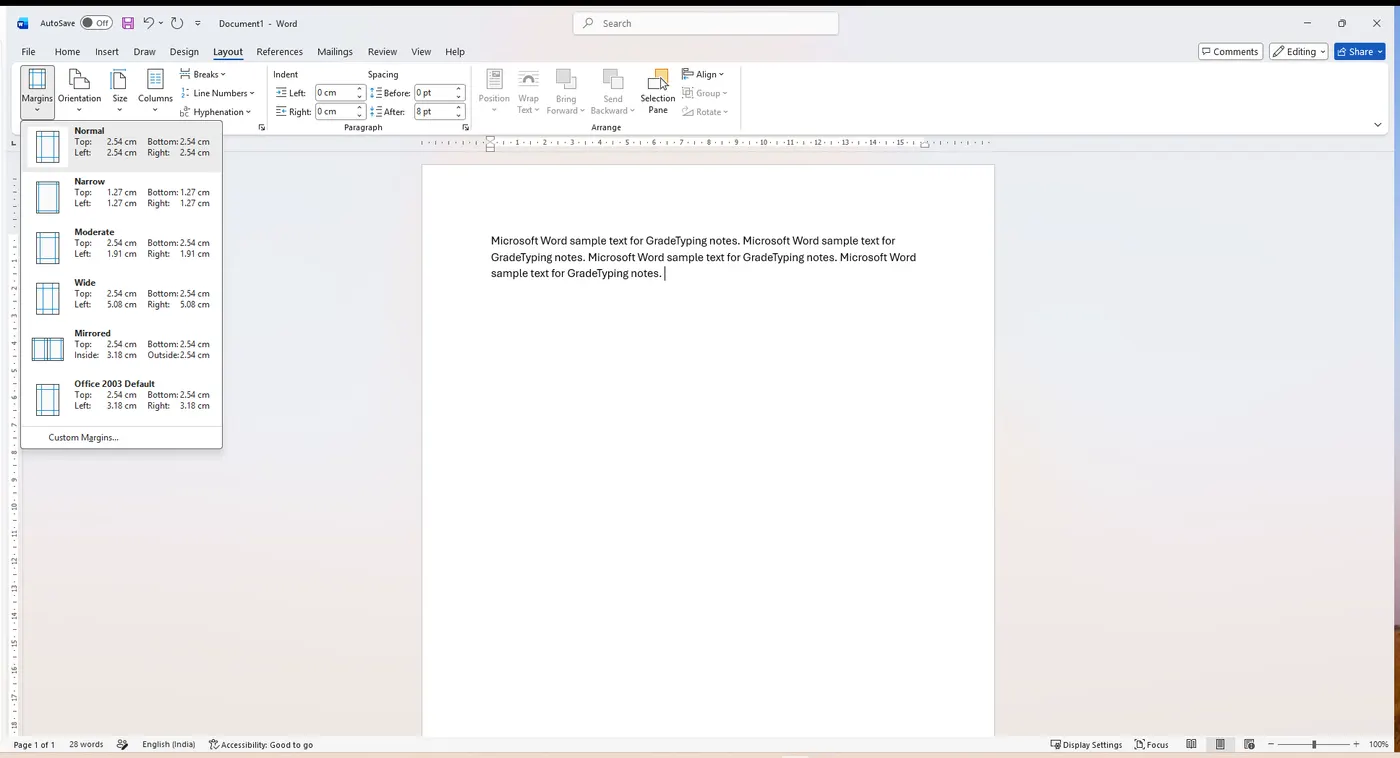 Pick a preset
Custom Margins…
Pick a preset
Custom Margins…
Line Spacing
Line spacing is the gap between the lines of text. Microsoft Word defaults the line spacing to double space (2.0). Line spacing affects an entire paragraph or document, not just one line. Use the Line Spacing button on the Home ribbon to change line spacing. To add spacing, follow the two steps below.
Step 1 Select the entire document (or the text you want to change). Click on the Home tab; in the Paragraph group, click the Line and Paragraph Spacing button.
Line Spacing
Step 2 A short menu of spacing values opens. Click the value you want — for example, select 1.5. For finer control over the exact spacing, click Line Spacing Options… at the bottom of the menu.
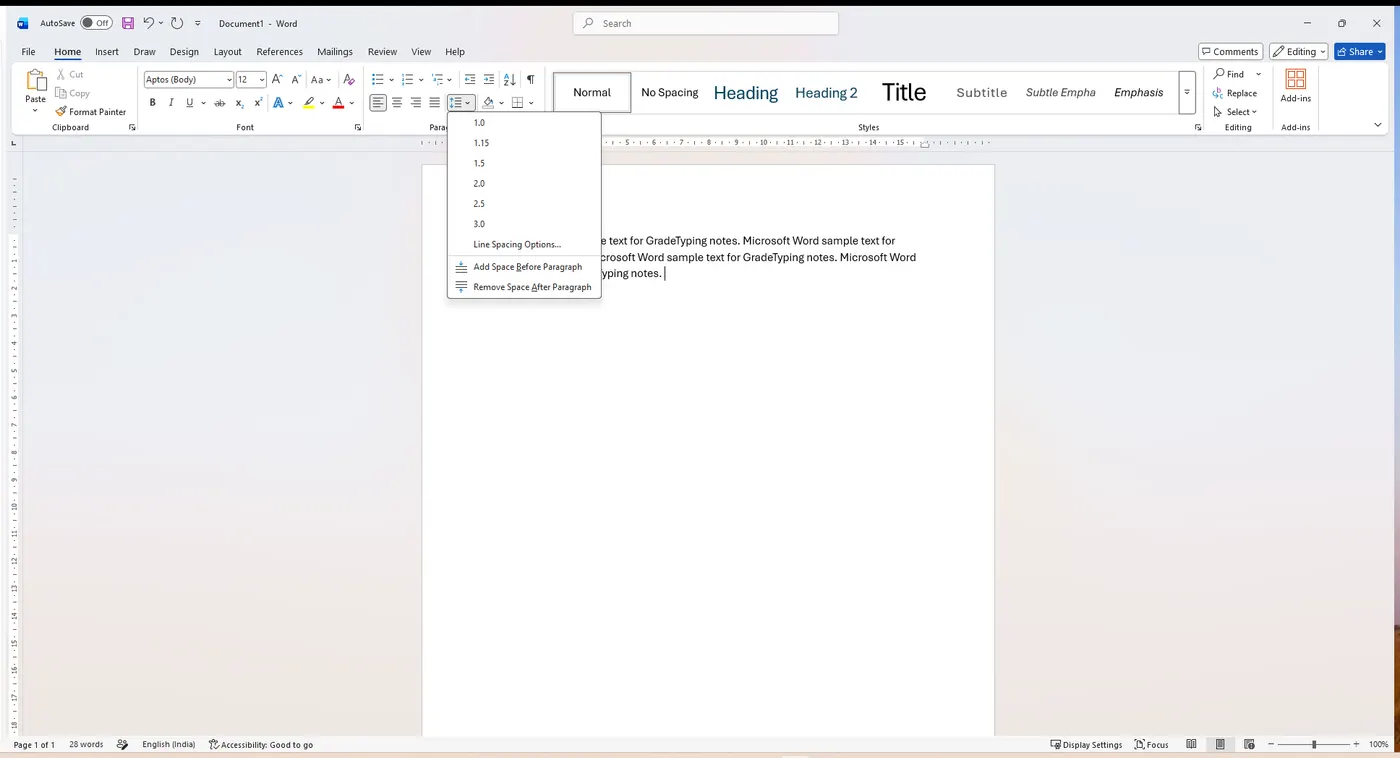 Choose a value
Formatting Text
Formats can be applied to any text within our document. The formatting styles are the most common way to change the appearance of text in a document. To apply formatting we must, as always, select the text first; we can use the mouse to select text in the various ways already explained. The common format buttons are on the Home tab. The original manual gives these format-option examples:
- Click on the Bold button to make text bold (Ctrl + B).
- Click on the Italic button to italicise text (Ctrl + I).
- Click on the Underline button to add an underline to text (Ctrl + U).
- Click on the Bullets button to add a bulleted list to text.
- Click on the Numbering button to add a numbered list to text.
Additional Font Options
Additional font options are available, such as font effects, special styles and previewing font changes. You can view these additional options by clicking on the Home tab and then clicking on the Dialog Box Launcher in the corner of the Font group.
The original "adding more effects" procedure runs as follows: place the insertion point before the first line of the document; type any text and then press the Enter key twice; select the text and click the Bold button; while the text is still selected, click the Dialog Box Launcher on the Font group; the Font window appears; in the Effects area, tick the check box next to All caps, then click OK. The steps below show the two key clicks.
Step 1 Select your text. On the Home tab, click the small Dialog Box Launcher arrow in the bottom-right corner of the Font group.
Font dialog launcher
Step 2 The Font window opens. In the Effects area, tick an effect such as All caps, then click OK. Font effects include superscript, subscript, outline, emboss and engrave.
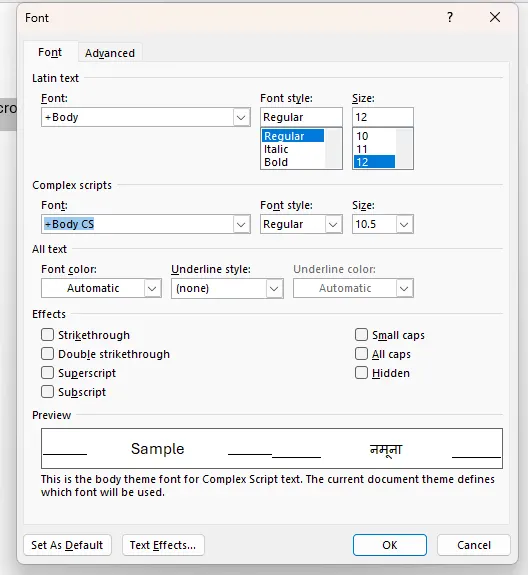 Effects
Text Alignment & View Modes
Text Alignment
Microsoft Word aligns paragraphs in four different ways relative to the left and right margins: left, center, right and justified. The Word default paragraph alignment is left. You can change paragraph alignment by clicking on an Alignment button, located on the Home ribbon in the Paragraph group.
| Button | Alignment | Shortcut |
|---|---|---|
| 1st | Align Text Left (default) | Ctrl + L |
| 2nd | Center Text | Ctrl + E |
| 3rd | Align Text Right | Ctrl + R |
| 4th | Justify (both edges straight, like a newspaper) | Ctrl + J |
Align Left / Center / Right / Justify
View Modes
Microsoft Word has five view modes. To select a view mode, click on the View tab and, in the Document Views group, select your desired view mode. The five modes are:
- 1. Read Mode — the best way to read a document, including some tools designed for reading instead of writing.
- 2. Print Layout — to check out how your document will look when it is printed. (This is the default; headers, footers and page numbers are displayed in this view.)
- 3. Web Layout — see how your document will look as a webpage. This layout is also great if you have wide tables in your document.
- 4. Outline — see your document in outline form, where content is shown as bulleted points. This view is useful for creating headings and moving whole paragraphs within the document.
- 5. Draft — switch your view to see just the text in your document. This is useful for quick editing because headers/footers and certain objects won't show up, allowing you to focus on your text.
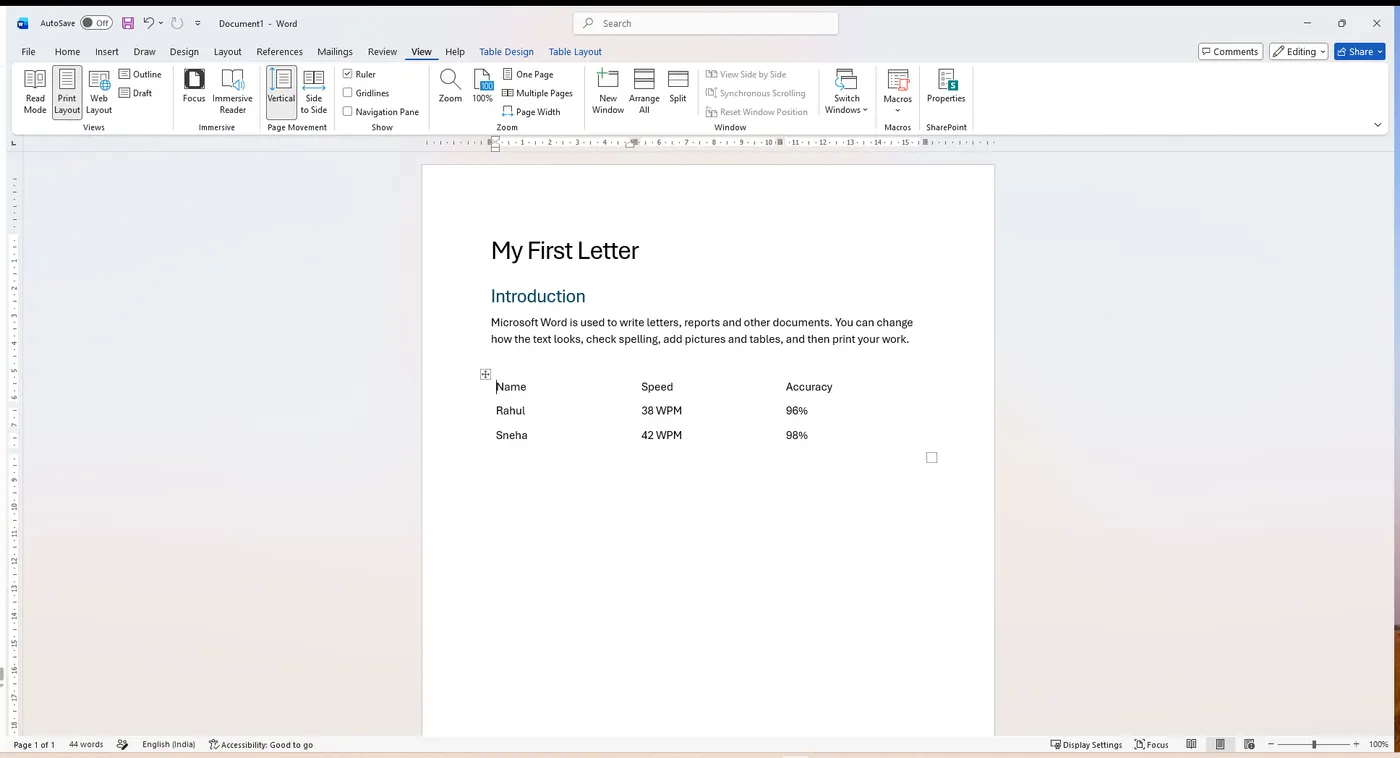 Document Views
Spelling & Grammar
Microsoft Word automatically checks for incorrect spelling and grammar. As we type the document, Word uses wavy red underlines to indicate possible spelling errors and wavy green underlines to indicate possible grammatical errors. To correct an error, right-click on a word with a wavy underline and then click on the correction you desire from the option panel; you can also edit the error directly in the document if no suggestions are applicable.
- In the document, place the mouse pointer over the misspelled text, click the right mouse button, and select the correction from the option panel.
- In the document, place the mouse pointer over the grammatical-error text, click the right mouse button, and select the correction from the option panel.
- In the document, place the mouse pointer over the repeated text, click the right mouse button, and select Delete Repeated Word from the option panel.
Full check To use additional spelling and grammar options, select the Review tab; in the Proofing group, click on the Spelling & Grammar button for a guided check of the whole document.
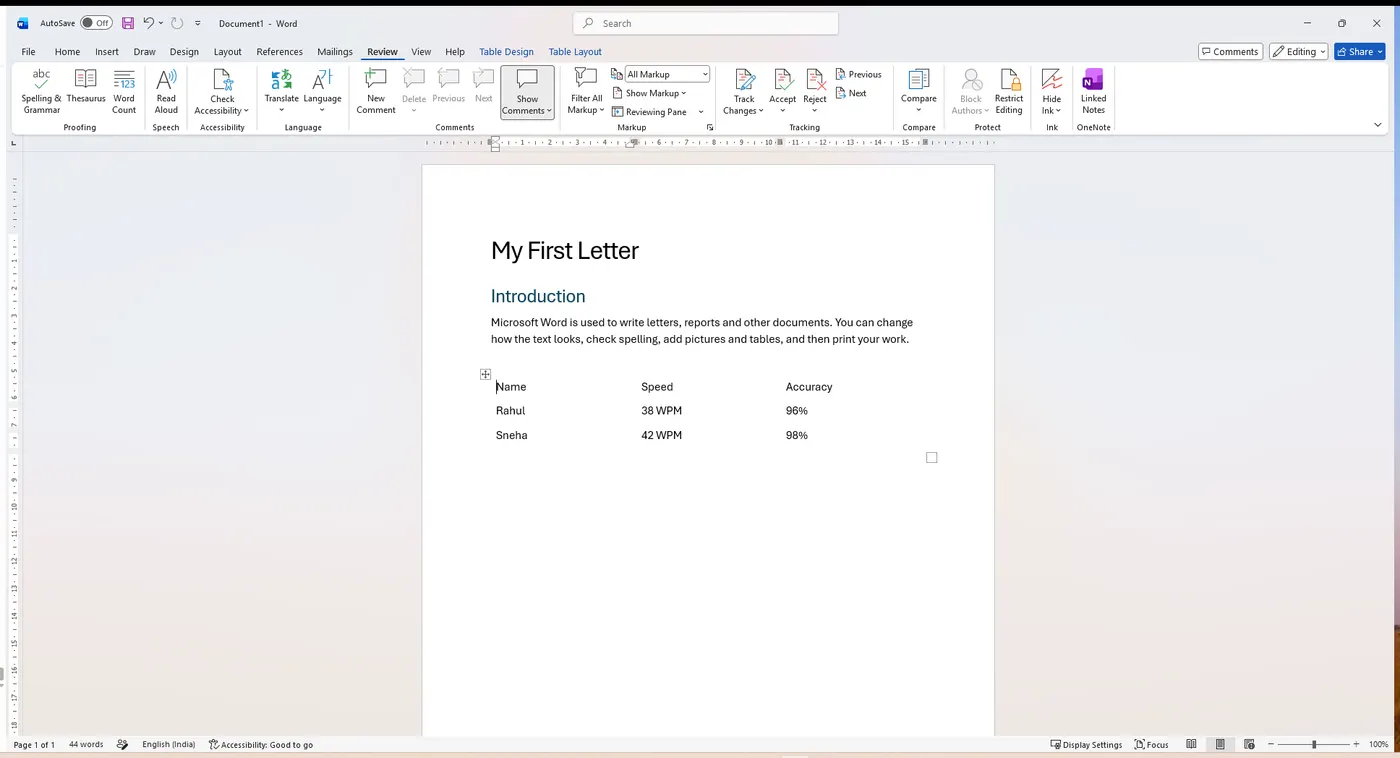 Spelling & Grammar
Page & Section Breaks
Page Breaks and Section Breaks can be inserted anywhere within a document. A break ends one part of the document and starts the next at a chosen point — a page break, for example, pushes the text after the cursor onto a fresh page. Follow these three steps.
Step 1 Select the Page Layout tab, then click on the Breaks button in the Page Setup group.
Breaks
Step 2 A panel opens with two sets of options — Page Breaks (Page, Column, Text Wrapping) and Section Breaks (Next Page, Continuous, Even Page, Odd Page).
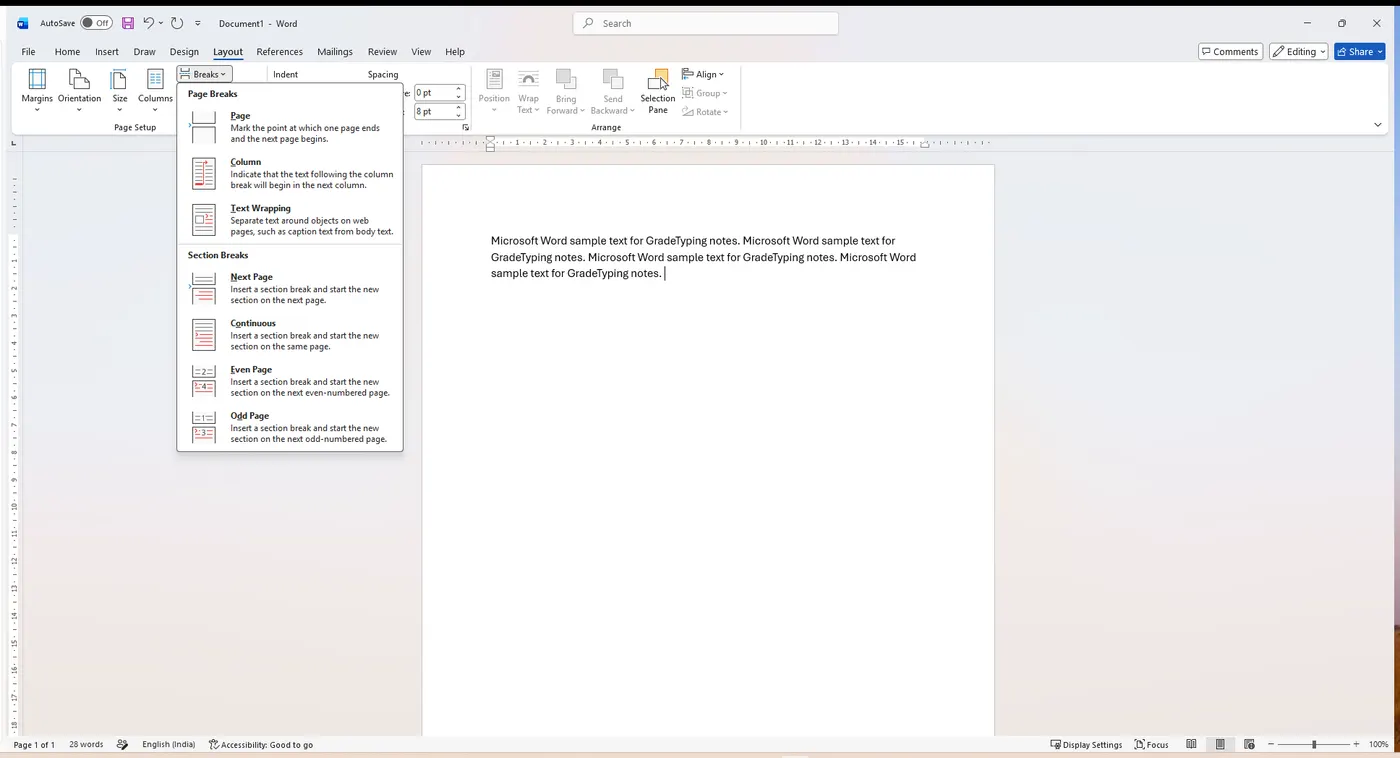 All break options
Step 3 Select the Page option. This will insert a page break that places us on a new page in the document, moving the text after the cursor onto a brand-new page. (To arrange text in newspaper-style vertical columns instead, you would insert a Column break.)
Page
Working with Tables — Creating & Editing
Tables offer a convenient way to display information that might otherwise be confusing and cluttered. Text is neatly formatted in a table without setting tab stops. A table is made of rows and columns, and the place where a row and a column intersect to form a rectangular shape is known as a cell.
A. Create a table
The Table Tools tab only appears when a table is selected. To create a table in Microsoft Word, follow these steps.
Step 1 Click on the Insert ribbon. The Table button is the only option in the Tables group. The Table panel will appear; select, for example, two rows and two columns.
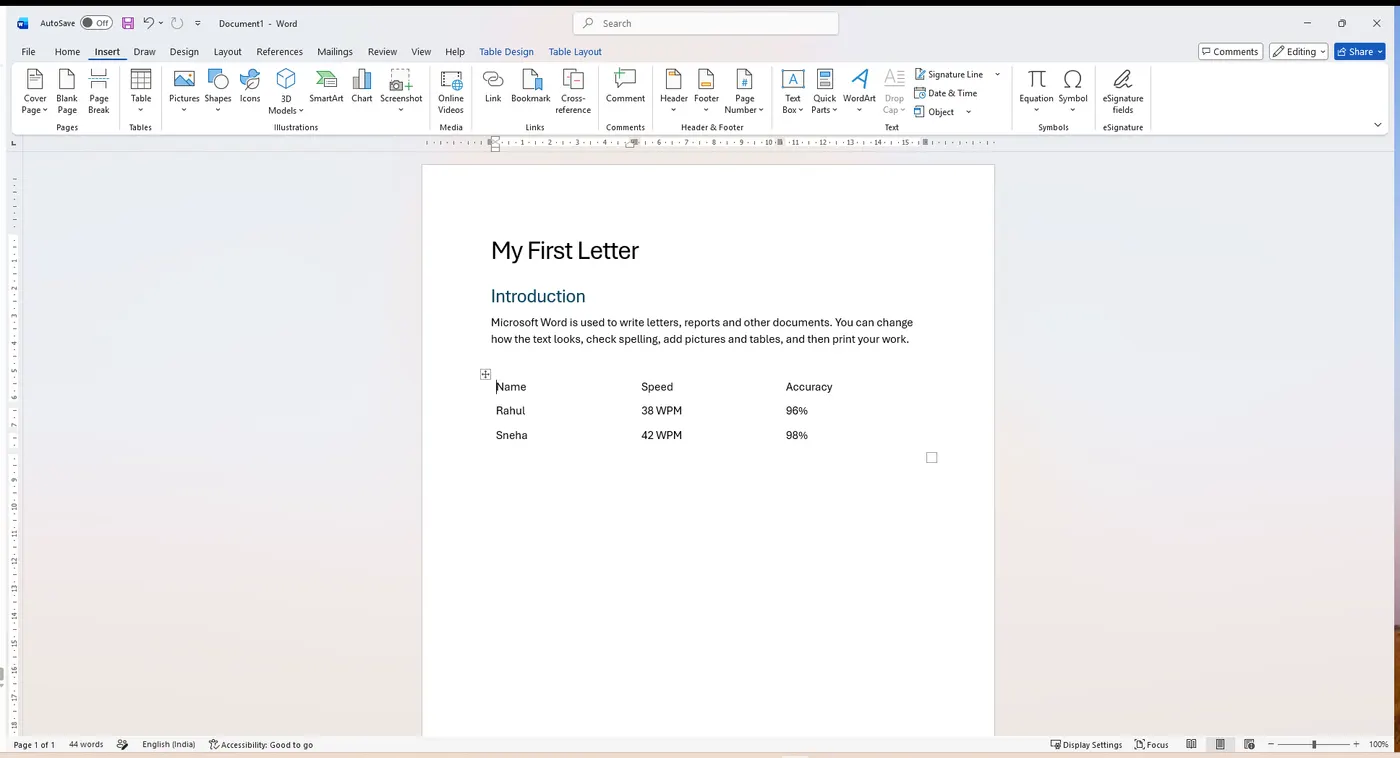 Table
Table
Step 2 To insert a table into our document, move the mouse pointer over the number of rows and columns we desire. The cell selection will be highlighted as we move the mouse; when the desired rows and columns are highlighted, click on the last cell. Then type the information in the table — the insertion point will appear in the first cell; type text in the first cell, and use the Tab key on the keyboard to move from one cell to the next.
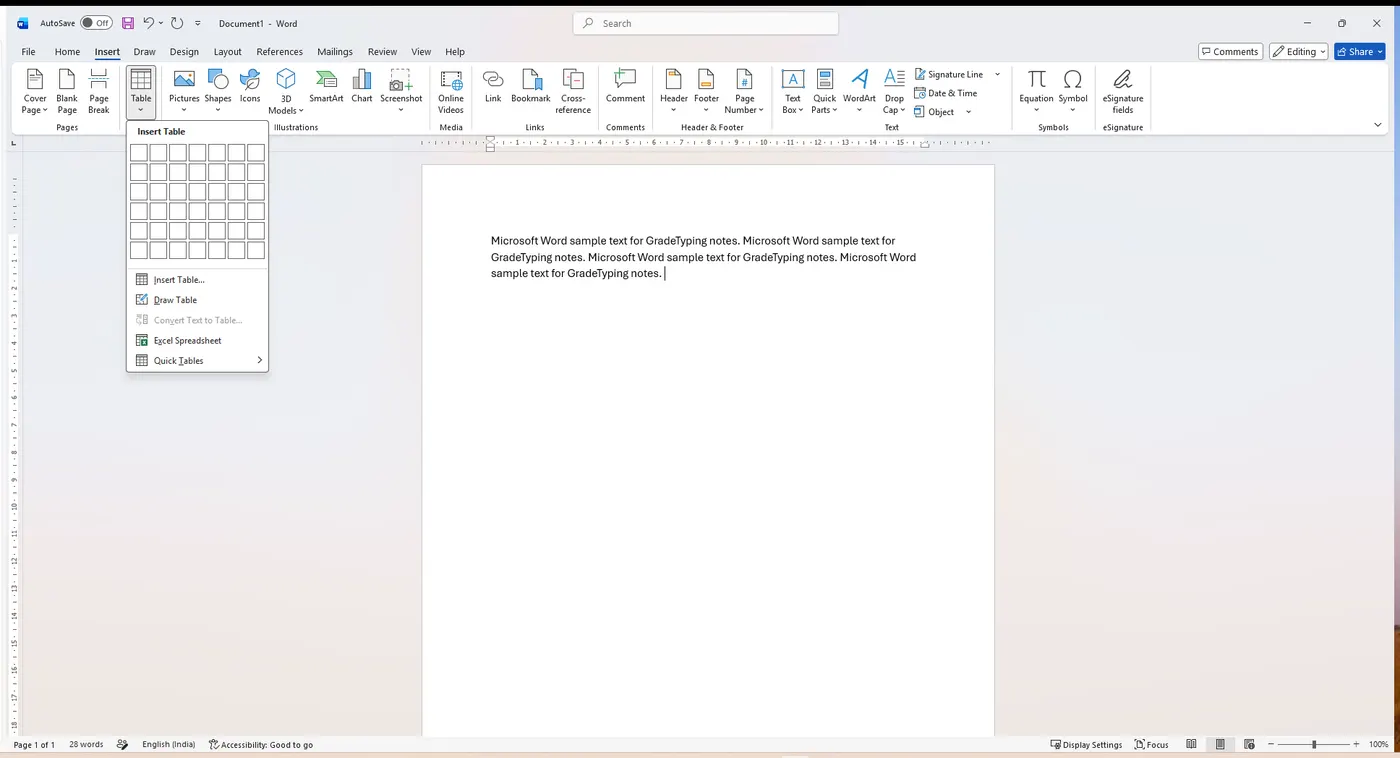 Drag to choose size
B. Edit a table — moving & selecting
Moving the insertion point and selecting text in a table is very similar to the ways we do so for regular text in a document. However, there are some procedures that are unique to tables, as illustrated below.
| Procedure | Description |
|---|---|
| Tab and (Shift + Tab) | Use the Tab key to move from left to right; use Shift + Tab to move from right to left. |
| Keyboard Arrow Keys | The up and down arrows will move up and down rows. |
| Move the insertion point | Use the mouse to position the cursor as needed. |
| Select a single cell | Click three times inside the cell, or drag over the cell's contents. |
| Select an entire row | Place the mouse pointer on the left margin pointing to the row, then click once, or drag over the row's cell contents. |
| Select an entire column | Click the column's top gridline/border, or drag over the column's cell contents. |
| Select the entire table | Single-click the table move handle on the top-left corner of the table, or press the Alt key and double-click in any cell of the table. |
Tables — Width, Rows, Merge & Format
When the cursor is inside a table, two extra tabs appear — Table Layout and Table Design. They hold every table command.
Adjust Column Width
Columns in a new table are always the same width. It is often necessary to change the width of one or more columns so that text or data can be seen. Position the mouse pointer on the column boundary (the right side of the column). The mouse pointer appears as a double vertical line with left and right arrows. Hold down the left mouse button and drag the pointer either left or right to change the width; release the button when you are satisfied with the new width.
AutoFit
AutoFit is a feature that will automatically adjust the column width to accommodate the widest text entry in the column. To AutoFit the entire table, place the mouse pointer at the leftmost column boundary; when the pointer appears as a double vertical line with left and right arrows, double-click the left mouse button.
Insert Rows or Columns
To insert a column, select a cell in the desired column where the new column will be inserted to the right or left.
- To insert a column to the right of the table: click in any cell on the last column, on the Table Tools ribbon click the Layout tab located in the Rows & Columns group, and click the Insert Right button — the new column appears.
- To insert a new row at the top of the table: click anywhere in the first row, and on the Table Tools ribbon click the Layout tab in the Rows & Columns group, then click the Insert Above button — the new row appears.
Merge Cells; Delete Cells, Rows, Columns & Table
Merge Cells: to combine two or more adjacent cells, first select those cells; on the Table Tools ribbon click the Layout tab in the Merge group, then click the Merge Cell button — the multiple cells merge into one cell.
Delete Cells, Rows, Columns and Table: to delete a cell, row, column or table, select the cell(s) to be deleted, then on the Table Tools ribbon click the Layout tab in the Rows & Columns group, and click the Delete button — the delete options will appear.
Format a Table — AutoFormat
AutoFormat has numerous table formats that may be applied to our table. These different Table Styles may affect the style of the lines or borders in the table, the justification of text and the font formats. If your Word document contains more than one table, each table may have its own format. Try to make all editing changes to the table before using AutoFormat.
Table Layout tab — insert/delete rows & columns, merge cells, and set width & height. (To drag-resize: point at a column boundary and drag; double-click it for AutoFit.)
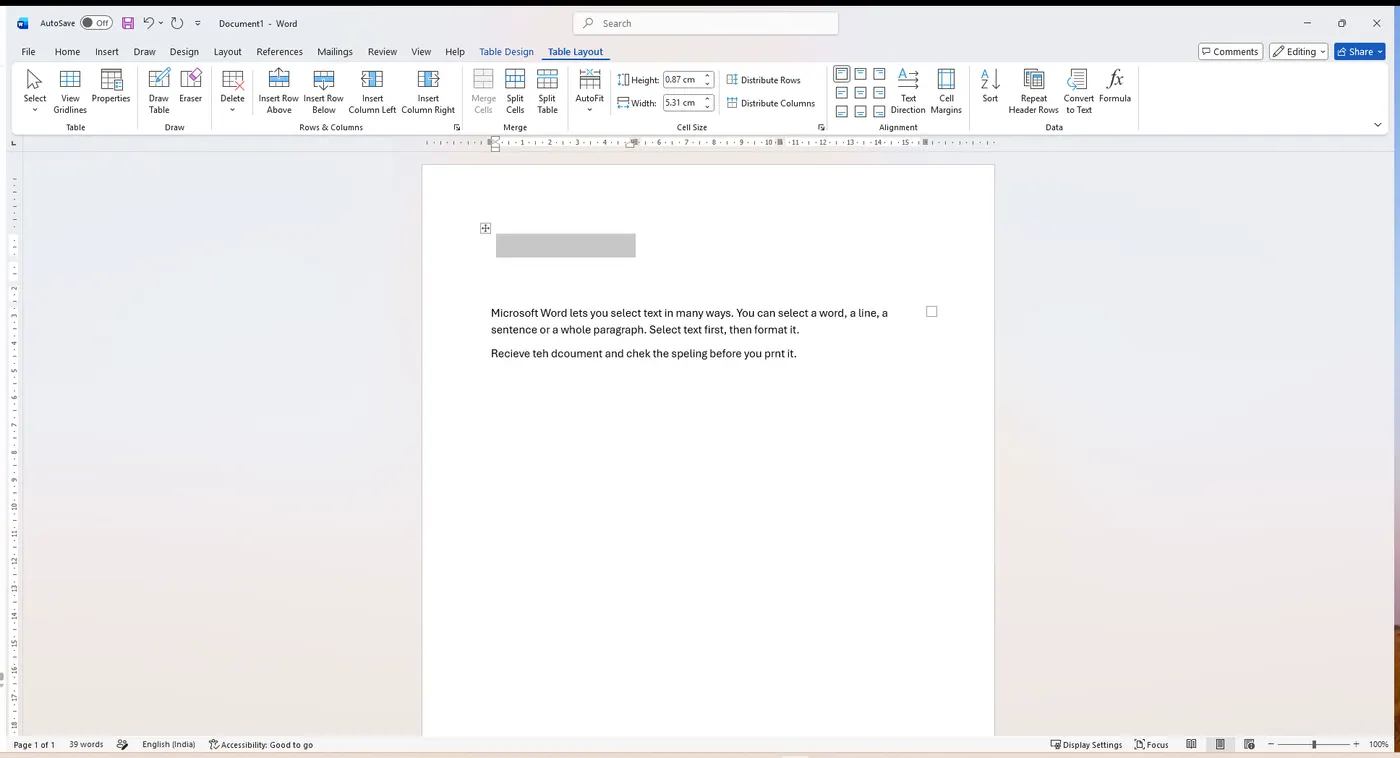 Insert / delete rows & columns
Merge / Split
Width / Height
Insert / delete rows & columns
Merge / Split
Width / Height
Tables — Design, AutoFormat & Text
The Table Design tab is where the look of the whole table is controlled. From here you apply ready-made styles, shading and borders.
A. Auto Format — on the Table Tools ribbon, click the Design tab located in the Table Styles group, then click the drop-down arrow to view multiple formats to select from. Click on a Table Style of your choice to apply it (AutoFormat).
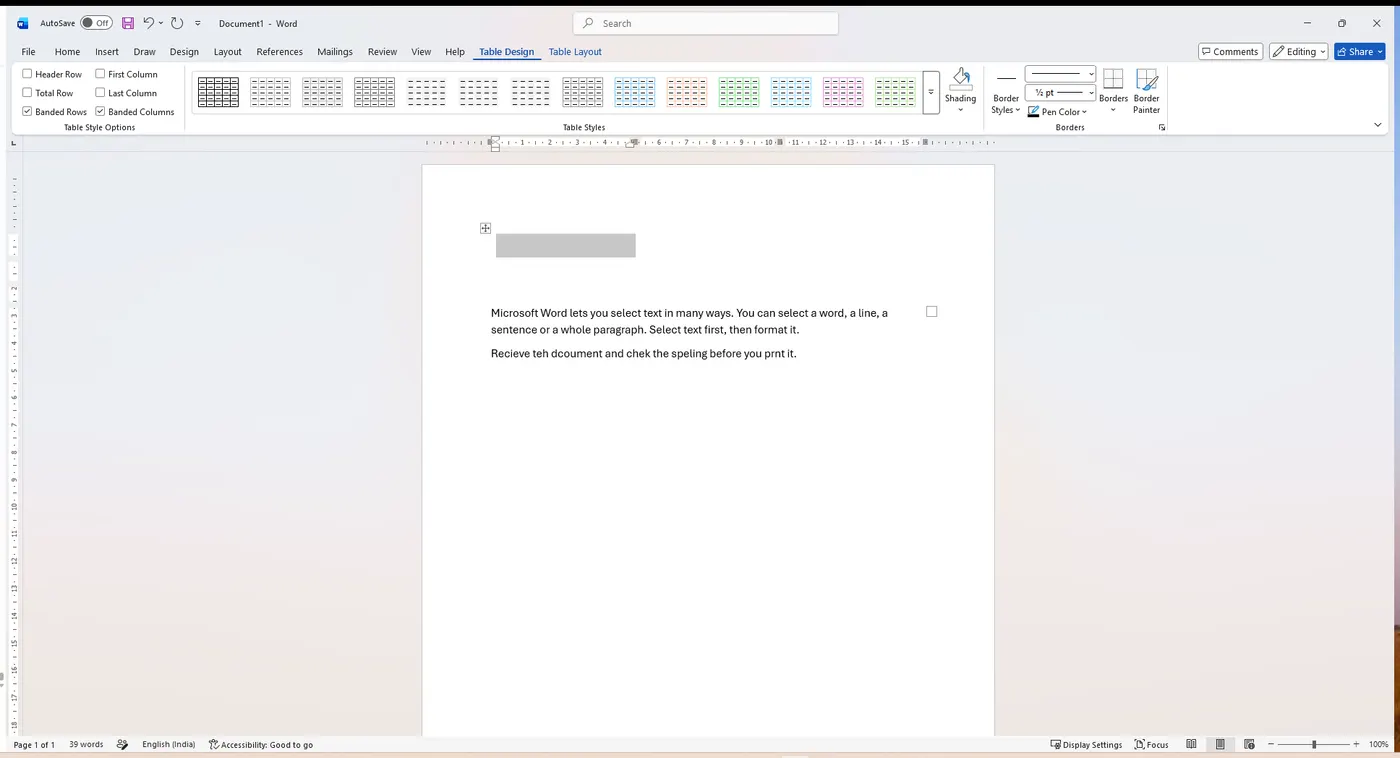 Table Styles
B. Text Format and Alignment
Text within a table can be formatted the same way you format text in other areas of the document. Use the command buttons found on the Home ribbon (Bold, Italic, alignment, font colour and so on). In the Table → Layout tab, the Repeat Header Row option can be used to repeat the first row of the table on multiple pages.
Printing a Document
Click on the File tab and select the Print option to print your current document. This will display the Print window options, along with a preview of the document to the right, such as the range of pages to print and the number of copies to print. The default printer is the printer that your applications will use unless you specify otherwise; to change printers, click on the drop-down arrow next to the Printer Name — this will display a list of installed printers and allow you to select another printer. Use the steps below.
Step 1 Click the File tab and choose Print (or just press Ctrl + P).
File → Print
Step 2 Select your desired options in the Print window — pick the printer, set the number of copies and the page range — then click the Print button to print your document.
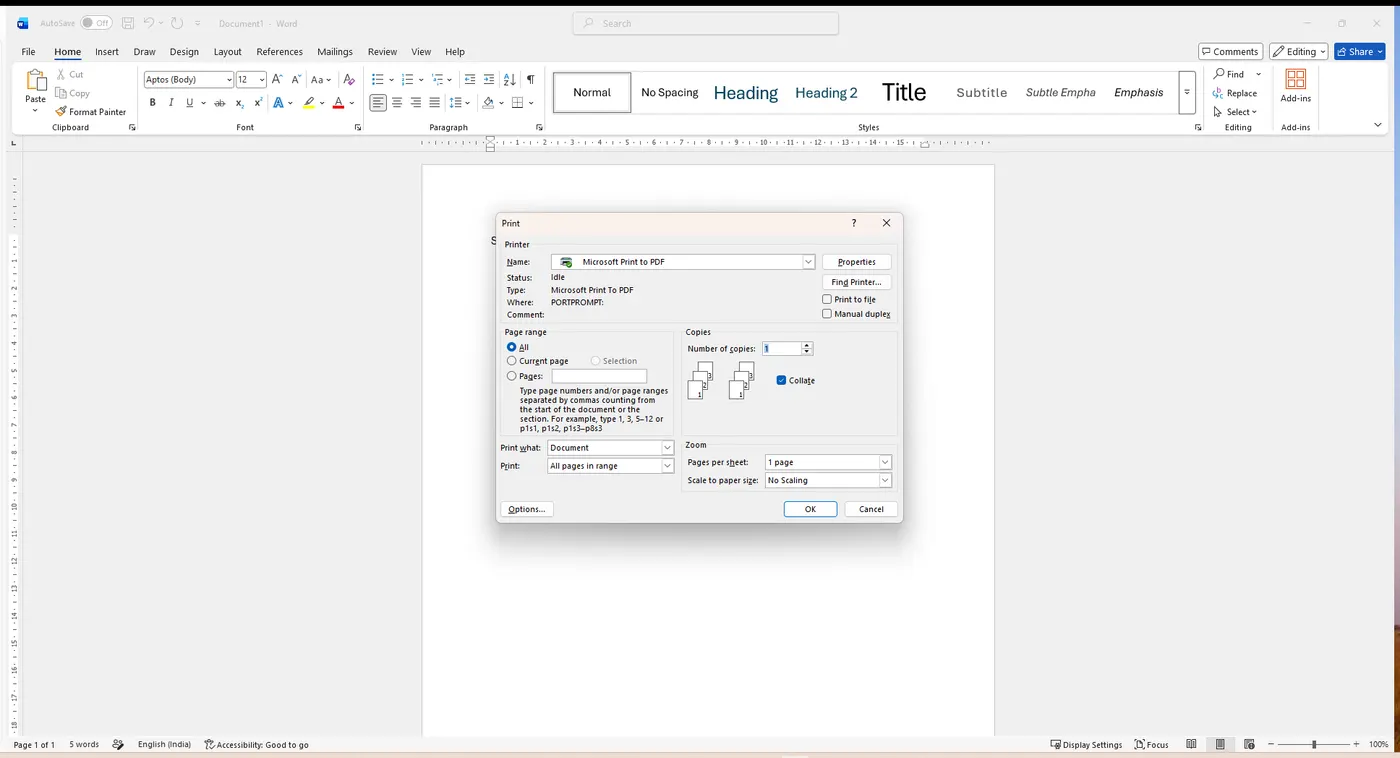 Choose printer
Copies
Click OK to print
Choose printer
Copies
Click OK to print
Inserting Pictures & Shapes
The Insert tab's Illustrations group adds pictures, shapes, SmartArt and charts. Click the button you need.
1. Inserting a Picture. Microsoft Office is equipped with a Picture folder containing several photo selections; we can also save additional photos to the Picture folder or create a new folder for our pictures. To insert a picture in our file: (1) click on the Insert tab; (2) click the Picture button from the Illustrations group; (3) navigate to your desired Picture folder; (4) select a photo; (5) click the Insert button.
2. Inserting Online Pictures. Within Microsoft Office there are numerous online pictures to illustrate a specific topic. From the Insert ribbon: (1) click the Online Pictures button from the Illustration group; (2) the Insert Picture window appears; (3) in the Search box, type your desired graphic topic and press Enter; (4) select your desired picture and click Insert.
Step 1 Click the Insert tab, then click Pictures (a saved photo) or Shapes (a drawing).
Pictures
Shapes
Step 2 (Picture) The Insert Picture window opens (it looks like the Save As window). Go to your picture folder, select a photo and click Insert. Online Pictures instead searches the web — type a topic, press Enter, pick an image and click Insert.
Step 2 (Shape) 3. Inserting Shapes. The Shapes option allows you to insert a variety of shapes — rectangles, circles, arrows, lines, flowchart symbols and callouts. Click the Shapes button from the Illustration group; the Shape panel appears, so select your desired shape; the mouse pointer changes into a plus sign; hold the left mouse button down and, while dragging, your desired shape will appear. (Continuing to drag the mouse will enlarge the shape.)
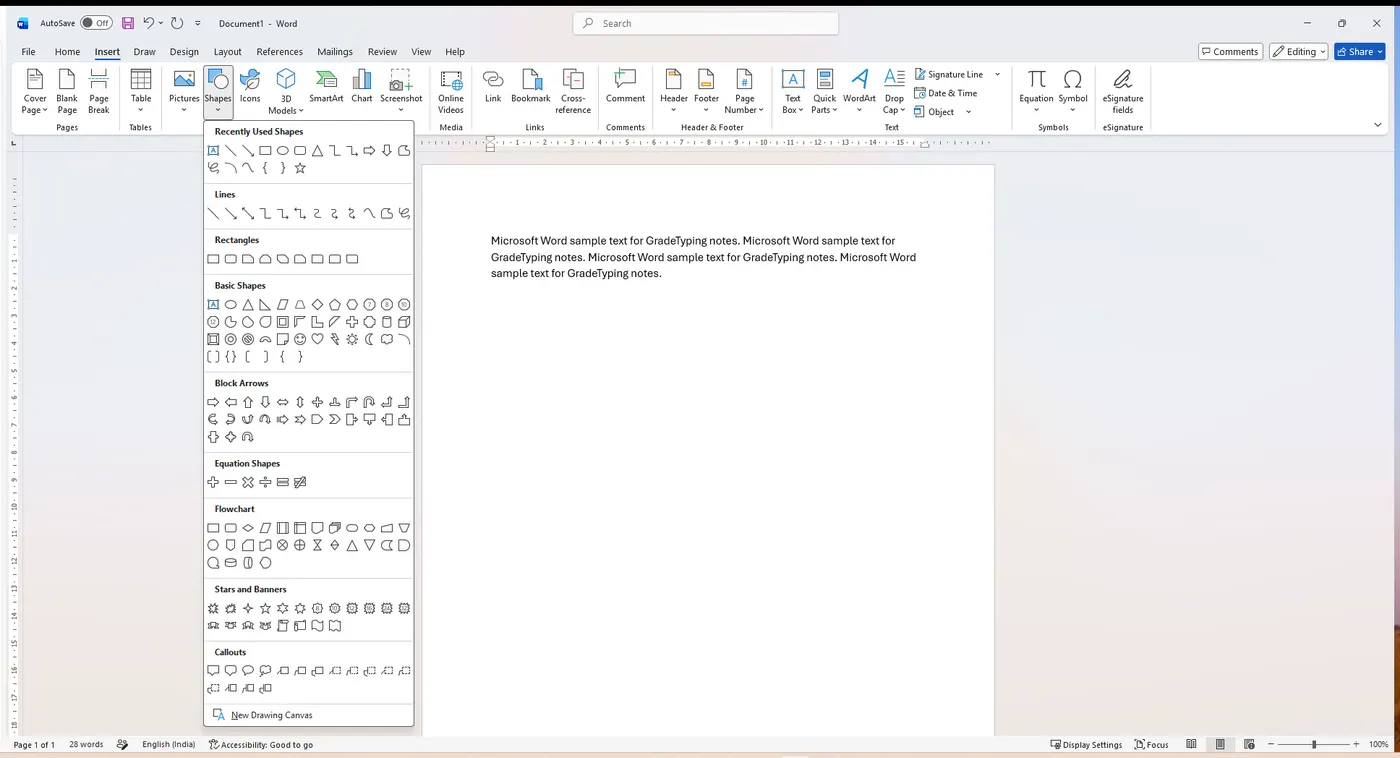 Pick a shape, then drag
SmartArt & Charts
4. SmartArt allows you to change graphic images into visual communication information, including graphical lists, process diagrams, organizational charts, etc. From the Insert ribbon: click the SmartArt button from the Illustration group; the SmartArt panel appears; select your desired graphic image and click OK.
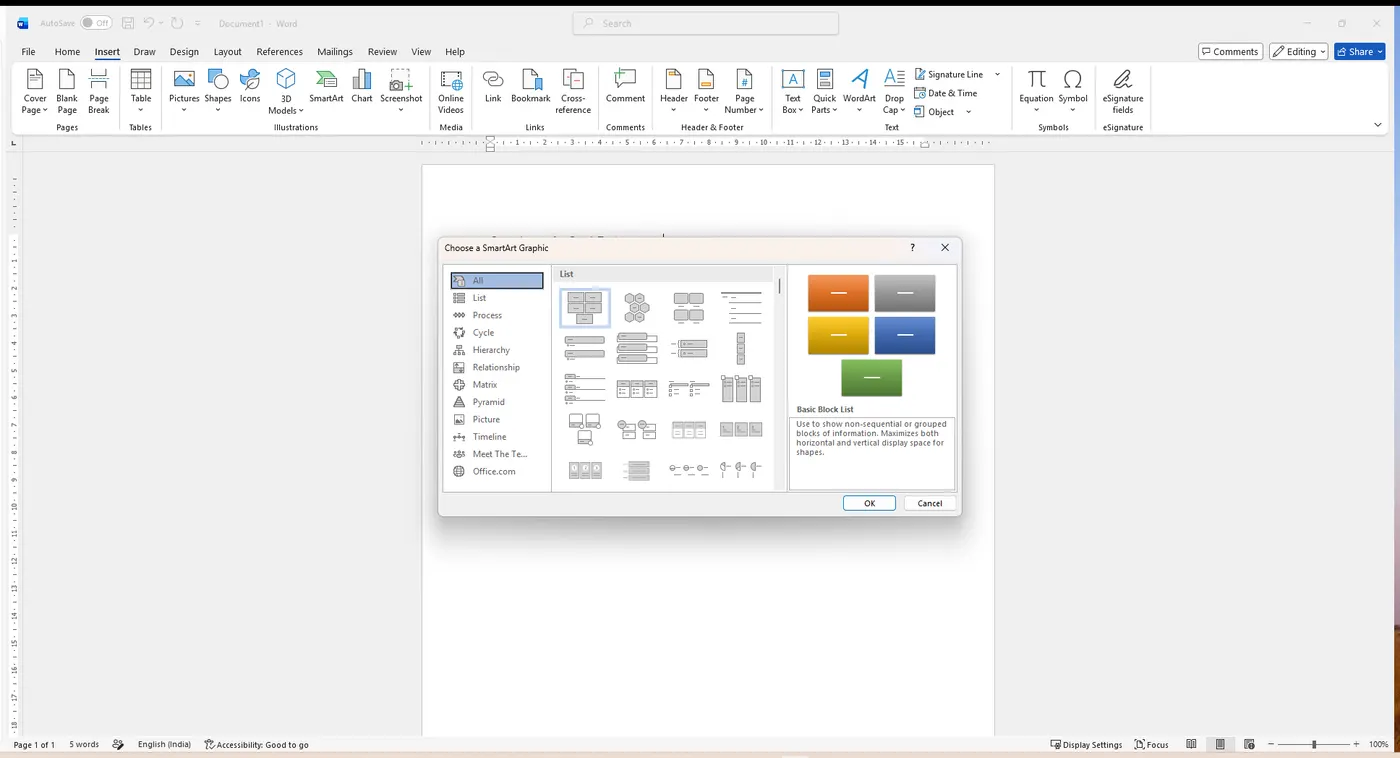 Pick a graphic
OK
Pick a graphic
OK
5. Charts. To illustrate and compare data you can use the chart option; this is similar to the Excel chart feature. From the Insert ribbon: click the Chart button from the Illustration group; the Chart panel appears; select your desired chart type and click OK; the selected chart type appears next to a spreadsheet; enter your desired data onto the spreadsheet and the chart will reflect your data; finally, on the spreadsheet window click the Close window button and the chart will appear on your document. (The ribbon where you create charts is the Insert ribbon.)
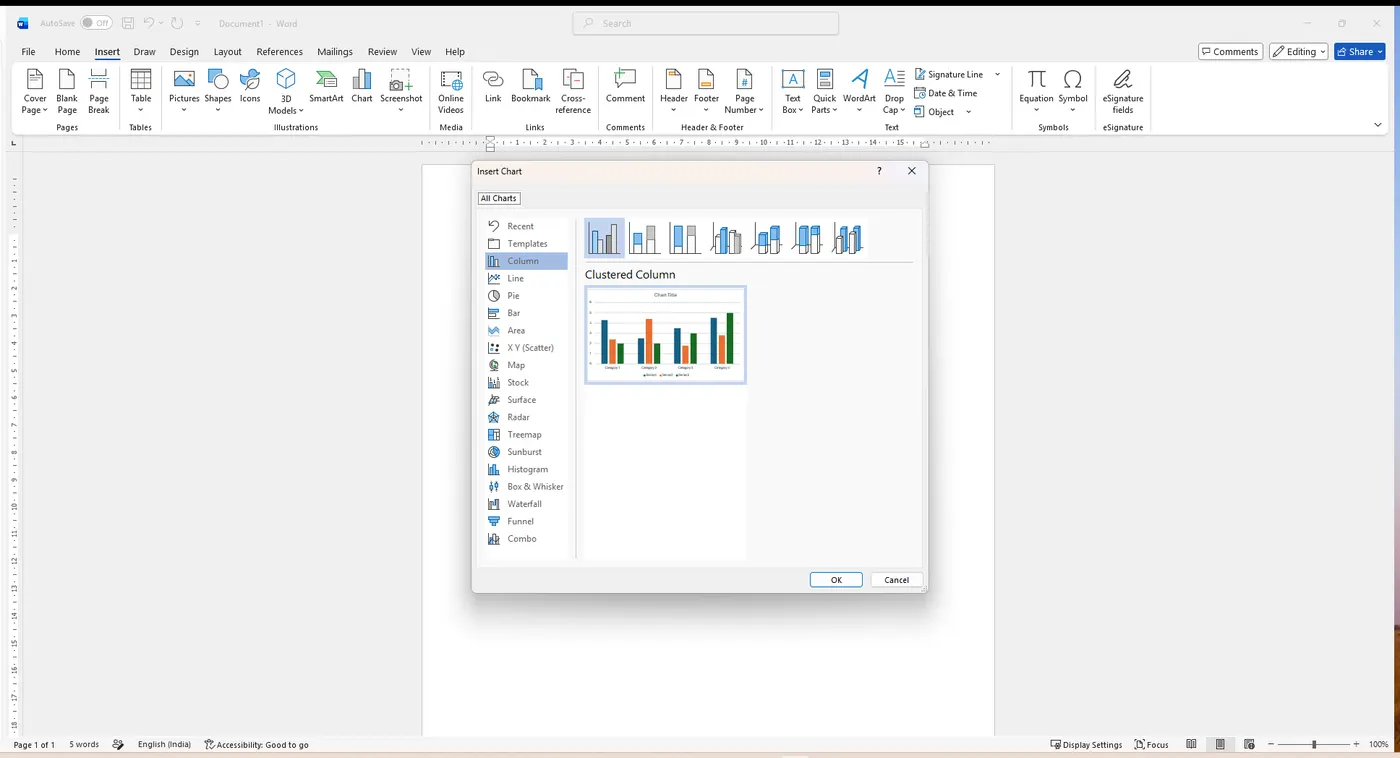 Pick a chart type
OK
Pick a chart type
OK
Track Changes & Comments
Track Changes is a tool that is utilised in Microsoft Word for electronically reviewing and marking up a document. A document can be reviewed and edited by a group of readers, and the author of the document has final control over which changes to accept or reject. All the tools are on the Review ribbon.
New Comment
Track Changes
Accept / Reject
- A. Turning on Track Changes — this marks changes in the current document and keeps track of each change by reviewer name. Click the Review tab; in the Tracking group, click the Track Changes button. The document can now be edited with Track Changes; click the Track Changes button a second time to turn it off.
- B. Apply comments to Track Changes — select the Track Change text to which you want to apply a comment; click the Review tab and, in the Comments group, click the New Comment button. The text you select is highlighted and a comment box displays on the right side of the document; type your comments in the Comment box, then click anywhere in the document to deselect the comment area.
- C. Accept or Reject Tracked Changes — select the text change that has been tracked; click the Review tab; in the Changes group, click Accept or Reject.
Cover Pages & Working with an Image
Adding a Cover Page
Microsoft Word enables you to insert a variety of predesigned cover pages into our document automatically. The procedure: (1) click the Insert tab and go to the Pages group; (2) click the Cover Page button; (3) the Built-In window appears with predesigned cover pages; (4) select a cover page of your choice; (5) on the Pages group you can also insert a Blank Page or a Page Break.
Step Click the Insert tab → Pages group → Cover Page, then pick a ready-made design from the gallery.
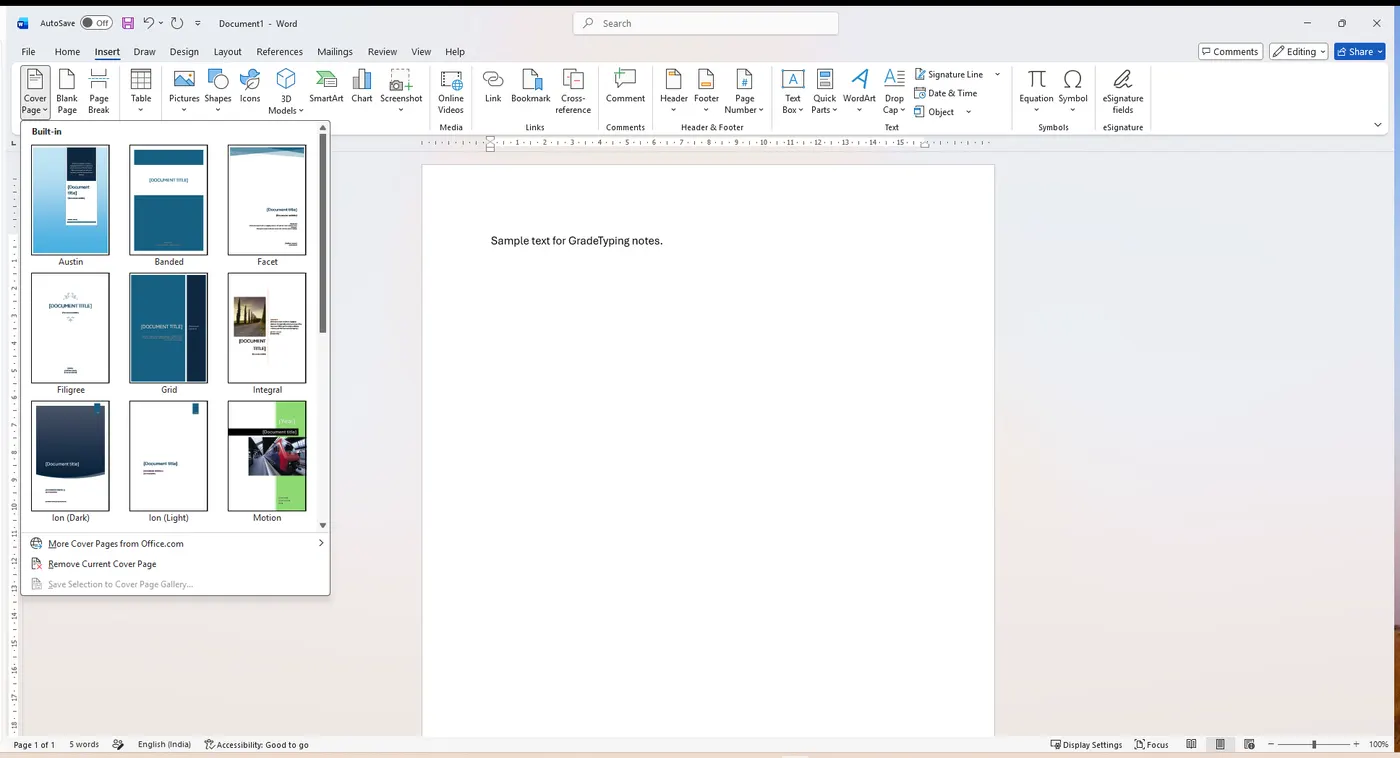 Pick a cover page
Working with an Image
Images that appear on your document can be moved, resized, rotated, modified or deleted. To change an image, click once on the image to select it. The following items will appear on the image: circle handles on each of the four corners, box handles on each of the four sides, and a green dot handle on the top of the graphic. (Initially a newly inserted picture has 8 resize handles.)
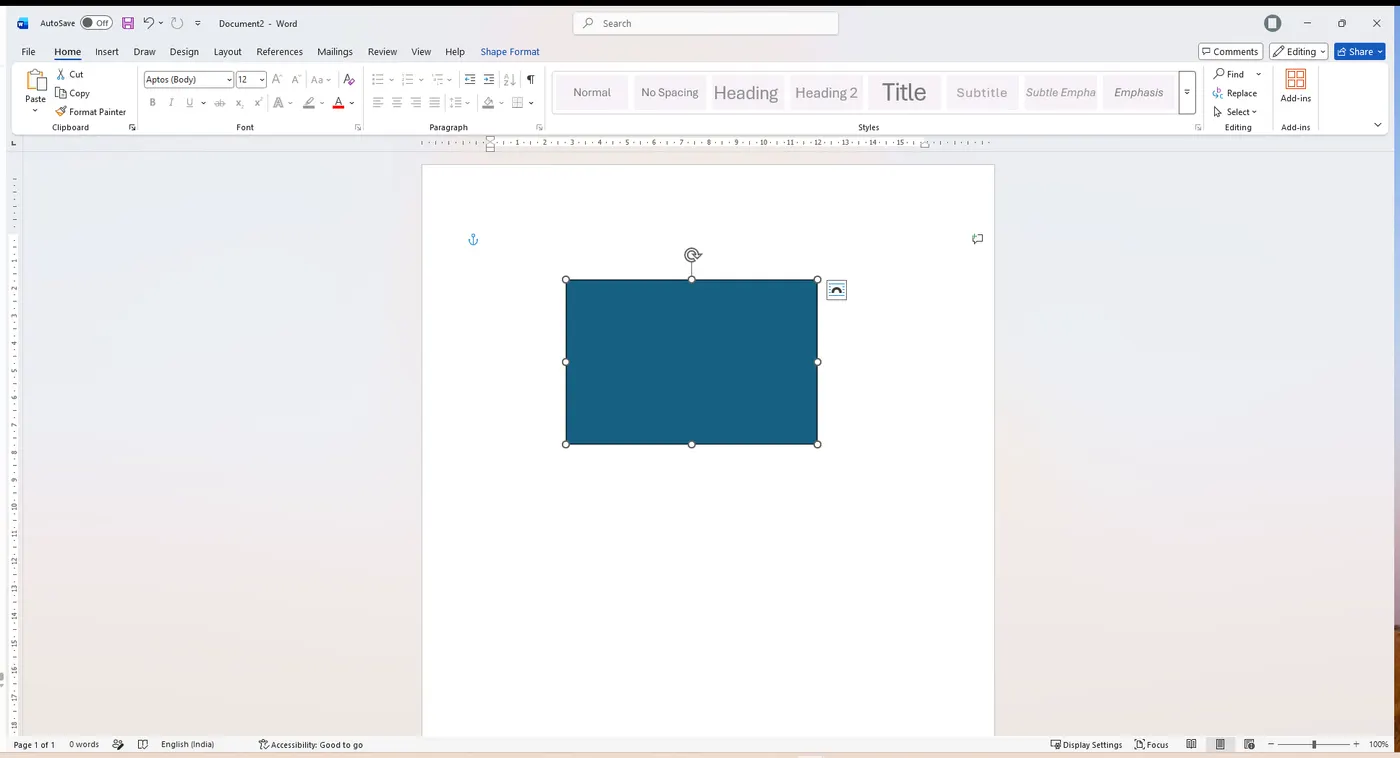 Sizing handle (drag to resize)
Rotate handle
Sizing handle (drag to resize)
Rotate handle
- 1. Move an image to another location on the document — select the image and place the mouse pointer on it; when the pointer changes to a double-arrow cross, left-click the image and drag it to a new location.
- 2. Resize an image to make it smaller or larger — select the image and place the pointer on one of the sizing handles (circles/boxes); when the pointer changes to a double-sided directional arrow, left-click and drag until the desired size is achieved. Use a corner circle handle for the best results in resizing.
- 3. Rotate an image to a different angle — select the image and place the pointer on the curved arrow handle; when the pointer changes to a curved arrow, left-click and drag in the direction you want to rotate.
- 4. Modify an image by changing its colour scheme, style, location and cropping — select the image and the Picture Tools ribbon appears; click the Format tab and modify the image using the buttons within the Adjust, Picture Styles, Arrange and Size groups (this is where Crop removes an unwanted part of the graphic).
Key Facts & Shortcuts
| File extension | .docx | Opening file name | Document1 |
| Type of software | Word Processor (Application) | Default margin (all sides) | 1 inch |
| Number of alignments | 4 | Default alignment | Left |
| Default line spacing | 2.0 (double) | Number of view modes | 5 |
| Red wavy underline | Spelling error | Green wavy underline | Grammar error |
| Typed text first held in | RAM | New picture has | 8 sizing handles |
Keyboard shortcuts
| Ctrl + A | Select All | Ctrl + B / I / U | Bold / Italic / Underline |
| Ctrl + C / X / V | Copy / Cut / Paste | Ctrl + Z | Undo |
| Ctrl + L / E / R / J | Left / Center / Right / Justify | Ctrl + S / O | Save / Open |
| Ctrl + Home / End | Start / End of document | F2 / F1 | Rename / Help |
Exam Question Bank
These 150 objective questions are the complete set frequently asked in GCC-TBC and other computer examinations, reproduced and numbered as in the source. Revise with the answer beside each question. (True/False statements are answered True or False.)
| # | Question | Answer |
|---|---|---|
| 1 | On the status bar, views like Print Layout, Full Screen Reading View, Web Layout, Outline, Draft etc. — these buttons are called the "View Buttons". | True |
| 2 | For more space from the left margin for one particular paragraph, use the ___ indent. | Left |
| 3 | To save a file, on the Standard toolbar click the Save button. | True |
| 4 | Portrait and Landscape are Page Orientation. | True |
| 5 | There are ___ alignments in MS Word. | 4 |
| 6 | The toolbar near the File menu is called the ___ | Quick Access Toolbar |
| 7 | From which tab can you check the Spelling and Grammar of text in a document? | Review |
| 8 | Background colour or effects applied to a document are NOT visible in ___ preview. | Print Preview |
| 9 | Which tab in MS Word is used to change character size and typeface? | Format |
| 10 | We can go directly to a required page using the ___ option under Home Tab → Editing group → Find command. | Go To |
| 11 | If the mouse moves in the ___, the pointer looks like an "I-Beam". | Page Area |
| 12 | Cell Address / Cell Reference is reached using the Go To option under Home → Editing → Find command. | True |
| 13 | To apply center alignment to a paragraph, press ___ | Ctrl + E |
| 14 | To reach the end of the typed document, use the ___ shortcut key. | Ctrl + End |
| 15 | Which ribbon do you use to change margins? | Page Layout |
| 16 | The minimum number of rows and columns in an MS Word table is ___ | 1 and 1 |
| 17 | A word underlined with a wavy red line indicates a ___ | Spelling mistake |
| 18 | The typed matter gets stored in ___ before it is saved into a new file. | RAM |
| 19 | The ___ key removes one letter next to (to the right of) the cursor position. | Delete |
| 20 | After clicking the mouse on the top area of a column in a table, the ___ gets selected. | Column |
| 21 | A blinking straight line where we can type the matter is the ___ | Cursor |
| 22 | In MS Word, the document created has the default extension ___ | .docx |
| 23 | We can insert pictures using the ___ tab and the Picture command. | Insert |
| 24 | To insert a Symbol in a document, click the ___ tab. | Insert |
| 25 | The Caption option is used to get a reference to a specific place in the document. | False |
| 26 | Ctrl + A means ___ | Select All |
| 27 | We can create a document by using a ___ | Word Processor |
| 28 | To set text in vertical columns like a newspaper or magazine, insert a ___ break. | Column |
| 29 | To link the document on clicking particular text, the ___ command is used. | Hyperlinks |
| 30 | To align the selected paragraph to its right, press ___ | Ctrl + R |
Exam Question Bank (cont.)
| # | Question | Answer |
|---|---|---|
| 31 | The steps to open an existing Word document are ___ | File > Open |
| 32 | To cancel any open dialog box, the ___ key can be used. | Esc |
| 33 | To apply different shapes and designs to text, use the ___ feature in MS Word. | WordArt |
| 34 | We cannot insert Clip Art pictures or images in MS Word. | False |
| 35 | We can use the ___ facility to remove an unwanted part of a graphic. | Crop |
| 36 | The ___ dialog box is displayed when we try to save a document for the first time. | Save As |
| 37 | To select a paragraph, ___ with the mouse on the paragraph. | Triple Click |
| 38 | The ___ helps to set the outline of the current document. | Outline View |
| 39 | We can delete typed matter from the Header and Footer. | True |
| 40 | MS Word is Application Software. | True |
| 41 | You will choose ___ to save a document with a new name. | File > Save As |
| 42 | After clicking the mouse on the left area of a row in a table, the ___ gets selected. | Row |
| 43 | Headers and Footers are displayed in ___ view. | Print Layout |
| 44 | You cannot undo certain operations like saving, printing, opening and creating documents. | True |
| 45 | The ___ shortcut key is used to paste matter in MS Word. | Ctrl + V |
| 46 | The collection of pictures from different applications in MS Office is called ___ | Clip Art |
| 47 | Press the ___ key to close (end) the current paragraph. | Enter |
| 48 | In MS Word, Ctrl + Home is used to ___ | Move the cursor to the beginning of the document |
| 49 | Spelling and grammar checkers are commonly found as part of a word processor. | True |
| 50 | When Word gets loaded, the opening screen displays a document named ___ | Document 1 |
| 51 | We cannot change the Column Width and Row Height of a table. | False |
| 52 | A ___ cannot be resized. | Dialog box |
| 53 | The default left margin in Word is ___ | 1 inch |
| 54 | To set the margins, first click the ___ tab. | Page Layout |
| 55 | Word includes a series of predefined graphics to visually communicate information, called ___ | Clip Art |
| 56 | The ___ can be used to set margins and indents in a document. | Ruler Line |
| 57 | Which of the following is NOT available in font spacing? | Loosely |
| 58 | Ctrl + O means ___ | Open Document |
| 59 | Borders can be applied to ___ | All of the above |
| 60 | To set numbers or bullets to every item in a list, the ___ facility is provided. | Bullets and Numbering |
Exam Question Bank (cont.)
| # | Question | Answer |
|---|---|---|
| 61 | For more space from the right margin for one particular paragraph, use the ___ indent. | Right |
| 62 | For making the Undo command undo (reverse) after being used, the ___ command is used. | None of the above |
| 63 | The page-orientation effect of printing the document horizontally is ___ | Landscape |
| 64 | After a table has been created in MS Word, which operation CANNOT be performed? | Split table into two tables |
| 65 | On which ribbon do you find the option to add a chart? | Insert |
| 66 | To start new text on a new page by breaking the current page, insert a ___ break. | Page |
| 67 | To display line numbers in a document, use ___ | Page Layout Tab → Page Setup |
| 68 | In MS Word we can use bookmarks and footnotes. | True |
| 69 | The Increase Indent button is in the ___ group of the Home tab. | Paragraph |
| 70 | A ___ contains rows and columns. | Table |
| 71 | The Status Bar is displayed on the ___ side of the Word window. | None of the above |
| 72 | After clicking on the Header and Footer, we cannot edit it. | False |
| 73 | Using the Home tab you can perform editing functions such as cut, copy, paste, find and replace. | True |
| 74 | The Increase Indent button is given in the ___ group of the Home tab. | Paragraph |
| 75 | If the mouse moves in the ___, the pointer looks like an "I-beam" shape. | Page Area |
| 76 | To find the lowest number in a row or column, the ___ function is used. | Min() |
| 77 | Drop Caps are used in a document to ___ | make the initial letter large |
| 78 | In ___ view, the page number gets displayed. | Print Layout |
| 79 | The Drop Cap option is shown on the ___ tab. | Insert |
| 80 | In MS Word, the name of the document is displayed on the ___ | Title Bar |
| 81 | When the first line of a paragraph starts by leaving some space from the start of the other lines, the ___ indent is set. | First Line |
| 82 | Which ribbon shows what fonts are available for use? | Home |
| 83 | We can increase the size of the first character of a paragraph compared with other characters with the help of ___ in text-formatting effect. | Drop Cap |
| 84 | We cannot edit a document file once it is saved. | False |
| 85 | To set a new bullet other than those available in the list, click the option ___ | Define New Bullet |
| 86 | The Line tool option is in the ___ option of the Insert tab. | Shape |
| 87 | A ___ is a paragraph format in which the first line starts from outside than the other lines of the paragraph. | First Line Indent |
| 88 | Superscript, subscript, outline, emboss and engrave are known as ___ | Font effects |
| 89 | To find any character or word in a document, use the ___ command. | Find |
| 90 | We can give numbers to the text points in a list with the help of ___ | Numbers |
Exam Question Bank (cont.)
| # | Question | Answer |
|---|---|---|
| 91 | In MS Word you specify the save details of your file in the ___ | Save As dialog box |
| 92 | What is the function of Ctrl + B in MS Word? | It makes selected text bold |
| 93 | The software used for the purpose of document creation is called a ___ | Word Processor |
| 94 | To change the typeface of a document, which tab will you choose? | Home → Font Group |
| 95 | When a picture is inserted in a document, it initially has ___ resize handles. | 8 |
| 96 | Superscript, subscript, outline, emboss and engrave are ___ | Font effects |
| 97 | In Word, Left, Right, Center and Justify are the different types of ___ | None of the above |
| 98 | Readymade formats of professionally designed documents in MS Word are called ___ | Template |
| 99 | By using word processors you can create a ___ type of file. | Document |
| 100 | A number or letter that appears a little below the normal text is called ___ | Subscript |
| 101 | The Print option is given in the ___ menu. | File |
| 102 | In MS Word, the "Undo" option is present on the ___ Toolbar. | Quick Access |
| 103 | A blinking line where we can type the text is the ___ | Cursor |
| 104 | A special symbol is inserted from ___ | Insert → Symbol |
| 105 | To delete a whole selected matter of text, which key do we press? | Delete key |
| 106 | We can exit from the MS Word application by clicking the ___ command from the menu. | Exit |
| 107 | The ___ key is used to delete only the text of a table (not the table itself). | Enter |
| 108 | "YOUR TEXT IS HERE" in the dashed box means the ___ option. | Word Art (different fonts etc.) |
| 109 | Word-processing software is used to process ___ | Text |
| 110 | Which option keeps all occurrences of a word shown as wrong exactly as they are? | Ignore All |
| 111 | Use the ___ key to get a blank line before or after a paragraph. | Enter |
| 112 | In the Find & Replace dialog box, the ___ option replaces a particular word throughout the document. | Replace All |
| 113 | The Formula Bar is always available in MS Word. | False |
| 114 | The total number of pages in the current document is shown on the ___ | Status Bar |
| 115 | The Line tool button is given in the Insert tab — ___ option. | Shape |
| 116 | In the Home tab — ___ group, there are various types of font colours. | Font |
| 117 | In Table → Layout tab, the ___ option repeats the first row of a table on multiple pages. | Repeat Header Row |
| 118 | The Ctrl + J shortcut key means ___ | Justify align |
| 119 | To display Help, we use the shortcut key ___ | F1 |
| 120 | In a table, where a row and column intersect and form a rectangular shape is known as a ___ | Cell |
Exam Question Bank (cont.)
| # | Question | Answer |
|---|---|---|
| 121 | If the mouse moves in the ___, the pointer looks like an I-beam shape. | Page Area |
| 122 | To set text matter around a picture, use Drawing Tools tab → Format tab → ___ option. | Text Wrapping |
| 123 | In Mail Merge, to use a previously created contact list, use the ___ option in Select Recipients. | Use Existing List |
| 124 | From which toolbar can we get the Undo command? | Quick Access Toolbar |
| 125 | From which tab can you see the option to Show or Hide the Ruler? | View |
| 126 | Hyperlink, Bookmark and Cross-reference options are available under the ___ group of the Insert tab. | Links |
| 127 | We can insert a page number at ___ | Both A and B |
| 128 | Grammar mistakes are underlined by a ___ curly line. | Green |
| 129 | In MS Word, we can use the Horizontal Ruler to ___ | All of the above |
| 130 | To display the line numbers in a document, the ___ option is used. | Page Layout Tab → Page Setup |
| 131 | In MS Word, for what does the ruler help? | All of the above |
| 132 | Word Processing means ___ | To make some process on the words |
| 133 | The shortcut key for the "Redo" command is ___ | Ctrl + Y |
| 134 | The Ctrl + Z shortcut key means ___ | Undo the last action |
| 135 | Which key is used to remove one letter immediately at the back of (to the left of) the cursor? | Backspace key |
| 136 | In Mail Merge, to print an address directly on envelopes, the ___ facility can be used. | Envelopes |
| 137 | In MS Word, where do we find the "Close" option? | File |
| 138 | Arial and Times New Roman are examples of ___ | Fonts |
| 139 | Different types of underlines are available in the ___ group of the Home tab. | Font |
| 140 | In MS Word, professionally designed documents are ___ formats called Templates. | Readymade |
| 141 | The unwanted part of a graphic can be cut by using the ___ facility. | Crop |
| 142 | With Drawing Tools → Format tab → WordArt group, which option gives a glow effect to WordArt? | Glow |
| 143 | In which ribbon can we create charts? | Insert |
| 144 | To create a new file, we use the ___ menu. | File |
| 145 | A ___ contains rows and columns. | Table |
| 146 | The collection of pictures of different applications in MS Office is called ___ | Clip Art |
| 147 | Which option converts the first letter of every word of selected matter to upper (capital) case, keeping the rest small? | Capitalize Each Word |
| 148 | In MS Word, what is the maximum scale percentage available in the scale drop-down bar? | 200 |
| 149 | In Mail Merge, to change an address, click Mailing tab → Start Mail Merge group → Edit Recipients List icon. | True |
| 150 | Objects that can be opened and edited through the software in which they were made are known as ___ | Embedded Objects |
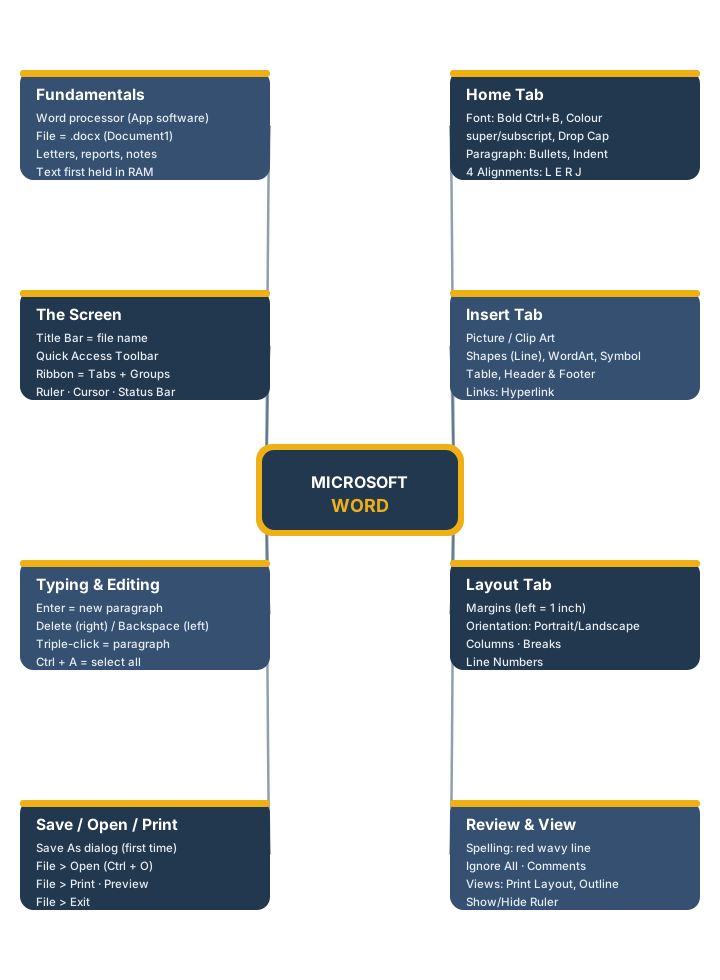
Chapter Mind Map
One-glance revision of the whole chapter — follow each branch to recall the key points.